
One of the most important concepts builders teach homeowners today is invisible accessibility. When people think about building a home for the long haul, they often worry that safety features will make their primary bath look like a medical facility. I love proving that this fear is completely unnecessary. By incorporating invisible accessibility into your floor plan from the very beginning, you can build a bathroom that feels like a five-star mountain resort while quietly providing physical support for every stage of life.
In this comprehensive guide, we are going to explore how invisible accessibility transforms residential bath design. We will review core floor plan principles, examine five key luxury design features, answer common consumer questions, look at material selections, and walk through a custom builder rough-in checklist. Whether you are building a custom home in Johnson City, remodeling a property in Kingsport, or planning your dream retreat in Bristol, this guide will help you create a space that balances beauty, function, and lasting peace of mind.
The Basic Principles of Invisible Universal Design
To understand how invisible accessibility works, we first have to examine how traditional bathrooms are built. Standard residential construction often relies on steps, narrow doorways, tight toilet nooks, and shallow shower pans with high thresholds. These design choices create physical barriers for young children, pregnant mothers, people recovering from sports injuries, and adults who want to age in place comfortably.
Universal design aims to remove those physical barriers. When we apply invisible accessibility to universal design, the goal is to make every supportive element completely built-in. The room does not look modified or retrofitted. Instead, it simply looks well-proportioned, open, and high-end.
+-------------------------------------------------------------------+
|               TRADITIONAL VS. INVISIBLE ACCESSIBLE                |
+-------------------------------------------------------------------+
| Standard Bathroom                 | Invisible Accessible Bathroom |
+-----------------------------------+-------------------------------+
| 28 to 30-inch Doorways            | 36-inch Wide Framed Openings  |
| Raised Shower Curbs (4-6 inches)  | Zero-Threshold Curbless Floor |
| Industrial Surface Grab Bars      | Structural Towel Rail Combo   |
| Standard Cabinetry Base           | Floating Vanity with Clearance|
| Single Overhead Light Fixture     | Layered LED Task Lighting     |
+-----------------------------------+-------------------------------+
Zero-Barrier Flow
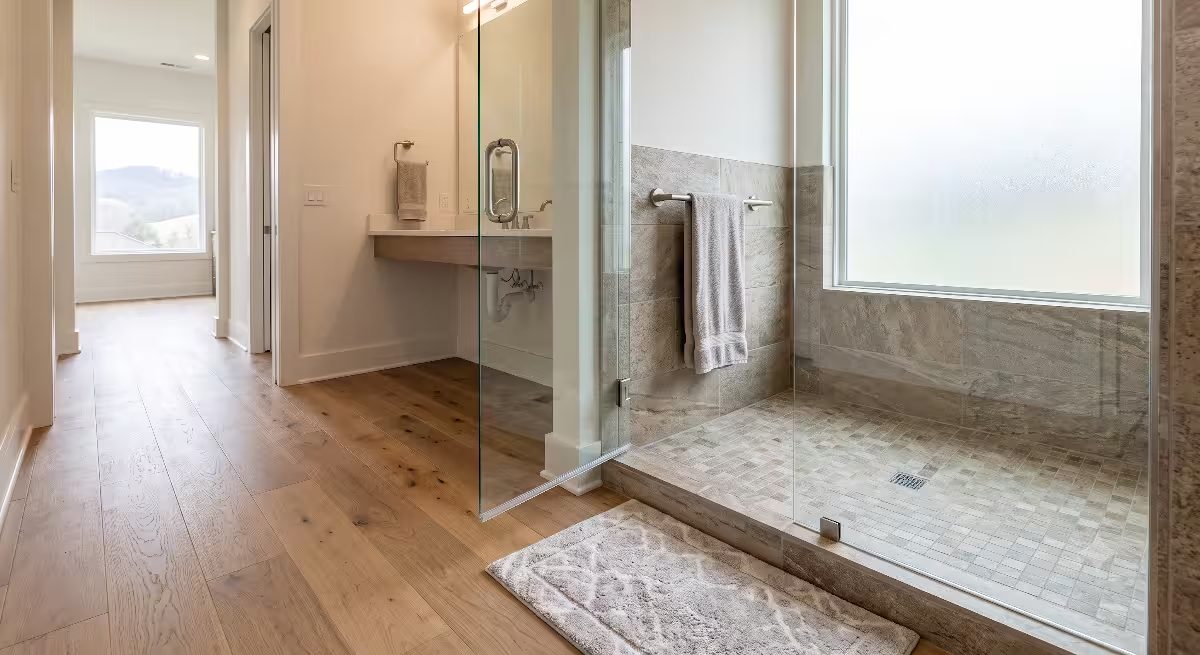
The first principle of invisible accessibility is zero-barrier flow. This means that the floor moves smoothly from the main hallway into the bathroom and directly into the shower without any sudden changes in height.
In standard construction, a shower pan sits above the subfloor, creating a threshold four to six inches tall. Stepping over that curb requires balance and knee strength. In contrast, invisible accessibility utilizes a recessed subfloor system. The entire bathroom floor becomes a continuous surface. By carrying high-end porcelain tile seamlessly from the vanity area straight into the shower, the room instantly looks larger and more luxurious. The safety benefit is immense, yet anyone walking into the room simply notices the clean, uninterrupted lines of custom tile work.
Ergonomic Clearance
The second principle of invisible accessibility focuses on physical clearance and spatial geometry. A standard bathroom door is often twenty-eight or thirty inches wide. That width feels tight when carrying laundry baskets or helping a toddler, and it is impossible to navigate with a walker or wheelchair.
When drafting a custom floor plan, invisible accessibility demands thirty-six-inch door frames that yield a clear opening of at least thirty-two inches. Additionally, we plan for a clear five-foot turning circle inside the main space. This open floor area does not make the room look like an institution. Instead, it creates an airy, spacious layout where two people can comfortably get ready in the morning without bumping elbows. Ergonomic clearance is about giving your family room to breathe while ensuring that mobility devices can move freely if the need ever arises.
Layered Task Lighting
Lighting is one of the most overlooked components of invisible accessibility. Shadows and glare are major causes of slips and trips in wet environments. Traditional bathrooms often rely on a single overhead fixture that casts dark shadows inside the shower stall and around the vanity.
Invisible accessibility solves this problem by using layered, glare-free LED lighting systems. We install warm LED strip lighting under vanity toe-kicks and beneath floating wall cabinets. These lights act as automatic nightlights, guiding night visits without forcing you to turn on harsh overhead bulbs. Inside the shower, recessed waterproof LEDs ensure that footways are evenly lit. Backlit vanity mirrors illuminate the face evenly without creating harsh shadows under the eyes. This layered lighting approach elevates the spa atmosphere while ensuring that every step is clearly visible for eyes of all ages.
5 Key Invisible Accessibility Features for Luxury Bathrooms
When designing a primary bath, incorporating invisible accessibility requires picking fixtures and architectural details that serve a double purpose. Here are five essential design choices that deliver maximum function while keeping your home looking like a custom masterpiece.
+-------------------------------------------------------------------+
|              5 KEY INVISIBLE ACCESSIBILITY FEATURES               |
+-------------------------------------------------------------------+
| 1. Curbless Zero-Entry Showers with Linear Drains                 |
| 2. Dual-Purpose Designer Support Bars (Disguised Grab Bars)       |
| 3. Floating Vanities with Hidden Knee Clearances                   |
| 4. Tiled Built-In Shower Benches & Wet-Room Layouts               |
| 5. Lever-Style Controls & Smart Touchless Fixtures                |
+-------------------------------------------------------------------+
1. Curbless, Zero-Entry Showers with Linear Drains
A curbless shower is the gold standard for invisible accessibility in modern homes. By eliminating the step-over curb, you remove the primary cause of bathroom falls.
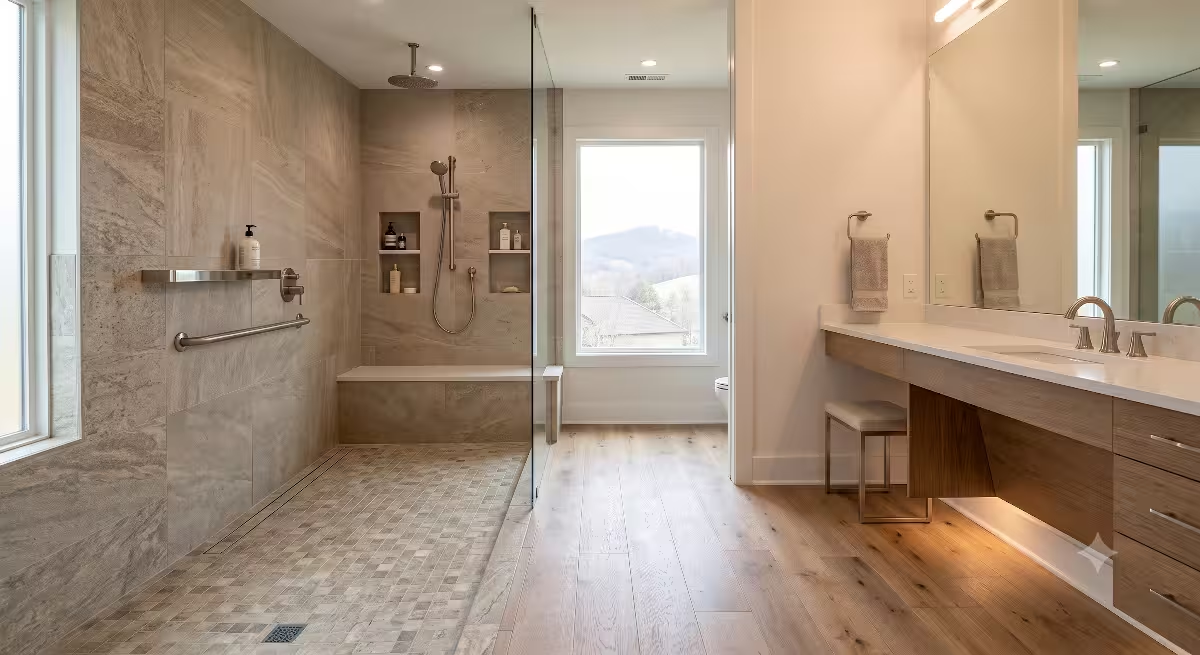
To achieve this look, the shower floor slopes gently toward a hidden linear drain. Linear drains allow us to use large-format floor tiles rather than small mosaic tiles, creating a sleek, uninterrupted aesthetic. Frameless heavy glass panels keep the space feeling open while keeping water contained. Instead of hanging plastic caddies over the shower arm, we build deep, floor-to-ceiling tiled niches directly into the wall framing. These recessed niches keep soap and shampoo at convenient heights for both standing and seated bathers.
Custom Builder Note: Installing a curbless shower correctly requires advanced structural planning. During the rough framing stage, we lower the wood floor joists in the shower zone by about two inches. This recess allows us to install the sloped shower pan flush with the surrounding floor. Incorporating invisible accessibility at the framing stage prevents the need for ugly ramps later on.
2. Dual-Purpose Designer Support Bars (Disguised Grab Bars)
When people think of grab bars, they usually picture industrial chrome tubes screwed into hospital walls. Modern invisible accessibility completely eliminates that clinical look by using dual-purpose hardware.
Today, leading luxury manufacturers produce heavy-duty support rails that are disguised as elegant bath accessories. A solid brass towel bar mounted outside the shower can support up to five hundred pounds of force. Inside the shower, structural corner shelves double as heavy-duty handholds. Toilet paper holders feature integrated support arms that blend into the surrounding metal finish. These fixtures are available in modern finishes like matte black, brushed bronze, and polished nickel. They give you solid support when stepping on slippery tile without signaling to guests that the room has been modified for physical assistance.
Custom Builder Note: A support rail is only as strong as what lies behind the wall. During rough construction, we install solid three-quarter-inch plywood backing or structural two-by-six blocking between the wall studs wherever towels, paper holders, or shower shelves will be mounted. This structural backing guarantees that your invisible accessibility fixtures can safely bear full adult weight at a moment’s notice.
3. Floating Vanities with Hidden Knee Clearances
Vanities are often a major roadblock in traditional bathroom design. Standard cabinet bases sit directly on the floor, preventing seated users from pulling up to the sink comfortably.
Floating vanities offer a brilliant solution for invisible accessibility. These cabinets attach directly to the wall studs, leaving open space beneath the unit. From a pure design standpoint, floating vanities make small bathrooms feel expansive by allowing the floor tile to extend all the way to the wall. Functionally, the open space underneath provides room for feet and knees if someone needs to sit on a vanity stool or use a wheelchair. We install soft-close drawers equipped with custom U-shaped cutouts that curve around the plumbing pipes, maximizing usable cabinet storage without taking up legroom below the basin.
Custom Builder Note: Floating vanities must be mounted at an ergonomic height. We typically set the countertop height between thirty-four and thirty-five inches above the finished floor. This height strikes a ideal balance, reducing back strain for standing adults while remaining accessible for seated daily routines.
+-------------------------------------------------------------------+
|               FLOATING VANITY STRUCTURAL PROFILE                  |
+-------------------------------------------------------------------+
|                                                                   |
|   [================ Countertop (34-35" High) ================]   |
|   |                                                          |    |
|   |   +--------------------------------------------------+   |    |
|   |   | Upper Storage Drawer (U-Shaped Pipe Cutout)      |   |    |
|   |   +--------------------------------------------------+   |    |
|   |   | Lower Storage Drawer                             |   |    |
|   |   +--------------------------------------------------+   |    |
|   |                                                          |    |
|   +==========================================================+    |
|   :                                                          :    |
|   :  Open Knee & Foot Clearance Space (10-12" Floor Gap)     :    |
|   :                                                          :    |
|  ==================== Finished Floor ===========================  |
+-------------------------------------------------------------------+
4. Tiled Built-In Shower Benches & Wet-Room Layouts
Standing for long periods under a shower head can become exhausting after a workout, during pregnancy, or while recovering from illness. Plastic fold-down seats look temporary and clutter the space.
In an invisible accessibility design plan, resting areas are integrated directly into the architecture. We build tiled floating benches or corner seats that match the wall stone or porcelain slab work. Extending radiant floor heating cables into the bench seat transforms a safety feature into a true spa luxury. In larger homes, we often design complete wet rooms where the tub and shower occupy one waterproofed enclosure. This layout allows for total freedom of movement, easy cleaning, and zero physical barriers between bathing zones.
5. Lever-Style Controls & Smart Touchless Fixtures
Hand dexterity can change over time due to arthritis, swelling, or simple fatigue. Round doorknobs and traditional cross-handle faucets require strong gripping and twisting movements.
Invisible accessibility replaces difficult knobs with fluid lever handles, motion-activated faucets, or digital smart valves. Single-lever faucets can be operated effortlessly using the side of a hand or an elbow. Thermostatic shower valves let you pre-set your ideal water temperature, preventing unexpected bursts of scalding water if someone turns on a fixture elsewhere in the home. Digital shower panels allow users to activate body sprays, handheld wands, and overhead rain heads with a single touch of a button or voice command.
Frequently Asked Questions about Invisible Accessibility Bathrooms
When homeowners search online for accessibility solutions, they usually have specific questions about aesthetics, building codes, resale value, and spatial measurements. Here are detailed, practical answers to the four most common queries.
How can I make my bathroom accessible without it looking like a hospital?
The secret to avoiding an institutional look is focusing on material texture, concealed hardware, and integrated architecture. Hospital bathrooms look cold because they rely on exposed stainless steel bars, white plastic seats, vinyl floors, and harsh fluorescent lights.
To achieve invisible accessibility, substitute those clinical materials with warm, natural finishes:
- Use micro-textured, matte-finish porcelain tiles that offer slip resistance while looking like natural slate or travertine.
- Choose dual-purpose hardware like weight-rated towel bars and shampoo shelves that match your chosen metal finish, whether brushed nickel, champagne bronze, or matte black.
- Build structural shower benches out of tile or slab quartz rather than adding plastic furniture after the build.
- Install warm LED lighting beneath cabinets and inside wall niches to eliminate dark corners and create a soothing, ambient glow.
By making safety features an organic part of your finish choices, you create a room that feels like a quiet sanctuary rather than a medical setting.
What is the difference between ADA compliance and universal home design?
It is common to confuse ADA compliance with universal design, but they serve different purposes:
+-------------------------------------------------------------------+
|               ADA COMPLIANCE VS. UNIVERSAL DESIGN                 |
+-------------------------------------------------------------------+
| Feature            | ADA Compliance         | Universal Design    |
+--------------------+------------------------+---------------------+
| Primary Focus      | Commercial Buildings   | Residential Homes   |
| Legal Requirement  | Mandatory by Law       | Voluntary Choice    |
| Aesthetic Flexibility| Fixed Specs & Visuals| Seamless & Custom   |
| Target User        | Specific Disabilities  | All Ages & Abilities|
+--------------------+------------------------+---------------------+
ADA compliance refers to the Americans with Disabilities Act, which sets strict, legally binding codes for public commercial buildings. These codes specify exact mounting heights, clear floor spaces, and high-contrast visuals designed to serve people with specific physical disabilities.
Universal design, on the other hand, is a residential design philosophy. It focuses on making private living spaces comfortable, safe, and usable for everyone, from young children to grandparents. Universal design gives custom home builders the freedom to blend functional needs with luxury styling. While ADA rules might require an exposed metal bar in a restaurant restroom, universal design allows us to install an invisible accessibility support bar that looks identical to a high-end designer towel rail.
Does an accessible bathroom remodel increase home resale value?
Yes, provided the modifications are executed using invisible accessibility principles.
In past decades, modifying a bathroom for safety meant adding industrial grab bars and high-threshold walk-in tubs. These retrofits often reduced resale value because potential buyers viewed the room as outdated or specialized for medical care. They saw a space that would require an expensive remodel to look modern again.
Today, buyers actively search for homes with curbless showers, wide doorways, open floor plans, and main-level living. When you utilize invisible accessibility, future buyers simply see an upscale, modern primary bath. They appreciate the spacious layout, floating vanity, and curbless entry without feeling like they are living in a care home. This broad appeals protects your home’s equity and makes your property far more attractive to the growing market of multi-generational buyers.
PAA 4: What are the minimum door widths and space clearances for an accessible bathroom?
To ensure your bathroom layout accommodates physical aids seamlessly, keep these core dimensional guidelines in mind during drafting:
- Doorway Width: Standard doors are twenty-eight to thirty inches wide. Invisible accessibility requires a thirty-six-inch wide door slab, which provides approximately thirty-two to thirty-four inches of clear pass-through space once hinges and jambs are factored in.
- Turning Radius: Plan for a clear sixty-inch (five-foot) turning circle on the floor between the vanity, toilet, and shower. This space allows a person using a walker or wheelchair to rotate three hundred and sixty degrees without hitting furniture or walls.
- Toilet Clearance: Position the center of the toilet eighteen inches from the side wall. Leave at least thirty inches of clear space in front of the bowl, though thirty-six to forty-eight inches is far more comfortable.
- Shower Area: A curbless shower enclosure should measure at least thirty-six by sixty inches to allow comfortable movement, with forty-eight by sixty inches being the ideal size for adding a built-in bench.
+-------------------------------------------------------------------+
|                ESSENTIAL SPATIAL CLEARANCES                       |
+-------------------------------------------------------------------+
|                                                                   |
|     +-------------------------------------------------------+     |
|     |                                                       |     |
|     |                60-Inch Turning Circle                 |     |
|     |                 (Clear Floor Area)                    |     |
|     |                                                       |     |
|     +-------------------------------------------------------+     |
|                                                                   |
|  [36" Wide Door Frame] ----> Clear Pass-Through: 32" to 34"       |
|  [Toilet Centerline]   ----> 18" From Side Wall                   |
|  [Shower Dimension]    ----> Minimum 36" x 60" (48" x 60" Ideal)   |
|                                                                   |
+-------------------------------------------------------------------+
Material Selection: Where Safety Meets High-End Aesthetics
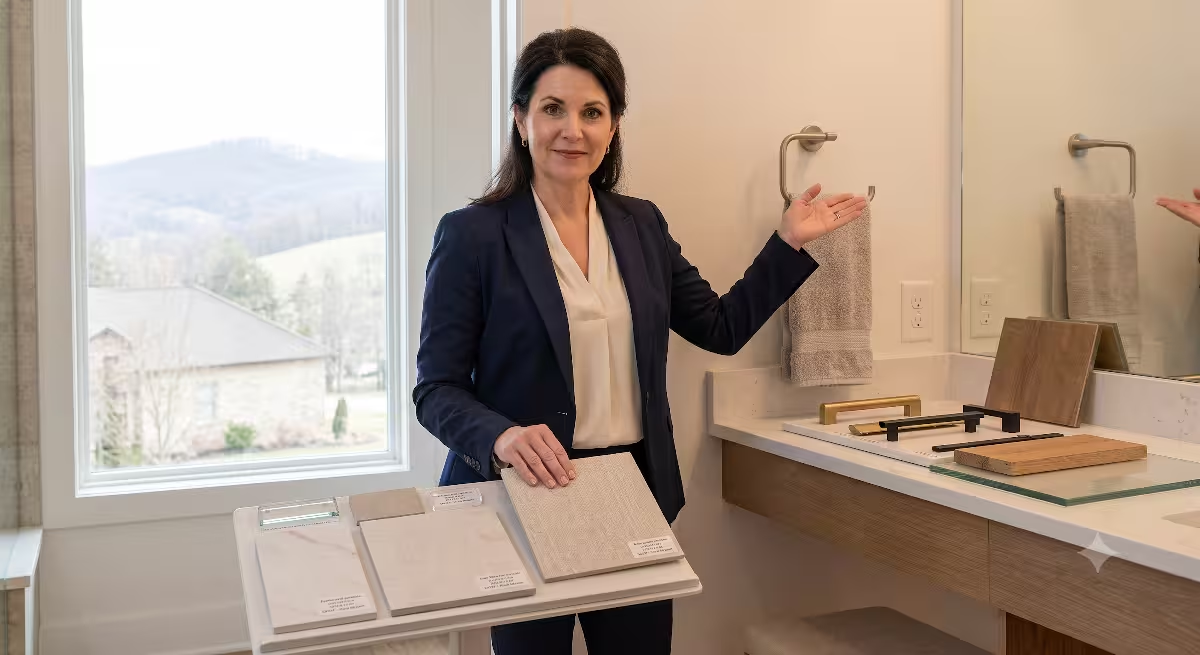
Selecting the right materials is where engineering science meets interior design. To successfully implement invisible accessibility, every surface must offer tactile safety without sacrificing tactile luxury.
Flooring: Slip-Resistance Without Rough Textures
Floor tile selection is the single most critical safety decision in bath design. Smooth, polished marble or glass tiles become dangerously slick when wet. However, excessively rough, coarse tiles are unpleasant on bare feet and difficult to clean.
When sourcing tile for invisible accessibility, check the manufacturer’s Dynamic Coefficient of Friction (DCOF) rating. A tile’s DCOF measures its slip resistance when wet. For wet areas like bathroom floors and shower pans, choose porcelain tiles with a wet DCOF rating of 0.42 or higher. Modern matte-finish porcelain tiles use advanced surface technology to provide exceptional foot grip while remaining smooth and silky to the touch. Large-format matte tiles with subtle stone grain patterns give you a high-end look alongside reliable wet traction.
+-------------------------------------------------------------------+
|                MATERIAL SELECTION SAFETY MATRIX                   |
+-------------------------------------------------------------------+
| Surface Category   | Preferred Option       | Safety Metric       |
+--------------------+------------------------+---------------------+
| Floor Tile         | Matte Porcelain        | DCOF >= 0.42 (Wet)  |
| Shower Walls       | Large-Format Slab Tile | Minimal Grout Lines |
| Cabinet Hardware   | Extended D-Style Pulls | Full-Hand Grip      |
| Fixture Finishes   | Textured Metallic      | Non-Glare Surface   |
+--------------------+------------------------+---------------------+
Hardware & Metals: Coordinated Structural Finishes
Hardware choices tie the design together visually while providing physical support. When shopping for fixtures that feature invisible accessibility, avoid buying isolated pieces from different vendors. Instead, select a complete hardware suite from a trusted architectural manufacturer.
Coordinating your structural towel rails, paper holders, shower shelves, and faucet trims in a matching finish creates visual harmony. Textured metallic finishes like brushed brass, oil-rubbed bronze, or tactile matte black provide better grip than mirror-polished chrome, especially when hands are soapy or wet.
Cabinetry: Ergonomic Storage & Reach Zones
Cabinet layout determines how hard your body works during daily routines. Traditional vanity cabinets force you to bend over and reach deep into dark cupboards to retrieve supplies.
To support invisible accessibility, equip all lower vanity cabinets with full-extension pull-out drawers. Drawers bring cosmetics, towels, and toiletries out to you, eliminating the need to bend down or crouch on the floor. Install soft-close mechanisms on all doors and drawers to reduce physical effort and prevent pinching fingers. Replace small round cabinet knobs with wide, ergonomic D-shaped pull handles that can be hooked easily with a finger, hand, or wrist.
The Builder’s Rough-In Checklist for Invisible Accessibility
As a custom builder, I know that true quality lies hidden behind the drywall. You cannot simply decide to install heavy-duty fixtures after the paint is dry. Incorporating invisible accessibility requires precise planning during the early structural stages of construction.
Here is the exact rough-in checklist we use on our job sites to ensure your primary bathroom is framed and plumbed for long-term safety:
+-------------------------------------------------------------------+
|             BUILDER'S ROUGH-IN CHECKLIST FOR ACCESSIBILITY        |
+-------------------------------------------------------------------+
| [ ] Step 1: Structural Wall Blocking                              |
|     - Install 3/4" plywood backing between studs at 32-38" height.|
| [ ] Step 2: Recessed Subfloor Framing                             |
|     - Lower shower joists by 2" for a flush curbless shower pan.  |
| [ ] Step 3: Low-Voltage Electrical Pre-Wiring                     |
|     - Wire toe-kick lighting and GFCI outlets near the toilet.    |
| [ ] Step 4: Strategic Plumbing Rough-In                           |
|     - Mount hand-held slide bars and set anti-scald valves.       |
+-------------------------------------------------------------------+
Step 1: Structural Wall Blocking
Before drywall is installed, inspect the open wood studs around the entire room.
- Mount solid three-quarter-inch exterior-grade plywood backing or two-by-six lumber blocking between the framing studs.
- Ensure blocking is installed behind all shower walls, along the toilet enclosure, and around vanity mounting areas at a height between thirty-two and thirty-eight inches above the subfloor.
- This structural backing guarantees that any invisible accessibility support bar or floating vanity installed now or in the future will be anchored into solid timber rather than hollow drywall.
Step 2: Recessed Subfloor Framing
Setting up a curbless shower requires structural alterations before plumbing pipes are placed.
- Lower the floor joists beneath the shower zone by approximately two inches relative to the main bathroom floor.
- Install a marine-grade plywood subfloor deck in the recessed zone, sloping it precisely one-quarter inch per foot toward the linear drain location.
- Apply a continuous liquid or sheet waterproofing membrane across the entire shower zone and extend it at least six inches out onto the main bathroom floor to ensure leak-free performance for invisible accessibility.
Step 3: Low-Voltage Electrical Pre-Wiring
Lighting and power placement must be planned before insulation and drywall cover the walls.
- Run low-voltage lighting wires to vanity toe-kicks, beneath floating wall cabinets, and inside shower wall niches for automatic sensor nightlights.
- Install a dedicated GFCI electrical outlet behind or adjacent to the toilet at a height of eighteen inches. This outlet provides immediate power for an heated bidet toilet seat without running unsightly extension cords across the floor.
- Place light switches and digital climate controls at a maximum height of forty-eight inches above the finished floor so they remain within easy reach for adults of all heights.
Step 4: Strategic Plumbing Rough-In
Plumbing rough-in sets the stage for effortless daily water control.
- Install thermostatic mixing valves equipped with anti-scald temperature stops to protect sensitive skin from sudden water pressure changes.
- Rough in plumbing lines for a hand-held shower sprayer mounted on an adjustable vertical slider bar.
- Position primary shower diverter valves near the entrance of the shower enclosure rather than directly under the shower head. This allows you to turn on the shower and adjust water temperature without stepping into the water stream or getting wet.
Summary of Key Takeaways
To help you review what we have covered, here is a quick summary table matching every design challenge with its invisible accessibility solution:
+-------------------------------------------------------------------+
|                   DESIGN CHALLENGES & SOLUTIONS                   |
+-------------------------------------------------------------------+
| Challenge          | Traditional Problem    | Invisible Solution  |
+--------------------+------------------------+---------------------+
| Tripping Hazard    | 4-6 Inch Shower Curb   | Curbless Floor      |
| Clinical Aesthetics| Exposed Metal Bars     | Dual-Purpose Rail   |
| Restricted Space   | 28-30 Inch Doorways    | 36 Inch Door Frame  |
| Bending & Reaching | Deep Base Cabinets     | Floating Drawers    |
| Slippery Floors    | Polished Tile          | DCOF >= 0.42 Tile   |
| Scalding Risk      | Standard Valve         | Thermostatic Valve  |
+--------------------+------------------------+---------------------+
Final Thoughts
Building a custom home or remodeling your primary bath is one of the most rewarding investments you will ever make. True luxury in home design is not just about choosing beautiful quartz countertops or high-end tile. It is about creating a living space that supports your life effortlessly, protecting your family’s safety, independence, and dignity through every chapter of life.
By choosing invisible accessibility, you never have to choose between high-end style and practical function. Through smart structural planning, zero-threshold curbless shower pans, dual-purpose support hardware, floating vanities, and layered task lighting, your bathroom becomes a personal spa sanctuary that gracefully adapts to your changing needs over time.
From a female-centric design perspective, your primary bath should be a peaceful retreat where you start and end your day feeling rested, refreshed, and confident in your surroundings. Integrating invisible accessibility early in your design process protects your financial investment, enhances your home’s equity, and ensures that your space remains comfortably usable for years to come.
If you are planning to build a custom home or remodel your primary bath in Johnson City, Kingsport, Bristol, or anywhere in the broader Tri-Cities region, start these design conversations early. Work closely with your architect and custom builder during the initial drafting stage to ensure that structural blocking, recessed framing, and wide clearances are drawn into your floor plans from day one.