The dream of building a custom home in the rolling hills of Northeast Tennessee often starts with a plot of land. You might see a beautiful pasture in Jonesborough or a wooded ridge in Blountville and think it is the perfect spot for your family. The view is right, the price is right, and you can already see your front porch. But before we pour the foundation, we must ask the dirt a very serious question: Can you handle the water?
If you are looking at land, you do not want the excitement of a purchase to turn into confusion because of what lies beneath the surface. If your land does not have access to a city sewer line, you are going to need a septic system. To get a septic system, you have to prove that the ground can absorb and treat wastewater safely. This proof comes from a percolation test.
The percolation test determines if that septic system is legally and physically possible. It is the gatekeeper between you and your new home. Without a passing percolation test, that beautiful lot is just a place to have a picnic. It is not a building site.
This guide is designed to walk you through the entire process. I will explain the technical steps of how a percolation test is performed, the regulations here in Tennessee, and what the results mean for your building budget. We will keep things clear and precise, just like a good set of blueprints. As an added bonus, be sure to print out a copy of the Checklist of Questions to ask your soil scientist at the bottom of the article.
What is a Percolation Test?
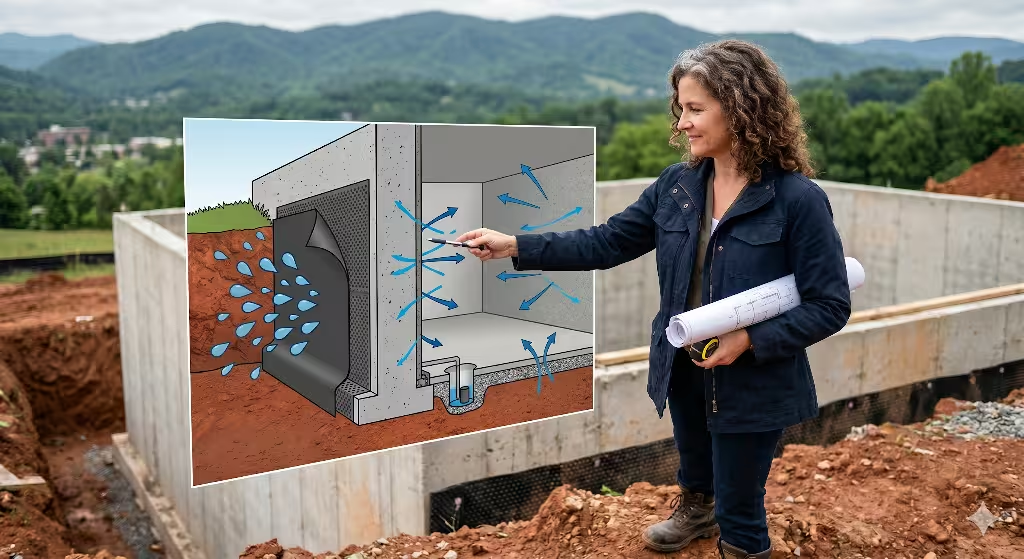
A percolation test is a soil evaluation method. It measures the rate at which water drains, or “percolates,” through the soil. When you flush a toilet in a home with a septic system, the water goes into a tank, and then the liquid flows out into the yard through buried pipes. It soaks into the ground.
The ground has to do two things. First, it has to be able to take the water away so it does not puddle in your yard. Second, and more importantly, it has to treat the water. As the water moves through the dirt, the soil acts like a filter. It cleans the water before it reaches the groundwater table.
If the water moves too fast, the soil does not have time to clean it. If the water moves too slow, it backs up into your house or surfaces in the yard. The percolation test tells us the exact speed of the soil.
This test is not just a good idea; it is the law. In Tennessee, the Department of Environment and Conservation, or TDEC, requires a passing soil evaluation before they will issue a Septic System Construction Permit. You cannot get a building permit in most counties without this septic permit in hand.
The Science of Hydraulic Conductivity
To understand the percolation test, you have to understand a concept called hydraulic conductivity. This is a fancy engineering term, but the concept is simple. It describes how easy it is for a fluid to move through empty spaces in the soil.
Soil is made up of sand, silt, and clay. Sandy soil has big gaps between the grains. Water falls through it like a sieve. Clay soil, which we have a lot of here in the Tri-Cities, has tiny particles packed tightly together. Water has a hard time squeezing through.
The percolation test measures this hydraulic conductivity in a real-world setting. We dig a hole, fill it with water, and watch what happens. It sounds basic, but there is a very strict procedure we must follow to get accurate results.
Why You Cannot Skip This Step
Buyers often ask if they can just install a system and hope for the best. The answer is no. If you skip the percolation test, you are gambling with your health and your wallet.
If you build a system on bad soil without a percolation test, the sewage will eventually fail. This can contaminate the drinking water for you and your neighbors. It can also lead to a foul smell in your yard and wet spots that never dry up.
Furthermore, banks will not lend you money to build a home on land that does not have a passing percolation test or a septic permit. It is one of the very first boxes they check.
The Process: How is a Percolation Test Performed Step-by-Step?
Now we are going to get into the details. If you are standing on your land watching this happen, or if you are just curious about what you are paying for, this is how the work gets done. The process is standardized so that every percolation test gives us reliable data.
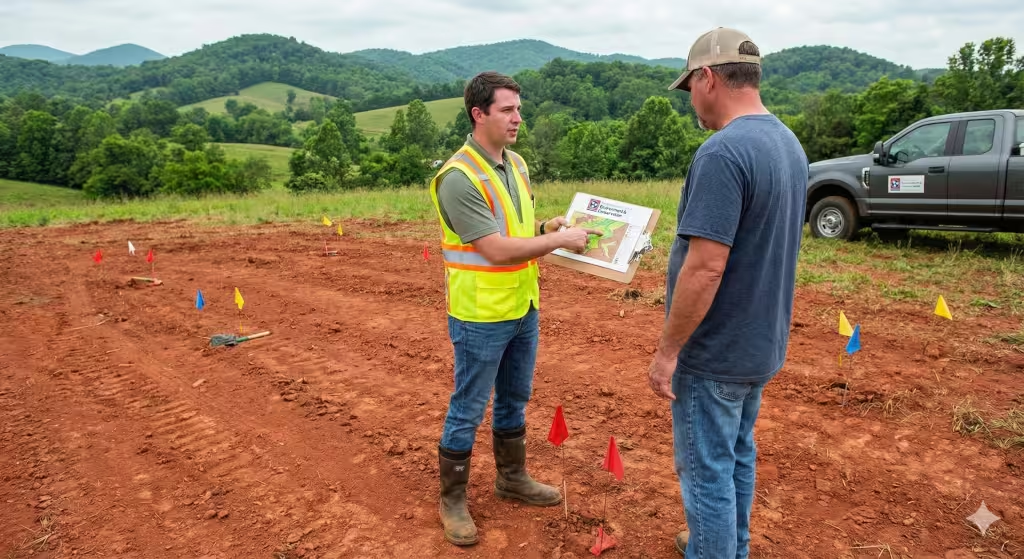
Step 1: Site Preparation and “The Grid”
We do not just walk out into the middle of the field and dig a hole at random. We have to be strategic. The percolation test needs to happen in the exact area where the drain field will go.
The person performing the test, usually a soil scientist or an environmental specialist, will look at the topography of the land. They look for the lay of the land. We cannot put a drain field on a slope that is too steep, and we cannot put it in a hole where rainwater collects.
Once a good spot is chosen, we set up a grid. In Tennessee, we need to know that the soil is consistent. We might dig several holes spaced about 50 feet apart. This ensures that the whole area is good, not just one lucky spot.
Digging the Holes
To start the percolation test, we dig the test holes. These are not huge pits. They are usually small, round holes.
Diameter: The holes are typically 6 to 12 inches across.
Depth: The depth is very important. We need to test the soil at the depth where the trench will be. This is usually between 24 and 30 inches deep.
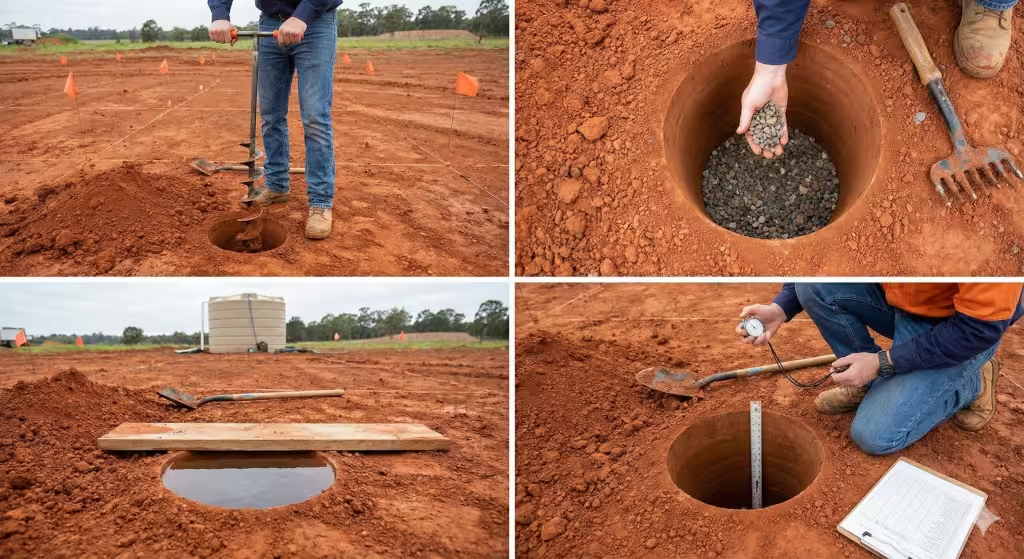
We use a post-hole digger or a manual auger to dig these holes. It is hard work, especially in our rocky East Tennessee ground. The sides of the hole need to be vertical. We want a nice, straight cylinder shape.
Step 2: Preparing the Test Hole
After the hole is dug, we cannot just pour water in yet. The act of digging can mess up the soil. If the auger blade smears the side of the hole, it seals up the natural pores in the dirt. This is called “smearing.”
If we leave the smear there, the water will not be able to get out, and the percolation test will fail even if the soil is actually good.
Scarification
To fix this, we use a knife or a sharp tool to scratch the sides of the hole. This is called scarification. We scratch up the sides to expose the natural soil structure. We remove any loose dirt from the bottom of the hole.
The Gravel Base
Next, we add a layer of gravel to the bottom of the hole. We usually put in about two inches of clean gravel.
Why do we do this? When we pour water into the hole for the percolation test, the water hits the bottom with some force. Without gravel, the water would stir up mud and seal the bottom of the hole. The gravel protects the soil surface so the water can flow naturally.
Step 3: The Presoak
This is perhaps the most critical step for us here in the Tri-Cities. Our soil has a lot of clay. Clay minerals are unique because they swell when they get wet.
If you pour water into dry clay, it might drain away fast at first. But as the clay gets wet, it expands and closes up the gaps. We need to know how the soil acts when it is fully swollen, because a septic system has to work even during the wettest week of the year.
To simulate these conditions, we perform a presoak. We fill the percolation test hole with water and let it sit.
We keep the water level high for at least 4 hours. In many cases, we fill it up and let it soak overnight. We want the soil to be completely saturated. If we skip the presoak, the percolation test results will be wrong. The water would drain too fast, giving us a false passing grade.
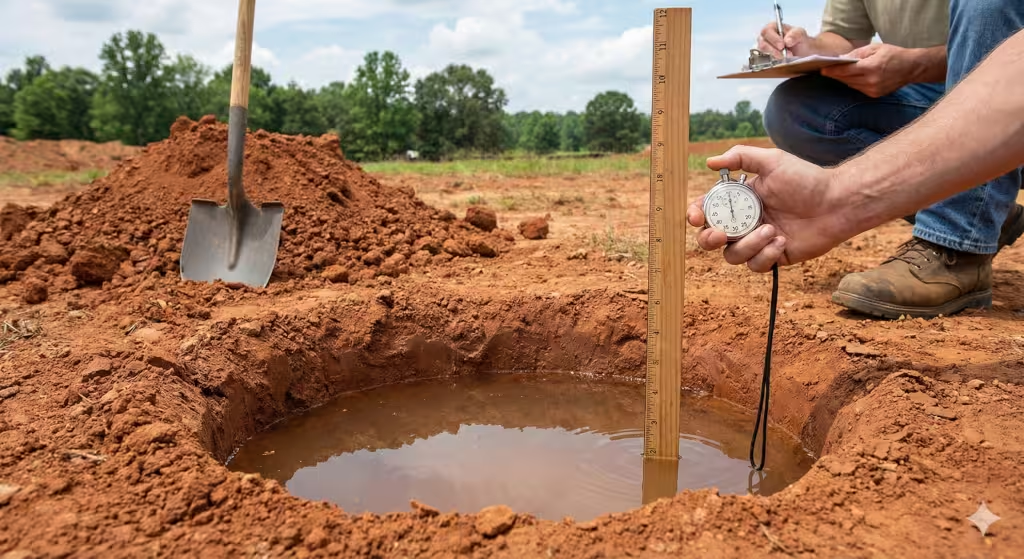
Step 4: The Measurement Phase
After the presoak is done, the real testing begins. This is where we get our numbers.
If there is still water left in the hole after the presoak, we adjust the level. We usually bring the water level to exactly 6 inches above the gravel.
Now, we watch the clock. We measure how much the water level drops over a specific amount of time.
Timing the Drop
We typically measure the drop every 30 minutes. We do this for four hours.
Here is an example of how it looks:
Start: Water is at 6 inches.
30 Minutes: We measure. The water dropped 1 inch. We refill it to 6 inches.
60 Minutes: We measure again. It dropped 0.8 inches. Refill.
90 Minutes: We measure again.
We keep doing this until the rate stabilizes. We want to see a consistent speed. The last reading is usually the one that counts. This final stable rate is the true percolation rate of the soil.
The Calculation
The result of a percolation test is expressed in “Minutes Per Inch” or MPI. This number tells us how many minutes it takes for the water to drop one inch.
The math is simple. If the water dropped 2 inches in 30 minutes, we divide the time by the inches.
30 minutes divided by 2 inches equals 15.
The result is 15 MPI.
This MPI number is the golden ticket. It dictates everything that happens next.
Tennessee Specifics: TDEC and Local Regulations
Building in Tennessee means dealing with specific local geology and laws. The percolation test procedure here is strictly governed by the state.
High Intensity Soil Maps
In many modern subdivisions in the Tri-Cities, you might not see someone out there with a bucket of water doing a traditional percolation test. Instead, you might see a soil scientist examining dirt cores.
This is because Tennessee allows for “High Intensity Soil Maps.” A licensed soil scientist comes out and drills deep holes with a truck-mounted auger or a hand probe. They look at the color and texture of the soil.
They are looking for clues. Grey soil usually means water stands there for long periods. Red or brown soil usually means water drains well. They map out the different soil types on the property.
TDEC will often accept this soil map in place of, or in addition to, the hydraulic percolation test. The soil scientist assigns an estimated percolation rate based on the texture of the soil. For example, they know that a heavy red clay usually percolates at around 60 to 75 MPI.
Who Performs the Test?
You generally cannot perform a valid percolation test yourself for a permit. It must be done by a certified professional. In Tennessee, you have two main options.
TDEC Environmental Specialist: You can apply through the local county health department or environmental field office. A state employee will come out and perform the evaluation. This is often cheaper, but the wait times can be long.
Private Soil Scientist: You can hire a private consultant who is licensed by the state. They are faster and can often help you find a solution if the soil is marginal. They create the map or run the percolation test and submit the data to the state for approval.
Tri-Cities Soil Context
Here in Johnson City, Kingsport, and Bristol, we have a mix of soils.
The Ridges: On the ridges, the soil is often shallow. We hit rock pretty quickly. A percolation test here might fail not because the water doesn’t drain, but because there isn’t enough dirt to filter it before it hits the bedrock.
The Valleys: In the valleys, we have deep clay. This clay can be very tight. A percolation test in heavy clay often results in a high MPI number, meaning the water drains very slowly.
Understanding these local trends helps us predict how a percolation test might go before we even start digging.
Interpreting the Results
Once the percolation test is done, you get a number. But what does that number mean?
The Passing Range
Generally, for a standard gravity septic system, we are looking for a percolation rate between 10 MPI and 75 MPI.
10 to 45 MPI: This is the sweet spot. The soil drains well but not too fast. You can use a standard system, and it probably won’t need to be huge.
46 to 75 MPI: This is slower soil. It passes, but the system will need to be larger. Because the water moves slowly, we need more surface area to get rid of it. This means more digging, more gravel, and a higher cost.
Too Fast (Less than 10 MPI)
If the percolation test shows the water draining in less than 10 minutes per inch, the soil is too sandy or rocky. The water zips right through.
This is a problem because the soil does not have enough time to clean the sewage. If you put a septic system here, you would be polluting the groundwater. You cannot install a standard system in this soil.
Too Slow (More than 75-105 MPI)
If the percolation test shows a rate of 90 or 100 minutes per inch, the soil is basically a sealed bowl. If you pump water into it, the water will just sit there.
If you installed a system here, the sewage would eventually bubble up to the surface of your yard. This is a “failed” percolation test for a conventional system.
What if My Land Fails the Perc Test?
Hearing that your land failed the percolation test is stressful. I have seen landowners panic when they get this news. But in many cases, it is not the end of the road. It just means we have to be smarter than the dirt.
If the standard percolation test fails, we look at alternative systems. Technology has come a long way.
Low Pressure Pipe (LPP) Systems
If the percolation test shows that the soil is a bit too slow, or if the good soil is shallow, we might use an LPP system.
In this system, we do not just let gravity pull the water down. We use a pump to push the water through small pipes with tiny holes. This sprays the water evenly across the entire drain field. It uses the soil more efficiently. This allows us to use soil that might be marginal on a standard percolation test.
Sand Mounds
If the water table is too high or the bedrock is too close, we might build a mound. We bring in special sand and build a hill on top of your natural soil.
The septic pipes are placed inside this sand mound. The sand does the cleaning that your natural soil couldn’t do. The percolation test for the sand is perfect because we brought the sand in ourselves. The natural soil underneath just has to be able to take the clean water away eventually.
Drip Irrigation
This is the most advanced option. It works like a sprinkler system for your lawn, but the sprinklers are buried underground. A computer controls a pump that sends tiny amounts of water into the soil at timed intervals.
Because it adds the water so slowly, it can work in very heavy clay that would fail a standard percolation test. It is expensive, but it can save a building lot that is otherwise unbuildable.
The “Wait and Retest” Strategy
Sometimes, a percolation test fails because the ground was already soaked from a week of heavy rain. Or maybe the test was done in the dead of winter.
In some cases, we can ask to redo the percolation test during a drier season. TDEC has specific rules about “wet weather testing,” but sometimes a second opinion or a test done under better conditions can yield a passing result.
Costs and Logistics
You are probably wondering how much this costs. As a builder, I track these numbers closely.
The Cost of the Test
A standard percolation test or soil evaluation in our area usually costs between $600 and $1,500.
The price depends on the size of the lot. A half-acre lot is quick. A 50-acre farm takes a lot more time to map. If you hire a private soil scientist, you are paying for their expertise and speed, so it might be on the higher end of that range.
The Cost of the System Based on the Test
The real financial impact of the percolation test is on the system cost.
Good Perc Test: A standard gravity system might cost $6,000 to $10,000.
Marginal Perc Test: A system for slower soil requires more field line. This might push the cost to $12,000 or $15,000.
Failed/Alternative Perc Test: If you need a pump system or a drip system, you could be looking at $20,000 to $40,000.
This is why the percolation test is so important. A bad result can add $30,000 to your building budget instantly.
Timeline
A percolation test is not instant.
Scheduling: It might take a few weeks to get someone out to the site, especially in the spring when everyone is building.
The Test: The actual digging and presoaking take about 24 hours. The measuring takes another half day.
The Paperwork: After the field work, the scientist has to draw the map and write the report.
The Permit: TDEC has to review the percolation test results and issue the permit. This can take anywhere from a couple of weeks to a month.
Detailed Equipment Used in a Percolation Test
When the expert arrives to perform the percolation test, they will have a truck full of gear. It helps to know what they are using so you understand the process better.
The Auger
The most common tool is the hand auger. It looks like a T-handle with a bucket at the bottom. The bucket has blades that cut into the soil. As they twist it, the bucket fills with dirt. They pull it up, dump it, and go back down. This creates the clean hole needed for the percolation test.
The Batter Board
To measure the drop in water accurately, we cannot just stick a ruler in the muddy hole. We use a batter board. This is a straight board laid across the top of the hole. It gives us a fixed reference point.
The Measuring Tape or Laser
We measure from the batter board down to the water surface. Some pros use a laser measure for extreme accuracy. Others use a tape measure attached to a float. The key is consistency. A mistake of a quarter-inch can change the MPI calculation significantly.
Water Tank
Since many vacant lots do not have water hooked up yet, the person performing the percolation test often has to bring water with them. They might have a large tank in their truck, or they might ask you to provide water. We need gallons of water for the presoak and the test, so logistics matter.
How a Percolation Test Affects Your Home Design
The results of the percolation test do not just tell you if you can build. They tell you where and how big you can build.
Number of Bedrooms
Septic systems are sized based on the number of bedrooms, not the number of bathrooms. TDEC assumes that more bedrooms equal more people, which equals more water usage.
If your percolation test result is marginal, the soil scientist might tell you that the land can support a 3-bedroom house, but not a 4-bedroom house. The soil is just too slow to handle the volume of water from that extra person. This is a critical conversation to have before you design your floor plan.
Location of the House
The area that passes the percolation test is designated as the “SSD Area” (Subsurface Sewage Disposal Area). You cannot build your house on top of this area. You cannot pave a driveway over it.
Sometimes, the only spot that passes the percolation test is right in the middle of the lot where you wanted to put your house. If that happens, you have to move the house. The soil dictates the site plan.
The Reserve Area
In many counties, you are required to have a “reserve area” or a “duplicate area.” This is a second spot of land that also passes the percolation test.
This is your insurance policy. If the first septic system fails in 20 years, you need a place to put the new one. This means you essentially need to find enough good soil for two septic systems. This can be tricky on small or rocky lots.
Common Myths About the Percolation Test
In my years of building, I have heard every rumor in the book about these tests. Let’s clear up a few.
Myth: “I can just dump a bag of sand in the hole to make it pass.”
Fact: This is fraud, and it doesn’t work. The inspectors are trained to look for altered soil. Plus, if you cheat the test, you are the one who will suffer when sewage backs up into your bathtub.
Myth: “If it fails, the land is worthless.”
Fact: Not necessarily. As we discussed, alternative systems exist. Also, you might be able to buy an easement on a neighbor’s property to put your drain field there if their soil is better.
Myth: “I don’t need a percolation test if the neighbors have septic.”
Fact: Soil changes drastically over short distances. Your neighbor might have a vein of sandy loam, while your lot is sitting on a shelf of limestone. Never assume your soil is the same as the lot next door.
Myth: “Winter is a bad time for a percolation test.”
Fact: Actually, the wet season (winter and spring) is often the best time for a soil evaluation. This is when the water table is highest. If you pass the test now, you know the system will work year-round. Some counties even restrict testing during dry summer months because the results can be misleadingly good.
Why Experience Matters
Interpreting a percolation test or a soil map is part science and part art. An experienced soil scientist can look at the vegetation growing on the land and get a clue about the drainage. Sycamore trees and willows love water, if you see them, it might mean the area is wet. Cedar trees often grow where the rock is close to the surface.
As a buyer, you want to rely heavily on these experts. When looking at land, we want the person performing the percolation test to be honest and thorough. We would rather lose a land sale than build a custom home that has septic problems later.
Questions Answered about Percolation Tests
Here are some specific questions I get asked often by folks in the Tri-Cities area.
Can I do my own percolation test?
No, not for the purpose of getting a permit in Tennessee. The state requires the evaluation to be done by a qualified professional to ensure the public health is protected. You can dig a hole and pour water in it for your own curiosity, but TDEC won’t accept your numbers.
How deep are perc test holes?
The holes for a percolation test are typically 24 to 30 inches deep. We need to test the soil at the depth where the effluent (wastewater) will actually be released.
Does a percolation test expire?
Technically, the soil does not change. However, regulations do change. A percolation test done in 1990 might not meet the stricter standards of today. If you have an old permit, you should check with the local health department to see if it is still valid.
Is a soil test the same as a percolation test?
People use the terms interchangeably, but they can mean different things. A “soil test” can also refer to checking nutrients for farming (like nitrogen and pH). A “percolation test” is specifically for drainage and septic suitability. When you call the expert, make sure you specify you need a septic soil evaluation.
Can I build a basement if the percolation test is shallow?
This is a tricky one. If the good soil is shallow, the septic system might need to be shallow. If your plumbing exits the house from the basement, it might be lower than the septic tank. In this case, you would need a pump in the basement to lift the waste up to the septic system. It is doable, but it adds cost.
Conclusion
The percolation test is the unsung hero of the home building process. It is a dirty, muddy, technical job, but it is the foundation of a healthy home.
If you are looking for land in the Tri-Cities, do not sign a purchase contract without a contingency clause. Make sure the contract says the sale is dependent on a passing percolation test and the ability to obtain a septic permit for the size of house you want.
It is better to spend a few hundred dollars on a test and walk away from a bad lot than to spend hundreds of thousands of dollars on a house you cannot flush.
If you have questions about a specific lot, or if you need a recommendation for a good soil scientist in Washington, Sullivan, or Carter County, reach out to the county, the bank, or your builder.
Start with the dirt. Respect the process. And remember, if the percolation test passes, you are one big step closer to breaking ground on your dream home.
A Tri-Cities TN Home Checklist of Questions to Ask your Soil Scientist
Phase 1: The Phone Interview (Before You Hire)
You are likely calling around to folks in Johnson City, Kingsport, or the surrounding counties. Use these questions to weed out the ones who might not be the best fit for your timeline or budget.
[ ] “Are you currently on the TDEC approved list of soil consultants?”
Why ask this: If they aren’t on the state’s list, their signature means nothing. You need someone whose work TDEC will accept without question.
[ ] “What is your current lead time for a site visit?”
Why ask this: In the spring and summer, good soil scientists get backed up for weeks. If you have a 30-day due diligence period on your land contract, you need someone who can get there next week, not next month.
[ ] “Do you charge a flat fee for the visit, or is it per hole/acre?”
Why ask this: Some charge a flat rate for a “preliminary evaluation” and then more for the actual map. Others charge by the acre. Get the full price upfront so there are no surprises.
[ ] “Does your fee include submitting the paperwork to TDEC, or do I have to do that?”
Why ask this: The paperwork can be confusing. It is worth paying a little extra for a consultant who handles the bureaucratic side of the percolation test results for you.
[ ] “How familiar are you with the soil patterns in [Specific Location, e.g., Fall Branch or Sulphur Springs]?”
Why ask this: Soil varies wildly here. Someone who works mostly in the sandy river bottoms might not be as sharp on the slate ridges of Sullivan County. You want local expertise.
Phase 2: On-Site (During the Evaluation)
If you meet them out at the property (which I highly recommend), these questions will help you understand what they are seeing in real-time.
[ ] “Can we look at the spot where I want to put the house first?”
Why ask this: You don’t want the drain field ending up right where your front porch was supposed to be. Direct them to your preferred house seat so they can try to work around it.
[ ] “Are you seeing any indicators of a high water table?”
Why ask this: Grey or mottled soil colors usually mean water stands there. If they see this, ask immediately about what that means for your system options.
[ ] “If we hit rock here, do we have enough room to move the system?”
Why ask this: If the lot is small and you hit bedrock, you might be out of luck. Ask them to verify the “reserve area” (the backup spot) while they are there.
[ ] “Are you performing a hydraulic percolation test or creating a high intensity soil map?”
Why ask this: As we discussed in the article, these are slightly different methods. Know which one you are paying for and why they chose that method for your lot.
Phase 3: The Results (After the Work is Done)
Once they give you the report, do not just file it away. Read it and ask these clarification questions.
[ ] “Based on this percolation rate, what is the maximum number of bedrooms I can build?”
Why ask this: This is the most important question for your value. If you planned a 4-bedroom house but the soil only supports 3, you need to know now.
[ ] “Did you identify any ‘useable but marginal’ areas?”
Why ask this: Sometimes there is soil that can work but will require a more expensive system. It is good to know if you have this as a backup option.
[ ] “Can you recommend a septic installer who is good with this specific type of soil?”
Why ask this: Soil scientists know who does good work. If the ground is tricky, they will know which installer has the finesse to handle it without messing up the site.
[ ] “How long is this soil map valid for?”
Why ask this: If you aren’t building for another year or two, ensure the paperwork won’t expire.
Pro-Tip from Tri-Cities TN Home
When you get the final soil map, laminate a copy.
Give one to your excavator, one to your septic installer, and keep one in your truck. That map is the “constitution” of your lot. It tells everyone where they can drive heavy machinery and where they must stay off. If a bulldozer drives over your future drain field and compacts the soil, you might ruin your passing percolation test and have to start all over. Protect that dirt!