The Tug-of-War Between Nostalgia and Practicality
There is something undeniably special about living in the Tri-Cities. Whether you are settled into a craftsman bungalow in the Tree Streets of Johnson City or you have restored a Victorian-era beauty in Kingsport, these houses have a soul. You can feel the history in the creak of the hardwood floors and see the craftsmanship in the thick crown molding. It is easy to fall in love with an old home. It is where you raised your family, where you celebrated holidays, and where you planned to spend the rest of your life.
However, as we get older, the very features that make an old home charming can turn into obstacles. That cozy, sunken living room becomes a trip hazard. The narrow, quirky bathroom door becomes a barrier. The steep front porch that looks so welcoming from the street becomes a mountain to climb. This is the central conflict we face: the emotional pull of our history versus the practical reality of our changing bodies.
Renovating an old home for aging in place is not just about remodeling. It is about engineering independence. It is about looking at a structure that was built for a different era and adapting it to keep you safe and comfortable. It is entirely possible to do this, but you have to be realistic. You have to anticipate the challenges of renovating an old home for aging in place before you start tearing down walls. It requires planning, precision, and a deep understanding of how an old home is put together.
We are going to walk through the structural, systemic, and financial hurdles you will face, so you can make the best decision for your future. At the end of the article is a checklist to help you plan your renovations.
The “Narrow” Problem: Hallways and Doorways
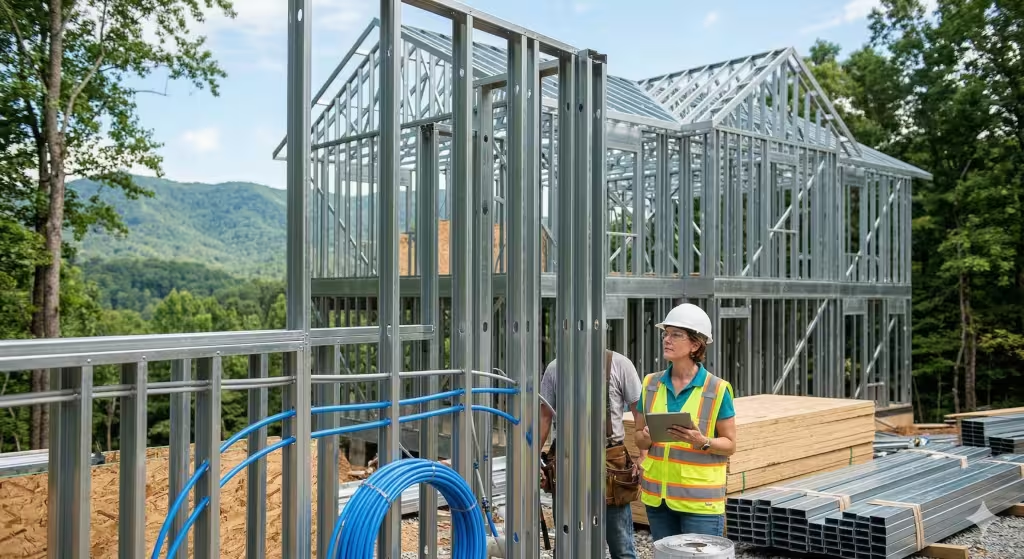
When you walk through an old home built in the 1940s or 50s, you might notice how cozy the rooms feel. Architects back then were focused on efficient use of heat and intimate spaces. They were not thinking about wheelchairs or walkers. This creates one of the most immediate physical barriers in an old home: the width of the doors and halls.
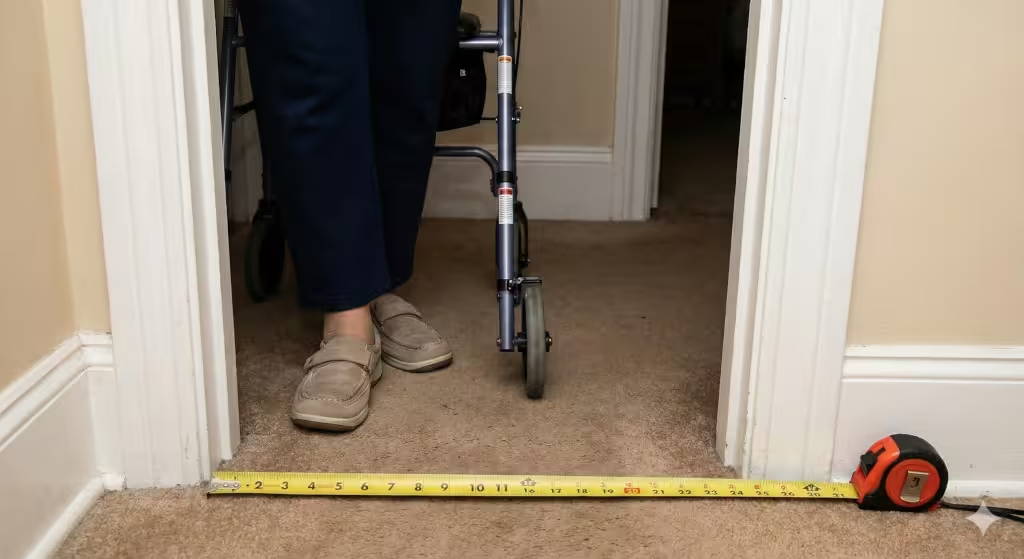
Most interior doors in an old home are only 24 to 30 inches wide. Hallways are often just 36 inches wide. While this is fine for walking through, it is a major problem if you ever need mobility assistance. A standard wheelchair usually needs a minimum clearance of 32 inches just to squeeze through, but 36 inches is the ideal standard for comfort. If your old home has narrow passages, navigating from the bedroom to the bathroom can become impossible.
The Engineering Challenge
You might think the solution is simple: just make the doorway bigger. In a new house, that is easy. In an old home, it is complicated. Widening a doorway often means cutting into the studs that hold up your roof or the second floor. These are called load-bearing walls. If you cut a stud in a load-bearing wall to widen a door in an old home, you have to replace that support with a header. This is a heavy beam that spreads the weight.
In an old home, the plaster walls can crack and crumble when you start cutting. You also have to move light switches and electrical wires that are often stapled right next to the door frame.
The Solution
Before we start knocking down walls in your old home, we look for easier fixes. One great piece of hardware is called an “offset hinge” or “swing clear hinge.” These special hinges allow the door to swing completely clear of the opening, adding about two inches of usable width. It is a small change that can make a big difference without the dust and cost of structural work. If that is not enough, we have to look at framing changes, but we do it carefully to preserve the integrity of your old home.
The Bathroom Battle: Footprint vs. Function
Bathrooms in an old home are often notoriously small. Decades ago, the bathroom was treated almost like a utility closet. It was a place to wash up quickly, not a spacious retreat. You will often find a toilet, a sink, and a tub jammed into a space that is barely 5 feet by 8 feet. This footprint is the enemy of aging in place.
To age safely, you need maneuvering space. You need room for a caregiver to stand next to you. You need space to turn around. The biggest hurdle here is the “curbless shower.” A traditional tub requires you to step high over a wall, which is a prime spot for falls. A curbless shower lets you roll or walk straight in with zero barriers.
Structural Hurdles in an Old Home
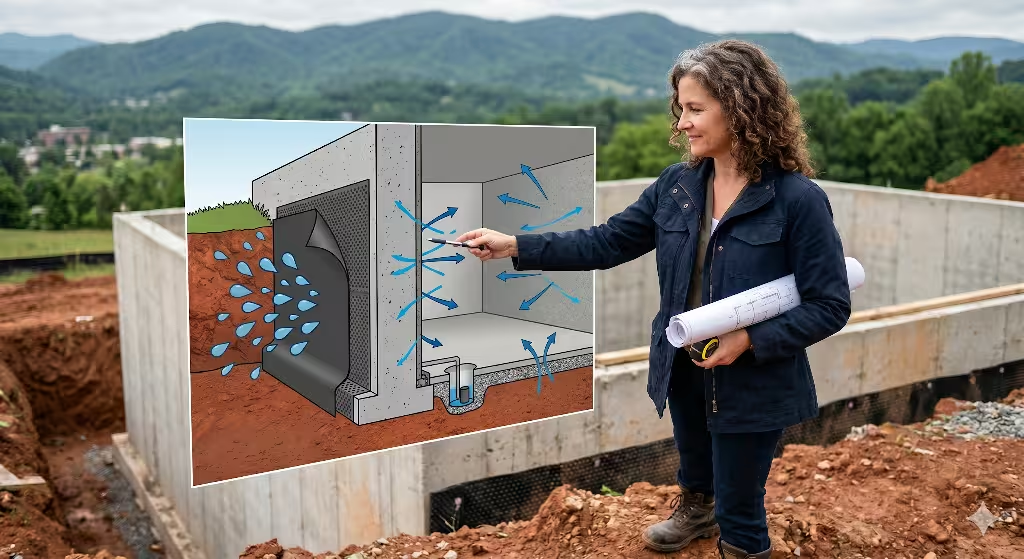
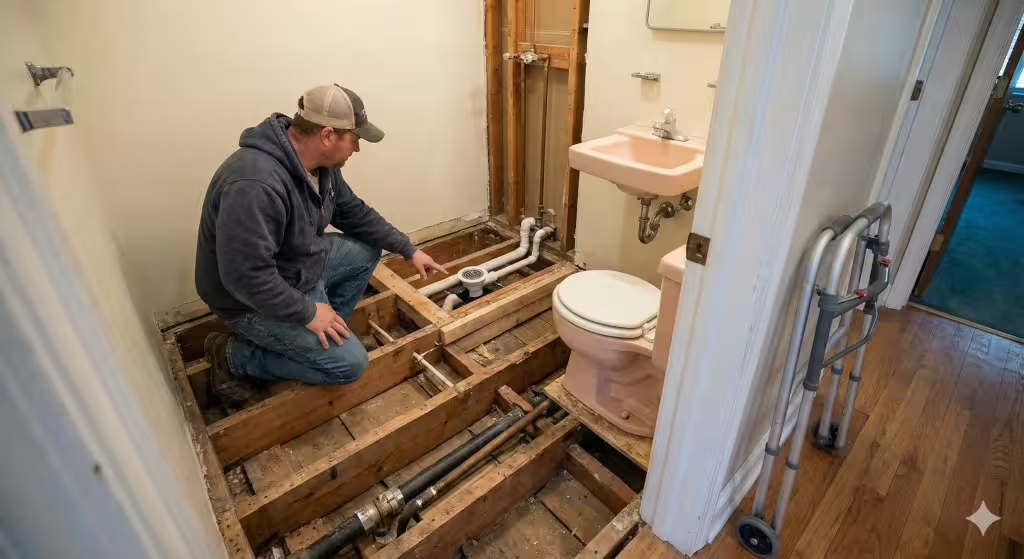
Creating a curbless shower in an old home is one of the hardest technical tasks we tackle. To get the shower floor flush with the bathroom floor, we have to lower the floor inside the shower area. In a new build, we plan for this. In an old home, the floor joists (the wooden beams holding up the floor) are already set.
To lower the floor, we often have to cut into those joists. This weakens the structure. To fix this, we use a technique called “sistering.” We bolt new, stronger lumber next to the old joists to reinforce them. Sometimes, we even have to drop the ceiling in the room below the bathroom to make space for the plumbing trap. It is a complex puzzle. If your old home is on a slab foundation, we have to jackhammer the concrete to move drains. It is invasive, but for many, it is the only way to stay in their old home safely.
Common Question: How much does it cost?
A common question people often ask is, “How much does it cost to retrofit a bathroom for elderly parents in the Tri-Cities?” In an old home, because of the plumbing and structural surprises, you are likely looking at a starting point of $25,000 and going up from there, depending on the finishes. It is an investment, but it is often cheaper than one month in an assisted living facility.
The “Trip Hazard” Terrain: Flooring Transitions
Walk through an old home that has been updated over the decades, and you will see a history of flooring trends. You might have original oak hardwood in the living room, thick ceramic tile in the kitchen, and plush carpet in the bedrooms. Every time the flooring material changes, the height of the floor changes.
In the industry, we call these “transitions.” In the world of aging in place, we call them “trip hazards.” A difference of just half an inch can catch the toe of a shoe or stop a walker wheel in its tracks. For someone with a shuffling gait, which is common as we age, these little bumps in your old home can lead to serious falls.
Leveling the Playing Field
Fixing this in an old home is tricky. We aim for a continuous, level surface throughout the main living floor. This might mean ripping out layers of old linoleum or particle board that were added years ago.
The hidden challenge here is the subfloor. In the humid climate of East Tennessee, crawlspaces can get damp. This can cause the subfloor in an old home to warp or rot over fifty years. When we pull up the carpet, we often find we need to repair the skeleton of the floor before we can lay down new, safe flooring.
We might use a self-leveling concrete compound to smooth out dips, or we might install plywood underlayment to bring lower rooms up to the height of the higher rooms. The goal is to make the floor in your old home feel like one seamless sheet, so you never have to look down to see where you are stepping.
Behind the Walls: Electrical and Lighting Deficiencies
As we age, our eyes change. A 60-year-old person needs about three times more light to read than a 20-year-old. The lighting in a typical old home is woefully inadequate for this. Most bedrooms in an old home have a single dome light in the center of the ceiling. This creates shadows in the corners and is not bright enough for safe living.
You might think, “I’ll just add more lights.” This brings us to the electrical system of your old home.
The Wiring Reality
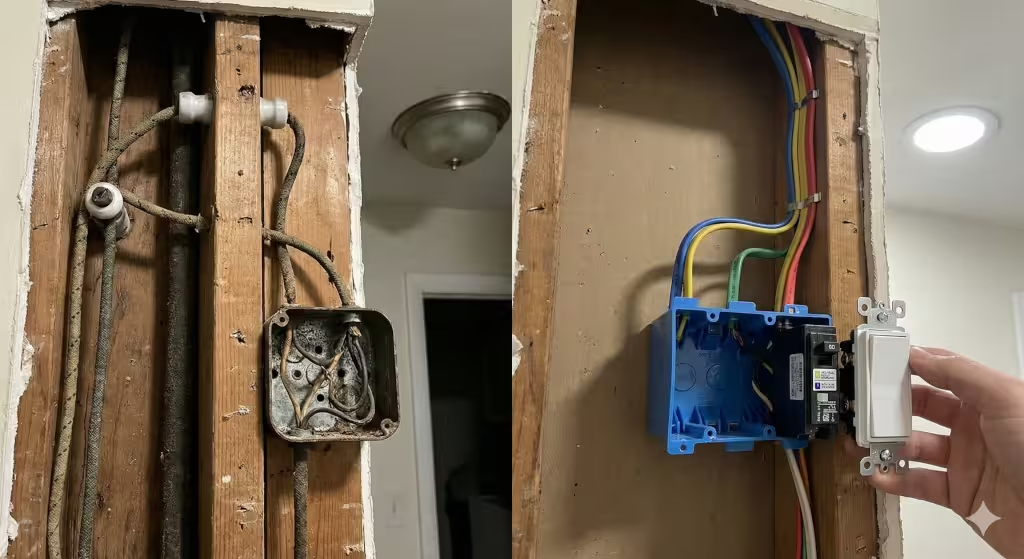
If your old home was built before 1950, it might still have knob-and-tube wiring. This is an ancient system where individual wires run through porcelain tubes. It is ungrounded and unsafe for modern electronics. Even homes built in the 1960s and 70s often have 100-amp electrical panels that are maxed out.
When we add twenty new high-output LED recessed lights to brighten up your kitchen and hallways, we are adding load to the system. We can’t just plug them in. We often have to rewire the circuits.
Safety Upgrades
Renovating an old home is the perfect time to install Arc-Fault Circuit Interrupters (AFCIs). These are special breakers that detect dangerous electrical arcs that can cause fires. They are required by code now, but your old home probably doesn’t have them. We also look at switch placement. In an old home, switches are often high up on the wall. We lower them to 48 inches so they can be reached from a seated position. We also swap out those tiny toggle switches for wide “rocker” switches that are easier to use if your hands have arthritis.
Access from the Outside: The Hillside Factor
We live in the Appalachian Highlands. Flat land is a luxury here. Many homes in Johnson City and Kingsport are built on hills. Even if your lot is flat, your old home likely sits on a raised foundation with a crawlspace. This means you probably have three to five steps just to get to your front porch.
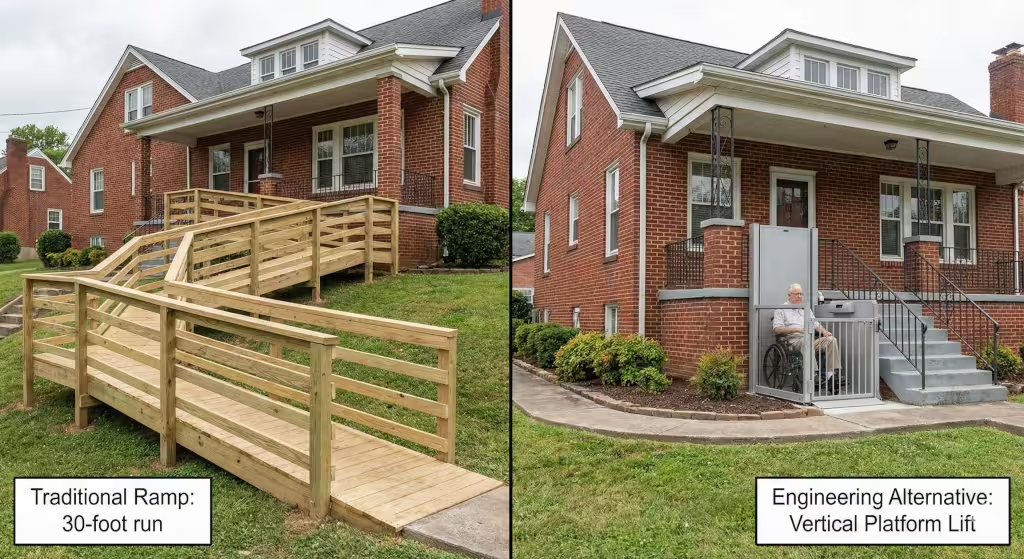
Those steps are a barrier to the outside world. If you cannot get out of your house safely, you become isolated. The standard solution is a ramp, but the math of a ramp can be shocking to homeowners.
The Ramp Math
ADA guidelines suggest a 1:12 slope for ramps. This means for every 1 inch of vertical rise, you need 12 inches (or one foot) of ramp length. Let’s say your front porch is 30 inches off the ground, a very common height for an old home. You need a 30-foot long ramp.
Where do you put a 30-foot ramp in the front yard of an old home? It can take over the entire lawn. It can block the driveway. It can ruin the curb appeal you have loved for years.
Engineering Alternatives
When a ramp is not feasible for an old home, we look at Vertical Platform Lifts (VPLs). These are like small, outdoor elevators. They sit next to the porch and lift you straight up. They take up much less space than a ramp. Another option for an old home is landscape regrading. We can build up the earth using berms and retaining walls to bring the ground level closer to the porch level. This creates a gentle, paved path instead of an industrial-looking aluminum ramp. It blends better with the architecture of an old home.
Historic Zoning and Regulatory Hurdles
If your old home is located in a designated historic district, like the Jonesborough Historic District or the White City neighborhood, you have another layer of challenges. These areas have strict rules about what you can do to the exterior of the house.
The historical commission wants to preserve the look of the neighborhood. They might not allow you to widen the front door of your old home if it changes the architectural style. They might reject a metal ramp on the front of a Victorian house.
Navigating the Red Tape
This does not mean you cannot renovate your old home. It just means you need a strategy. You have to work with the board. We often design wooden ramps that match the paint and trim style of the old home so they look original. We might propose a lift at the side or rear entrance instead of the front.
It is crucial to check the zoning of your old home before you buy materials. I have seen homeowners build a beautiful ramp only to be told to tear it down because they did not get a “Certificate of Appropriateness.”
Hidden Health Hazards in Demolition
When we start cutting into walls to widen those doors or rewire those lights, we disturb the dust of decades. In an old home, that dust can be toxic.
Lead and Asbestos
If your old home was built before 1978, it almost certainly contains lead-based paint. When this paint is sanded or demolished, it creates lead dust. This is dangerous for everyone, but it is especially harmful if you have a compromised immune system.
Then there is asbestos. In an old home, asbestos was used in everything: floor tiles, glue, pipe insulation, and even siding. It is a fantastic fire retardant, which is why builders used it, but if you breathe the fibers, it causes lung scarring and cancer.
The Professional Approach
You cannot just take a sledgehammer to an old home. We have to test materials first. If we find these hazards, we have to bring in remediation specialists who seal off the area and use negative air pressure machines. It adds time and cost to the renovation of an old home, but it is non-negotiable for your safety. Never try to DIY the demolition in an old home unless you know exactly what is behind the walls.
The “Smart” Old Home: Technology Integration
We used to think of aging in place as grab bars and ramps. Today, it is also about technology. But installing smart technology in an old home has its own challenges.
Thick plaster walls with metal lath (the mesh behind the plaster) act like a Faraday cage. They block Wi-Fi signals. If you want to install a smart doorbell to see who is at the door, or voice-activated lights, or a fall detection system, your old home might fight the signal.
Mesh Networks
To fix this, we often have to install a “mesh” Wi-Fi system. This uses multiple small transmitter nodes placed around the old home to bounce the signal around the thick walls. We also look for hardwired options where possible.
Smart thermostats are another great tool. They allow you to control the temperature without getting up. However, the wiring for the thermostat in an old home often lacks the “C-wire” (common wire) that powers modern smart devices.6 We often have to run new thermostat wire from the furnace to the wall unit, which can be tricky in a finished old home.
The Cost-Benefit Analysis: Renovation vs. Relocation
This is often the hardest conversation that owners who want to renovate have. Sometimes, despite how much you love it, your old home is just not suitable for aging in place. The structure might fight us too hard.
If the hallway is load-bearing and full of plumbing, widening it might cost a fortune. If the only bathroom is on the second floor and there is no space for an elevator, the old home might not work.
The 50% Rule
I use a rough rule of thumb: If the cost to renovate your old home for aging in place exceeds 50% of the home’s market value, you should pause. You have to ask if that money would be better spent on a newer, single-level home that is already accessible.
We also look at the layout. A split-level home (popular in the 70s) is one of the hardest types of old home to adapt because every room is on a different level. A ranch-style old home is much easier. You have to weigh the emotional value of your old home against the financial logic.
Conclusion: Engineering Your Forever Home
Renovating an old home for aging in place is a journey. It is a balancing act between preserving the memories of the past and building a safe foundation for the future. It requires patience, budget planning, and a builder who respects the unique engineering of an old home.
You are not just fixing up a house; you are designing your lifestyle for the next twenty years. The challenges of renovating an old home for aging in place are real, from the narrow doors and steep hills to the hidden wires and hazardous dust. But with the right expertise, these challenges can be overcome.
If you are living in an old home in the Tri-Cities and are wondering if it can be your forever home, do not guess. You need a partner who understands the bones of these buildings.
The “Forever Home” Renovate-ability Checklist
This checklist is designed to help you objectively audit your current home. Walk through your house with this list and a tape measure to see if your property is a good candidate for an “aging in place” renovation.
Instructions: Answer each question honestly.
Green Flag: The renovation is likely straightforward or moderately priced.
Red Flag: The renovation will likely be structurally complex, expensive, or require significant compromises.
Part 1: The Approach (Exterior)
How many steps are required to enter the main living level?
[ ] 0–1 Step: (Green Flag) Easy to ramp or grade.
[ ] 2–5 Steps: (Yellow Flag) Requires a long ramp or vertical lift.
[ ] 6+ Steps or Second Story Entry: (Red Flag) May require an expensive elevator or major landscape excavation.
Is the driveway flat or steep?
[ ] Flat/Gentle Slope: (Green Flag) Safe for loading/unloading.
[ ] Steep Hill: (Red Flag) Fall hazard in winter/rain; difficult for wheelchair transfers.
Part 2: The Layout (Interior)
Bedroom Location:
[ ] Master Bedroom on Main Floor: (Green Flag) Ideal.
[ ] Room to Convert on Main Floor: (Yellow Flag) Do you have a dining room or den that could become a bedroom?
[ ] All Bedrooms Upstairs: (Red Flag) Requires a stair lift, elevator, or an addition to the house.
Hallway Width: (Measure the narrowest point)
[ ] 36 inches or wider: (Green Flag) Great for mobility.
[ ] 32–35 inches: (Yellow Flag) Tight, but workable for most walkers.
[ ] Less than 32 inches: (Red Flag) Will likely require moving walls to be wheelchair accessible.
Doorway Widths:
[ ] 32 inches or wider: (Green Flag)
[ ] 28–30 inches: (Yellow Flag) Can often be fixed with “swing clear” hinges.
[ ] 24 inches: (Red Flag) Structural widening required.
Part 3: The Bathroom
Maneuvering Space:
[ ] 5-foot turning radius available: (Green Flag) Plenty of room for a wheelchair.
[ ] Tight, but walls are non-load bearing: (Yellow Flag) Can expand into a closet or bedroom.
[ ] Small “closet” style bath surrounded by load-bearing walls: (Red Flag) Very difficult/expensive to expand.
Floor Construction:
[ ] Crawlspace or Basement underneath: (Green Flag) Moving drains for a curbless shower is easier.
[ ] Concrete Slab: (Yellow Flag) Requires jackhammering concrete to move plumbing.
Part 4: Systems & Structure
Electrical Panel:
[ ] Modern Breaker Box (200 Amp): (Green Flag) Ready for added lighting.
[ ] Old Fuse Box or 100 Amp Panel: (Red Flag) Likely needs a full service upgrade ($2k–$5k+).
Subfloor Condition:
[ ] Solid, level, no squeaks: (Green Flag)
[ ] Sags, dips, or “spongy” spots: (Red Flag) Indicates rot or structural issues that must be fixed before new flooring is laid.
Scoring Your Home
Mostly Green Flags: Your old home is a prime candidate! With a good builder, you can engineer a safe, beautiful future here.
Mix of Yellow/Red: Renovation is possible, but you need a feasibility study. The costs will be higher, and you may need to prioritize the most critical safety updates first.
Mostly Red Flags: It is time for a serious conversation. The cost to renovate might exceed the value of the home. It may be wiser financially to sell and move to a single-level home that is already accessible.