Creating a potting room in your home is about more than just a place to store soil. It is about crafting a functional sanctuary that connects your indoor life with the natural beauty of the Tennessee landscape. Whether you are building a custom home in Johnson City or updating a space in Kingsport, the right home potting room design and layouts can change your gardening life. It adds real value to your property and makes your daily chores a joy.
The Rise of the Indoor Garden Sanctuary
In 2026, we are seeing a major shift in how people design their custom homes. A dedicated potting room is no longer just a luxury for estate homes. It has become a must-have for anyone who loves nature. These spaces act as a bridge between your cozy living room and the wild garden outside.
Living in Northeast Tennessee, we deal with specific weather. We are in Zone 7. This means we have cold winters and hot, humid summers. A dedicated potting room allows you to start seeds in February while the snow is still on the ground. It also gives you a place to bring in your tropical plants when the frost hits.
When buyers talk about home potting room design and layouts, they need to think about precision. You want a space that is technically sound but also looks beautiful. You need a room that can handle dirt and water but feels like a natural part of your home. Our goal is to help you find that balance.
Essential Features for a High-Performance Potting Room
When you start planning, you have to think about the basics. You cannot just put a table in a spare room and call it a potting room. You need features that can handle the “wet” work of gardening.
Durable Flooring
The floor is the most important part of any potting room. You are going to spill water. You are going to drop mud. You might even spill some fertilizer. You need a floor that is non-slip and easy to clean. Brick is a classic choice for a potting room because it looks timeless and hides dirt well. However, if you want something easier to mop, we suggest slip-resistant porcelain tiles or natural stone. Stained concrete is also a great, cost-effective option for a modern look.
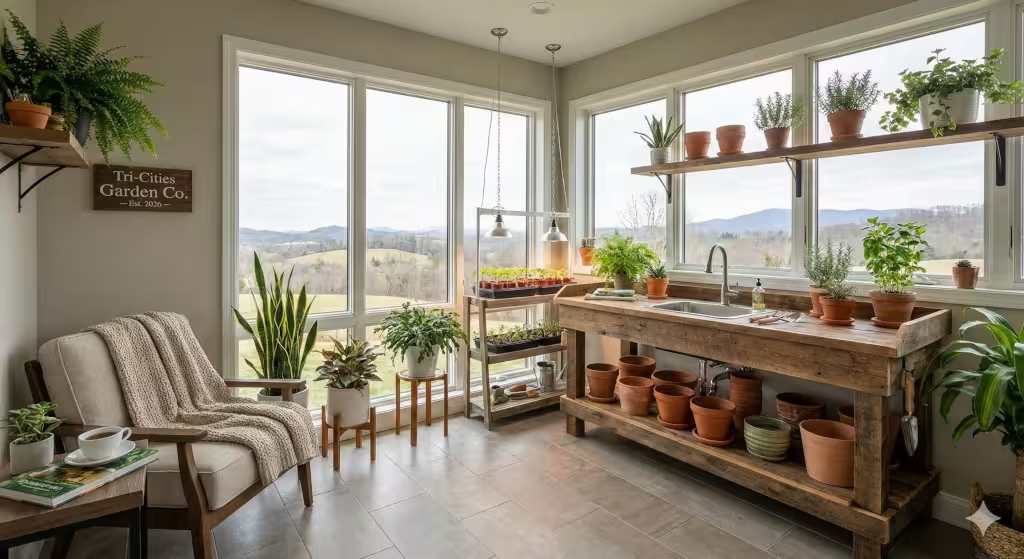
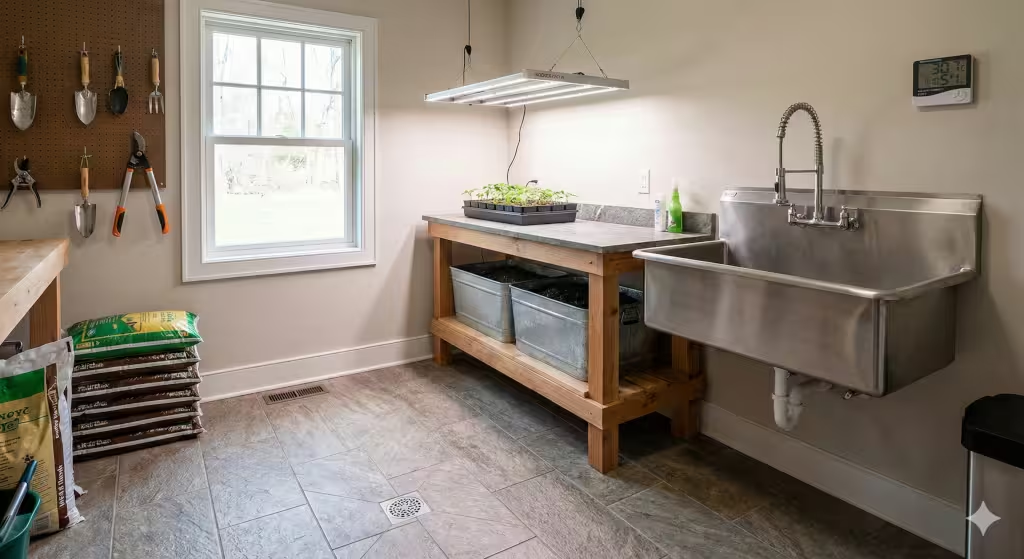
The Power of the Utility Sink
You need a good sink. A standard kitchen sink is usually too shallow. We recommend a deep-basin utility sink. Stainless steel is great because it won’t stain or rust. If you want a more “farmhouse” look, go with a large apron-front sink. Make sure your faucet has a high arc and a pull-down sprayer. This makes it easy to wash out large pots or rinse off your garden boots.
Worksurface Ergonomics
The potting bench is your main stage. It needs to be the right height so you don’t hurt your back. For most people, a height of 36 inches is perfect for standing work. If you are taller or shorter, we can customize that. Your potting room should have a bench with integrated soil bins. This lets you scoop soil directly onto your pots without making a mess.
Natural and Artificial Lighting
Plants need light, and so do you. If possible, put your potting room on the south side of your house. Large windows are a dream. But in the winter, Tennessee sun can be weak. In 2026, we use AI-powered LED grow lights. These lights can mimic the sun’s natural cycle. They help your seedlings grow strong even when it is cloudy outside.
Home Potting Room Design and Layouts: 4 Proven Configurations
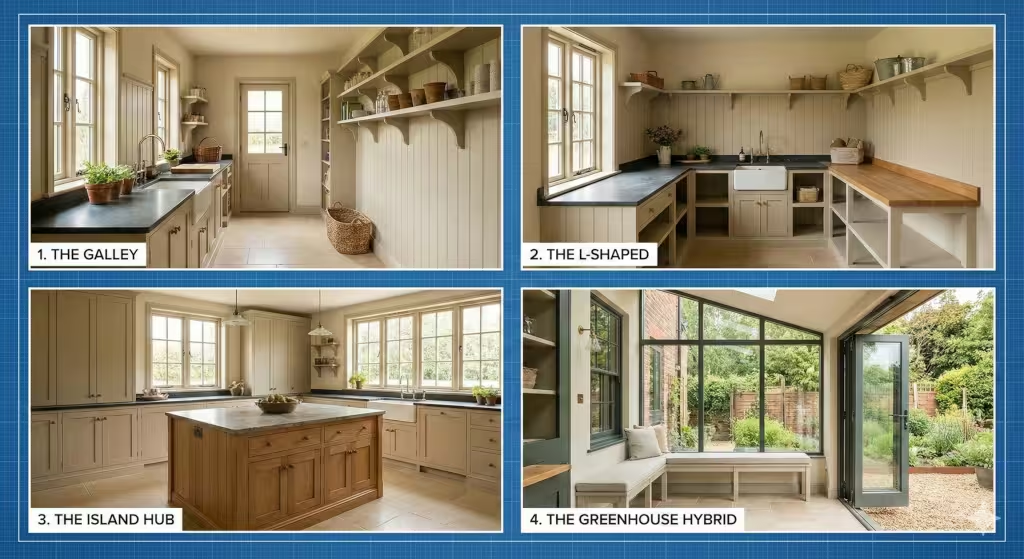
Not every potting room is the same size. Depending on your home, you might have a whole room or just a small corner. Here are four ways to set it up.
1. The Galley Layout
This is like a long, narrow kitchen. It works great if you are using a hallway or a converted mudroom. You have your bench and sink on one side and your storage on the other. It keeps everything in a straight line, which is very efficient for a quick potting room workflow.
2. The L-Shaped Corner
If you have a multi-purpose room, the L-shape is best. You can have your potting room on one wall and your laundry or craft station on the other. It keeps the dirty gardening work in its own corner while still sharing the plumbing with the rest of the room.
3. The Island Hub
If you have a lot of space, a central island is the way to go. This turns the space into a true garden studio. You can walk all the way around the island. This is perfect for making large floral arrangements or working with a friend. You can store your heavy soil bags under the island to keep the floor clear.
4. The Greenhouse Hybrid
For the ultimate custom home, we can use glass walls or large bifold doors. This connects the potting room directly to the outside. When the weather is nice, you can open the doors and feel like you are standing in the middle of your garden. It provides the best natural light for any potting room.
Smart Storage and Organization
A messy potting room is a stressful potting room. You need a place for every trowel and every seed packet. I always tell my clients to think vertically.
Vertical Mastery
Use your walls. Pegboards and slat walls are great because you can move the hooks around. You can hang your hand tools, like shears and pruners, so they are always at eye level. Magnetic strips are also handy for holding small metal tools.
Zoned Storage
Keep your “dirty” stuff separate from your “clean” stuff. Have a spot for fertilizers and organic pest control. Then, have a clean shelf for your pretty decorative pots and your gardening books. This keeps your potting room looking tidy.
The Mud Zone
Since your potting room is often near an entrance, you need a place for your muddy gear. Install a boot scraper outside the door. Inside, have a dedicated spot for your “wellies” and hooks for your garden aprons. This stops you from dragging Tennessee red clay through your clean house.
Environmental Controls: Keeping the Space Healthy
Because you are working with water and plants, you have to control the air in your potting room. If you don’t, you might end up with mold or a musty smell.
Ventilation Strategies
You need good airflow. Ceiling fans are a simple way to keep air moving. For a more professional potting room, we install exhaust systems. These pull the humid air out of the room. Ridge vents are also a good idea if your potting room is an addition with its own roof.
Climate Consistency
Your plants need a steady temperature. We usually connect the potting room to the main house HVAC system. However, if you have a lot of glass walls, you might need a small independent heater. This is vital for winterizing your perennials and keeping your seedlings from freezing.
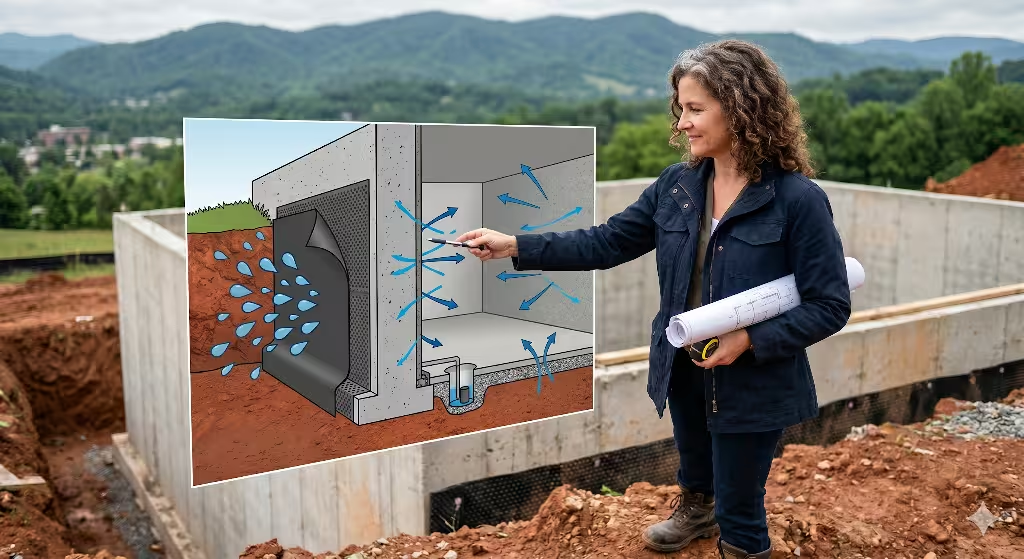
Drainage Solutions
In a professional potting room, a floor drain is a lifesaver. If you spill a bucket of water or need to hose down the floor, the drain takes care of it. We make sure the floor has a very slight slope so the water always goes toward the drain. This is a small detail that makes a huge difference in how much you enjoy the room.
Common Questions about Potting Room Design
What is the best size for a potting room?
If you just want a small station, an 8×8 space is plenty. If you plan to do a lot of seed starting and have a place to sit, a 10×12 room is the sweet spot.
How do I turn a small closet into a potting station?
You can use fold-down benches. When you aren’t gardening, the bench folds up against the wall. Use tiered shelving to make the most of the height. It is all about using every inch of the potting room.
Can a potting room add value to my home?
Yes. In the Tri-Cities market, buyers are looking for “lifestyle rooms.” A well-designed potting room shows that the home is high-quality and unique. It stands out during a home tour.
What are the best materials for a waterproof potting bench?
I like cedar or redwood because they naturally resist rot. If you want something more modern, galvanized steel is excellent. You can also use stone remnants from your kitchen counters for a luxury look in your potting room.
2026 Trends: The Future of Garden Spaces
As we look at 2026, the potting room is evolving. It is becoming a high-tech part of the house.
Biophilic Evolution
People are not just using these rooms for potting. They are using them for functional indoor farming. We are seeing more integrated systems for growing microgreens and herbs right inside the potting room.
Sustainable Luxury
We are using more reclaimed wood and natural colors. Muted neutrals, like the “Cremèle” style, are very popular right now. They make the room feel calm and grounded.
Integrated Tech
Smart home tech has reached the garden. You can now get potting room systems that monitor the moisture in your pots. They can even send an alert to your phone if your plants need water.
Precision in Every Square Foot
Designing a potting room is a project that pays off every time you step into the space. It is a place where you can be creative and get your hands dirty without worrying about the rest of the house. By focusing on the right home potting room design and layouts, you create a space that works for you and your plants.
In the Tri-Cities, we have access to some of the best materials and craftsmen in the state. Whether you are sourcing local stone or hiring a custom cabinet maker, your potting room can be a masterpiece. Remember, a good design starts with a plan and ends with a space that makes you happy every spring.
The Ultimate Potting Room Construction Checklist
When you are building a potting room, you want to get the materials right the first time. Tennessee weather can be tough on wood and stone, so I have put together this list of high-quality materials and local places where you can find them.
This checklist is broken down by the parts of the room. We have included local sources around Johnson City, Kingsport, and Bristol to help you get started.
1. Foundation and Flooring (The “Wet Zone” Essentials)
Since a potting room is a high-moisture area, your floor needs to be tough.
Slip-Resistant Tile: Look for porcelain tile with a high “DCOF” rating (this means it isn’t slippery when wet).
Natural Stone or Brick: Great for a timeless look and handles dirt easily.
Floor Drain: Don’t skip this. It makes cleaning the potting room as easy as using a hose.
Local Supplier: Zion Stone in Johnson City is excellent for stone veneer, and General Shale Brick in the Tri-Cities is the go-to for classic brick flooring.
2. Surfaces and Cabinetry
Your potting bench and cabinets are the workhorses of the room.
Waterproof Cabinets: Avoid cheap particle board. Use solid wood or marine-grade plywood.
Stone Countertops: Granite or quartz can handle the scraping of heavy pots.
Potting Bench Material: Use rot-resistant woods like Cedar or White Oak.
Local Supplier: Cabinets To Go in Johnson City offers water-resistant options, and Signature Stonecraft & Cabinetry can help with custom stone tops. For local cedar, check out Grant Cedar Mill or your local Lowe’s in Kingsport.
3. Plumbing and Fixtures
A potting room needs water that is easy to access.
Deep-Basin Utility Sink: Stainless steel or cast iron is best for heavy use.
High-Arc Faucet: Make sure it has a pull-down sprayer to reach every corner of your pots.
Drain Traps: Ask for a “plaster trap” or sediment trap. This stops soil and sand from clogging your main pipes.
Local Supplier: Hajoca in Kingsport or Johnson City is a professional wholesale house that sells top-tier fixtures to homeowners too.
4. Lighting and Electrical
You need to see what you are doing, even on a cloudy Tennessee morning.
LED Grow Lights: Essential if you want to start seeds indoors in the winter.
GFCI Outlets: Because you are working with water, all outlets in your potting room must be GFCI-protected for safety.
Natural Light: If you are building new, aim for south-facing windows.
Local Supplier: Any local hardware store like the Home Depot on Stone Drive in Kingsport will have the electrical supplies you need.
5. Unique Character and Reclaimed Materials
To give your potting room that authentic East Tennessee feel, use materials with history.
Barn Wood Shelving: Reclaimed wood adds warmth and grit to a potting room.
Vintage Sinks: Sometimes you can find a deep, cast-iron sink from an old farmhouse.
Local Supplier: Old Farm Reclaimed Lumber Works in Johnson City or Vintage Timbers in Greeneville are the best spots for wood with a story. You can also check the Heritage Alliance Salvage Warehouse in Jonesborough for unique vintage finds.
Material Cost Comparison Table (Estimated for 2026)
| Material | Estimated Cost | Durability | Best Use |
| Western Red Cedar | $15 – $25 per sq. ft. | High (Rot Resistant) | Main Potting Bench |
| Galvanized Steel | $10 – $20 per sq. ft. | Very High | Heavy-duty Worktops |
| Porcelain Tile | $5 – $12 per sq. ft. | Very High | Easy-clean Floors |
| Reclaimed Barn Wood | $10 – $30 per sq. ft. | Moderate | Wall Accents & Shelves |
Pro-Tip for Tri-Cities Homeowners
If you are building your potting room in a basement or a garage corner, pay extra attention to ventilation. Our local humidity can cause wood to swell. Using a dehumidifier or a dedicated exhaust fan from a supplier like Hajoca will keep your potting room smelling fresh and your wood surfaces in top shape for years.
A Timeline for Building a Potting Room on Your House
In Johnson City and grew up in Kingsport, we know how much our neighbors value their gardens. Whether you are dealing with the red clay of Sullivan County or the rolling hills of Washington County, having a dedicated space for your plants is a game changer. This timeline will walk you through the process step by step. We will cover everything from the first drawing to the moment you bring in your first tray of seedlings.
The Planning and Design Phase (Weeks 1 to 3)
The first step in any building project is the most important. As an engineer, I always say that an hour spent planning saves ten hours on the job site. During these first three weeks, you are not just dreaming; you are making hard decisions. You need to decide exactly where the potting room will go. Will it be a “bump-out” on the back of your house? Or are you converting part of your garage?
During week one, you should walk your property. Look at where the sun hits your home. A potting room needs light, so a south-facing spot is best. You should also think about your “workflow.” This is a fancy word for how you move while you work. You want your sink, your soil, and your pots to be close together. This saves your back and keeps the mess in one place.
By week two, you should have a basic drawing. It does not have to be a masterpiece, but it needs to show where the big items will go. This includes the sink, the potting bench, and the windows. This is also the time to look at your budget. Prices for lumber and stone can change, so get a few quotes from local suppliers in the Tri-Cities.
In week three, we finalize the technical details. We look at the plumbing and electricity. If you want a deep sink, we have to make sure the pipes can reach that part of the house. If you want high-tech grow lights, we need to plan for the right outlets. Once this plan is set, we can move on to the physical work.
Permitting and Approvals (Weeks 4 to 6)
In Tennessee, we have rules to make sure every building is safe. Even a small potting room needs the right permits. Depending on where you live, you might need to talk to the city planners in Johnson City or the county office in Blountville.
During week four, you submit your plans. They will check to make sure your potting room follows the local zoning laws. They want to know that the structure is strong and that the plumbing won’t leak into the ground. This part can be slow, but it is better to do it right than to face a fine later.
Week five is usually a waiting game. This is a good time to go back to the material checklist we gave you. You can start ordering your cedar wood or your porcelain tile. Many high-quality materials have “lead times.” This means it takes a few weeks for them to be delivered. If you order now, they will be ready exactly when you need them.
By week six, you should have your permits in hand. You are now ready to break ground. This is when the project starts to feel real. You can see the excitement building as the first delivery truck pulls into your driveway.
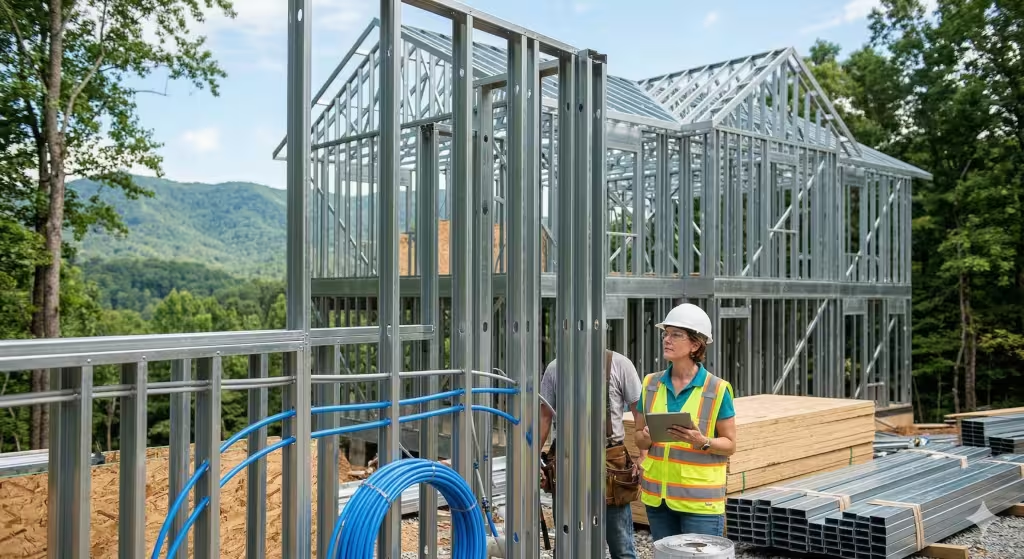
Site Preparation and Foundation (Weeks 7 to 8)
Now we get our hands dirty. The first physical step for your potting room is preparing the ground. If you are building an addition, we have to clear the grass and dig for the foundation. In the Tri-Cities, our soil can be a mix of rock and clay. We have to make sure the ground is level and solid.
During week seven, the “excavation” begins. We dig trenches for the footings. These are the concrete bases that hold up the walls. We also dig the trenches for your water lines and your floor drain. Remember, a good potting room needs a way for water to escape. We lay the pipes deep enough so they won’t freeze in our Tennessee winters.
In week eight, we pour the concrete. If you are doing a slab-on-grade floor, we pour the whole floor at once. We make sure it has a very slight slope. This is a technical trick. We want any spilled water to flow naturally toward the drain instead of sitting in the corners of your potting room. Once the concrete is poured, it needs a few days to “cure” or get hard.
Framing the Structure (Weeks 9 to 10)
This is the phase where you finally see the shape of your potting room. Framing is like building the skeleton of the room. We use strong wooden studs to create the walls and the roof.
During week nine, the walls go up. As a builder, this is one of my favorite parts. You can finally walk into the space and see the view from your new windows. We make sure the studs are perfectly straight. This makes it much easier to install cabinets later. We also frame out the openings for your doors and windows.
In week week ten, we focus on the roof. Your potting room needs a solid roof to keep out the rain. We install the rafters and then the “sheathing,” which is the wooden skin of the roof. We also wrap the whole structure in a special “house wrap.” This is a fabric that lets the house breathe but keeps water out. It is essential for preventing mold in a room where you will be using a lot of water.
Rough-In Plumbing and Electrical (Weeks 11 to 12)
Before we close up the walls, we have to put the “guts” of the potting room in place. This includes all the pipes and wires that make the room work.
During week eleven, the plumber comes in. They connect your utility sink to the main water line. They also install the “sediment trap” I mentioned earlier. This is a special part of the drain that catches sand and dirt. In a potting room, you are always washing off roots and soil. Without a trap, your pipes would clog in a month. We also run the lines for your floor drain.
In week twelve, the electrician takes over. They run the wires for your lights and outlets. We make sure to put outlets right above your potting bench. This is great for plugging in small tools or your phone charger. We also install the wiring for your AI grow lights. These lights need a steady power supply to help your plants grow. Every outlet in a potting room must be a GFCI outlet. This is a safety feature that shuts off the power if it gets wet.
Insulation and Drywall (Weeks 13 to 14)
Now that the pipes and wires are in, we can make the potting room look like a real room. This phase is about comfort and “finish.”
During week thirteen, we add the insulation. This is the fluffy material that goes inside the walls. It keeps the room warm in the winter and cool in the summer. In our area, we use insulation with a high “R-value.” This is just a measure of how well it keeps heat in. A well-insulated potting room is much cheaper to heat and cool.
In week fourteen, we hang the drywall. These are the large grey boards that form your walls. Once they are up, the room feels much smaller but much more like a home. We use “green board” for the potting room. This is a type of drywall that is treated to resist moisture. Regular drywall can get soft if it gets damp, but green board stays strong. We then “tape and mud” the seams to make the walls perfectly smooth.
Tiling and Flooring (Weeks 15 to 16)
This is a critical stage for your potting room. We are moving from the “rough” work to the “finish” work. The floor is the most important part of the design because it has to be waterproof.
During week fifteen, we install the tile or stone. If you chose porcelain tile, we lay it down with a strong adhesive. We make sure the tiles are tight against each other. This prevents dirt from getting into the cracks. If you are using natural stone, we seal it with a special liquid. This stops the stone from soaking up water or stains from your potting room activities.
In week sixteen, we apply the grout. This is the material that fills the spaces between the tiles. We use a “waterproof grout” for the potting room. This is a high-tech product that won’t crack or leak. Once the grout is dry, we give the floor a final cleaning. You can now see how the room will handle the “wet” work of gardening.
Cabinetry, Benches, and Finishes (Weeks 17 to 18)
We are almost there! This is when we bring in the furniture and the pretty details that make the potting room yours.
During week seventeen, we install the cabinets and the potting bench. As I said before, we use solid wood like cedar. We bolt the cabinets to the wall studs we put in back in week nine. This makes them very strong. You can stack heavy bags of soil or large ceramic pots without any worry. We also install your countertop. Whether it is granite or stainless steel, it needs to be level so your pots don’t slide.
In week eighteen, we add the “trim.” This is the wooden molding around the floor and the ceiling. We also paint the walls. I suggest using a “semi-gloss” paint for a potting room. It is much easier to wipe down if you splash mud on the walls. We also install the doors and the windows. Your potting room is now “sealed” from the outside.
Final Fixtures and Testing (Weeks 19 to 20)
The final two weeks are about making sure everything works perfectly. We test the water, the lights, and the air.
During week nineteen, we install the sink and the faucet. We turn on the water and check every pipe for leaks. We also test the floor drain. We pour a bucket of water on the floor to make sure it flows toward the drain. This is the ultimate test of a good potting room design. If the water stays in a puddle, we fix it now. We also hang your grow lights and test the smart home system.
In week twenty, we do the final “punch list.” This is a list of small things that need fixing. Maybe a door squeaks, or a piece of trim needs more paint. Once that is done, we do a deep clean. We scrub the floors and wash the windows. Your potting room is ready!
Why the 20-Week Timeline Matters
You might think 20 weeks is a long time for one room. But as a professional builder, I know that rushing leads to mistakes. If you hurry the foundation, your floor might crack. If you skip the sediment trap, your sink will clog. A 20-week schedule allows for every “subcontractor” to do their best work.
In the Tri-Cities, we often have rainy weeks in the spring. This schedule has “buffer time” built in. If the rain stops us from digging for a few days, we don’t fall behind. We just adjust and keep moving. A well-timed project is a stress-free project.
Final Thoughts
Building a potting room is an investment in your happiness. It gives you a place to escape the world and focus on your plants. When you follow a clear project timeline, you know exactly what to expect. You won’t be surprised by a bill or a delay. You can just look forward to the day you start your first seeds in your brand-new potting room.
A potting room built with integrity and skill will last as long as the home itself. It will be a place where memories are made and gardens are born.