

Building a custom home or remodeling a primary bathroom in Northeast Tennessee teaches you quickly that water is patient, relentless, and always looking for a way through your defenses. When a homeowner sits down with a homebuilder to walk through their bathroom floor plans, they often spend a lot of time talking about aesthetic choices like Italian porcelain tile, unlacquered brass fixtures, and frameless glass enclosures. Those elements are the pieces you see and enjoy every single day. Yet, for most builders, their primary focus is always fixed firmly on what sits completely hidden behind that beautiful tile work.
A finished tile wall or floor is not a waterproof system on its own. Grout absorbs water, ceramic surfaces transmit moisture through tiny micro-pores, and thinset mortar is essentially a cement sponge. The genuine barrier keeping your timber framing dry, preventing hidden subfloor rot, and stopping mold inside your wall cavities is the continuous layer underneath. In modern construction, builders and remodelers rely on shower waterproofing membranes to create an unbroken barrier against moisture intrusion.
The two primary systems used across the country are bonded sheet systems and fluid-applied elastomeric coatings. Both options are engineered to stop leaks and protect your framing, but they behave differently, install differently, and have unique strengths depending on the design of your bathroom. In this comprehensive guide, we will break down the engineering, practical installation steps, failure points, and performance standards of these critical systems so you can make the right decision for your home.
The Critical Plane Behind Your Tile
The Truth of Tile Showers
A common misconception among homeowners is that a tiled shower is naturally waterproof simply because tile feels hard, durable, and glassy. In reality, a tile installation is purely a decorative wear layer. Standard cement-based grout is porous. Even when treated with premium penetrating sealers, grout slows down moisture absorption rather than stopping it completely. Water molecules pass through grout joints, slip behind hairline cracks caused by natural building settling, and work their way through the cementitious mortar bed.
If you do not have high-performance shower waterproofing membranes directly underneath your tile and mortar, that daily shower water will soak straight into your backer board, framing studs, subflooring, and insulation. Over months and years, this moisture accumulation causes structural framing rot, black mold growth, subfloor sagging, and ruined ceilings in the rooms below.
The Engineering Objective
The primary technical goal of any shower build is establishing a continuous, unyielding moisture and vapor envelope directly beneath the tile assembly. In the building science world, we refer to this as the waterproofing plane. This plane must be monolithic, fully adhered, and sloped properly toward an integrated drain assembly so that any moisture reaching the membrane drains away safely rather than pooling against your framing.
Every single fastener penetration, inside corner, outside corner, plumbing supply rough-in, and floor-to-wall transition must be tied together. A tiny pinhole or an unsealed seam can allow ounces of water into a wall cavity every week. By specifying quality shower waterproofing membranes, builders ensure that every droplet hitting the wall either runs off the tile surface or hits the internal membrane barrier and flows straight down into the plumbing drain.
The Debate: Sheet vs Liquid Systems
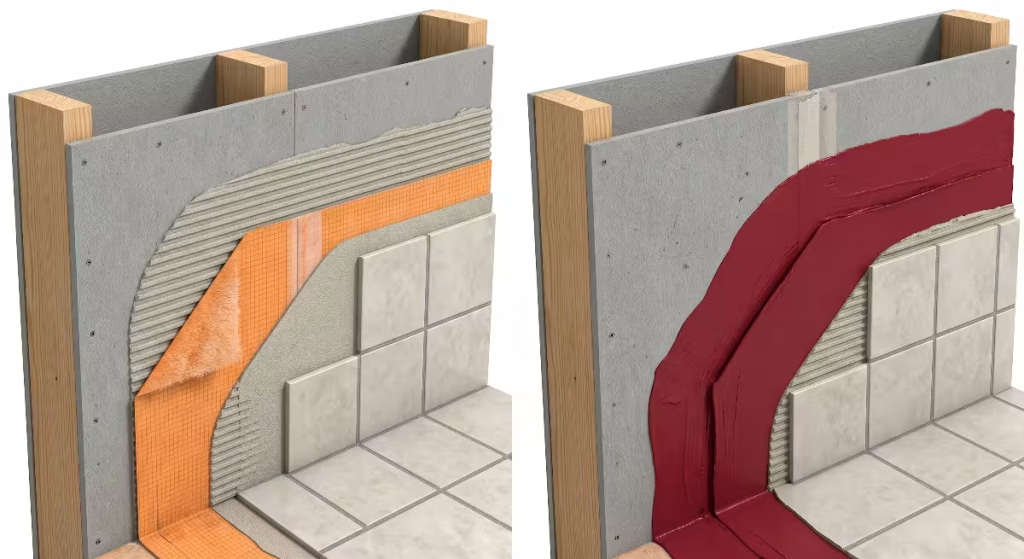
Contractors and homeowners continually weigh the practical differences between sheet membranes and liquid-applied coatings. Sheet systems are manufactured rolls of flexible plastic or fabric fleece that are cut to shape and embedded into wet mortar along the shower walls and floor. Liquid systems are elastomeric rubber coatings that you roll, brush, or spray directly onto the wall surfaces like heavy paint, building up thickness over multiple coats.
Both methods can produce an airtight, watertight installation that complies with national plumbing and residential building codes. However, each system approaches the job site with distinct operational demands. Sheet systems give you guaranteed, factory-controlled thickness but require careful seam work. Liquid coatings give you continuous, seamless coverage without overlapping joints, yet their final thickness depends entirely on the skill and care of the installer holding the roller.
Article Roadmap
To help you determine which approach fits your upcoming bathroom build or remodel, we are going to look under the hood of both technologies. We will examine the material science, compare real-world site conditions, evaluate how each membrane handles corners and niches, break down the actual costs, and highlight the most common installation blunders that lead to water damage. By understanding how shower waterproofing membranes function from an engineering standpoint, you can ensure your shower stays dry, safe, and solid for decades to come.
Technical Primer: Anatomy of the Two Systems
A. Sheet Membranes (Bonded Sheet Systems)
Bonded sheet systems are factory-engineered membranes delivered to the job site in rolls. The core of a modern sheet membrane is typically made from extruded polyethylene or polypropylene. These polymers are chosen because they are completely impervious to liquid water, chemically inert, and highly resistant to deterioration over decades of use.
To allow cement thinset mortar to stick to a smooth plastic sheet, manufacturers laminate a non-woven polyester or polypropylene fleece web to both sides of the plastic core. During installation, the fleece on the back side locks into the mortar bed spread across your backer board, while the fleece on the front side provides a mechanical anchor for the mortar used to set your shower tile.
Sheet systems are engineered to meet strict structural and moisture-resistance requirements under national testing protocols. In the United States, high-performing sheet shower waterproofing membranes are tested and certified under ANSI A118.10, which governs load-bearing, bonded, waterproof membranes used beneath thinset ceramic tile and stone.
Because the plastic core is manufactured under strict factory conditions, the thickness is uniform from one end of the roll to the other. Sheet shower waterproofing membranes also serve as effective vapor retarders, with low perm ratings that prevent water vapor from moving through walls, making them well-suited for high-moisture spaces like master showers and steam rooms.
B. Liquid-Applied Membranes (Fluid-Applied Elastomeric Coatings)
Liquid-applied waterproofing systems rely on advanced polymer chemistry. These products are typically formulated from water-based acrylic polymers, synthetic liquid rubbers, or hybrid polyurethane dispersions. When poured out of the bucket, the material looks like thick latex paint. As the water or solvent carrier evaporates, the polymers cross-link and cure into a tough, rubbery, elastomeric skin that sticks tenaciously to clean building substrates.
Liquid shower waterproofing membranes must also earn certification under ANSI A118.10 to prove they can hold water under hydrostatic pressure and bond securely to cementitious mortars. In addition, many liquid products are evaluated under ASTM C836, an engineering standard for high-solids content elastomeric waterproofing membranes.
The major advantage of fluid systems is that they form a completely seamless, continuous layer. There are no factory seams to tape, no overlaps to manage, and no mechanical joints across the open walls. The cured liquid membrane acts like a custom-molded rubber glove wrapped around every contour, niche, bench, and pipe penetration in your shower enclosure.
3. Head-to-Head Comparison: Physical and Practical Metrics
To evaluate these systems side by side, we have to look at how their physical characteristics translate to everyday construction conditions. The table below summarizes the key engineering and practical differences:
| Performance Metric | Sheet Membranes | Liquid-Applied Membranes |
| Thickness Control | Factory-calibrated, guaranteed uniform mil thickness | Manually controlled by the installer; requires wet-film gauge monitoring |
| Seams and Joints | Requires 2-inch overlaps sealed with mortar or sealing bands | 100% seamless and monolithic across all flat surfaces |
| Complex Shapes and Niches | Labor-intensive; requires cutting, folding, and overlapping pieces | Easy application; brushed or rolled directly over complex contours |
| Curing Time Before Tiling | Zero curing delay; tile can be laid immediately after embedding | Requires waiting 2 to 24 hours between coats and before setting tile |
| Crack Isolation Ability | Moderate bridging; fleece provides light uncoupling protection | Exceptional elasticity; stretches significantly across moving shrinkage cracks |
| Material and Component Cost | Higher upfront investment for rolls, pre-formed corners, and bands | Lower raw material cost; uses standard rollers and brushes |
Thickness Control
The biggest technical difference between these two categories of shower waterproofing membranes comes down to how their final thickness is controlled. With a factory sheet, thickness is set at the manufacturing plant using precision extruders. When you roll out a sheet measuring 20 mils or 30 mils thick, you know with absolute certainty that every single square inch of your shower wall has identical waterproofing protection.
Liquid-applied shower waterproofing membranes, by contrast, rely entirely on the person holding the roller. Manufacturers specify a target dry film thickness, often between 20 and 30 mils, which typically requires applying two or three wet coats measuring roughly 15 to 20 mils each while wet. If a worker rolls the liquid on too thin to make a bucket stretch further, the cured coating may have tiny pinholes that allow moisture to seep through over time.
If they dump the product into inside corners and let it pool too thick, the liquid skin can skim over on the surface while remaining wet underneath, leading to mud-cracking, blisters, and structural failure. Applying liquid shower waterproofing membranes correctly demands diligent use of a wet-film mil gauge during application.
Seams and Joints
A seamless surface is always an advantage in water management, and liquid coatings provide that benefit across open walls. When you roll a liquid membrane across a cement backer board, you create an uninterrupted, monolithic protective skin without any physical seams.
Sheet shower waterproofing membranes, on the other hand, are sold in standard roll widths, typically between 39 inches and 48 inches wide. To cover a standard walk-in shower, you have to place multiple sheets side by side, which introduces seams every few feet.
Every single seam represents a potential leak point if it is not installed properly. Under ANSI standards and manufacturer guidelines, every joint between two sheets must overlap by at least 2 inches and be fully embedded in thinset mortar, or it must be covered by a dedicated waterproof seam tape embedded across the joint. If an installer rushes the seam work, water can sneak past the joint over time.
Complex Geometries and Shower Features
Modern custom showers rarely feature four plain, flat walls. Homeowners love built-in shampoo niches, floating shower benches, shaving footrests, half-wall pony walls, and built-in entry curbs. Handling these multi-faceted surfaces with sheet shower waterproofing membranes requires patience, sharp utility knives, and precise folding.
Every niche requires cutting separate pieces for the sill, sides, top, and back, followed by installing pre-formed inside and outside corner patches to seal each intersecting joint. All those overlapping layers can add physical bulk to the corners, which makes setting flat tile later on more difficult.
Liquid shower waterproofing membranes excel across complex architectural shapes. Because the product is fluid, an installer can take a 3-inch angled paintbrush and work the liquid smoothly into tight niche corners, around plumbing stub-outs, and over curved shower seats. The liquid follows the exact geometry of your carpentry without creating bulky overlaps that throw your tile out of plumb.
Cure Time to Tile
Time on the job site is valuable, especially when coordinating multiple trade contractors. When an installer beds sheet shower waterproofing membranes into wet mortar, the waterproofing protection is instantaneous. The sheet is already solid, cured, and completely waterproof. You do not have to wait for the mortar holding the sheet to dry before you begin setting wall tile; you can mix up a fresh batch of mortar and start tiling right away.
Liquid shower waterproofing membranes require patience. You must apply the first coat, wait for it to change color or dry to the touch (which can take anywhere from 1 to 6 hours depending on ambient temperature and humidity), apply the second coat in an opposing direction, and then wait another 12 to 24 hours for the entire membrane to cure before setting tile. If you rush the drying process and set heavy tile over a gummy, partially cured liquid membrane, the trapped moisture from the mortar can re-emulsify the coating, destroying its ability to protect your home.
Crack Isolation Performance
Every home experiences natural settling, thermal expansion, and humidity movement. Framing lumber shrinks as it dries out, and concrete foundation slabs can develop hairline stress cracks over time. When your subfloor or framing moves, that movement can telegraph through your backer board and crack the tile above.
Both sheet and liquid shower waterproofing membranes provide crack isolation benefits, but they do it in different ways. High-quality liquid membranes are remarkably elastic, often offering elongation ratings of 200% to 400%. This allows the cured rubber membrane to stretch across an in-plane hairline shrinkage crack in a concrete slab without tearing, which protects the tile from cracking.
Sheet shower waterproofing membranes act more like a localized uncoupling mat. If a backer board shifts slightly, the non-woven fleece laminated to the sheet can release stress independently from the plastic core, preventing structural movement from snapping your expensive tile surfaces.
Workmanship and Application Dynamics
A. Applying Sheet Membranes
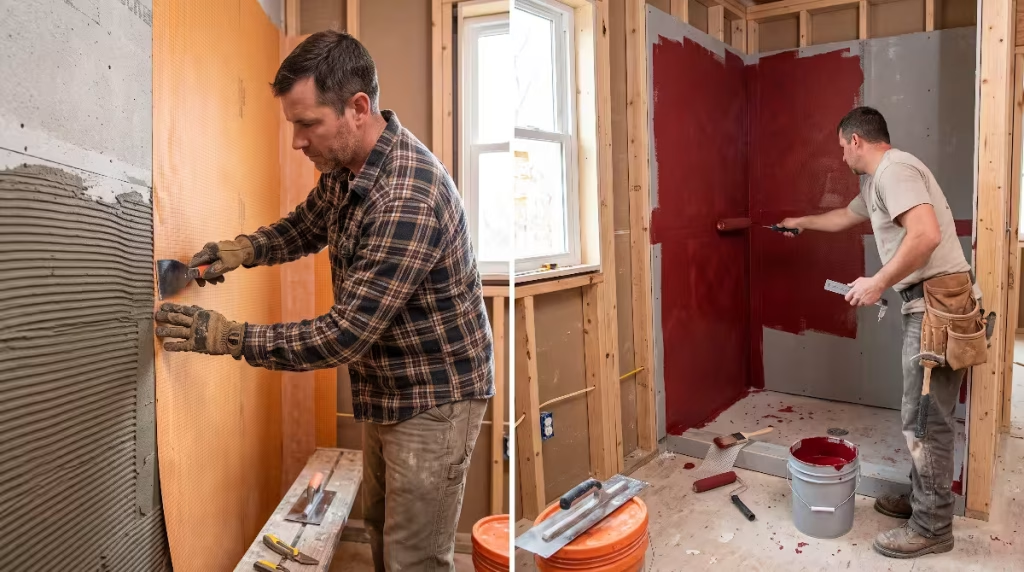
Installing sheet shower waterproofing membranes is a precise, mechanical craft that requires careful substrate preparation and consistent mortar handling. You cannot simply stick a sheet against a dry wall and expect it to hold up under real-world conditions.
Step 1: Substrate Preparation and Moisture Control
Before opening a single roll of sheet membrane, the shower walls and floor must be inspected thoroughly. The backer boards—whether cement board, fiber-cement, or coated foam panels—must be fastened tightly to the studs according to the manufacturer’s screw pattern. There should be no loose boards or bouncy panels.
Vacuum every surface thoroughly to remove framing dust, drywall debris, and grit. Dry cement backer board acts like an aggressive sponge. If you apply wet thinset mortar directly to dry cement board, the board will suck the water out of the mortar almost instantly, starving the cement of the moisture it needs to cure properly.
To prevent this, wipe down the cement backer board with a damp sponge immediately before spreading your mortar. This simple step satisfies the board’s thirst and ensures your mortar stays wet long enough to bond properly.
Step 2: Mortar Mixing, Trowel Selection, and Ridges
Mix your mortar according to the membrane manufacturer’s exact specifications. Many sheet manufacturers require an unmodified mortar meeting ANSI A118.1 standards, while others allow or recommend modified mortars meeting ANSI A118.4 or ANSI A118.15.
Follow the proper slake time: mix the mortar with clean water, let it sit untouched for 10 minutes so the chemical polymers can fully hydrate, and then give it a final quick stir without adding extra water.
Use the correct trowel size specified by the manufacturer, typically a 1/8-inch by 1/8-inch square-notch trowel or a 3/16-inch V-notch trowel. Comb the mortar onto the wall in straight, parallel lines. Combing in swirling patterns traps air pockets beneath the sheet, creating hollow zones where the membrane will not bond to the substrate.
Step 3: Embedment and Eliminating Air Pockets
Hang the cut-to-size sheet onto the freshly combed mortar bed. Starting from the center of the sheet and working toward the edges, press the membrane firmly into the mortar using a smooth plastic drywall taping blade, a wooden float, or a weighted roller.
Your goal during this step is twofold: you must fully collapse the combed mortar ridges into a continuous, flat bonding bed, and you must push out all trapped air bubbles. Pull back an occasional corner to inspect your work. You should see 100% continuous mortar coverage across the fleece on the back of the sheet with no dry spots.
Step 4: Seam Integration and Overlaps
Water must never find a path between two adjoining sheets. Every edge must overlap the neighboring sheet by a minimum of 2 inches, bedded solidly with mortar so no gaps remain. Alternatively, you can butt adjoining sheets together and cover the seam with a dedicated 5-inch-wide waterproof sealing band embedded in thinset.
Pay close attention to all inside corners, outside corners, and the transition where the vertical walls meet the sloped shower floor. Use pre-formed waterproof corner seals at these junctions. Trying to fold a flat sheet into a three-way corner where two walls meet the floor often creates bulky puckers and small holes that leak.
B. Applying Liquid Membranes
Liquid shower waterproofing membranes offer a streamlined workflow, but because they are applied freehand, the installer must work with high discipline to maintain proper thickness and coverage.
Step 1: Substrate Preparation and Joint Reinforcement
Just like sheet work, the substrate must be clean, dust-free, and structurally rigid. Liquid membranes cannot bridge large physical gaps between backer boards on their own. Inspect every wall seam, floor joint, and corner. Any joint wider than 1/8 inch should be filled with thinset mortar.
Next, reinforce every change of plane, including inside corners, outside corners, floor-to-wall transitions, and flat seams between backer boards. Embed alkali-resistant fiberglass mesh tape or the manufacturer’s woven fabric transition tape directly into a wet bed of the liquid membrane or thinset mortar. Allow this detail work to set up firmly before coating the main field of the walls.
Step 2: Managing Wet-Film Thickness
The most critical part of applying liquid shower waterproofing membranes is hitting the manufacturer’s required film thickness. You cannot eyeball this step. Professional installers use a simple, inexpensive metal tool called a wet-film mil gauge.
This gauge has small graduated teeth measuring thousandths of an inch. While the liquid coating is still wet on the wall, press the gauge straight into the film until it touches the backer board, pull it straight out, and check which teeth are coated with product.
If the manufacturer calls for a final dry film thickness of 30 mils, and the product dries down to roughly 50% of its wet volume, you must apply the liquid at a wet thickness of around 20 to 25 mils per coat across two separate applications. Applying the product too thin will leave micro-pores that leak water under continuous use.
Conversely, do not pour the liquid out and spread it an inch thick in one pass. Excessively thick liquid coatings take too long to dry and will develop shrinkage cracks across their surface as they cure, ruining the waterproof barrier.
Step 3: Cross-Hatch Application and Multi-Coat Curing
Never rely on a single coat of liquid membrane, no matter how thick it looks on the wall. Roll out the first coat using a 3/8-inch or 1/2-inch synthetic nap roller in a single direction, such as vertically from the ceiling to the floor. Let that first coat dry thoroughly. Most quality products change color as they dry, turning from a light pink to a dark red, or from light blue to dark navy, giving you a clear visual indicator that the carrier water has evaporated.
Once the initial coat is dry to the touch and tack-free, roll on the second coat in a perpendicular direction, moving horizontally across the walls. This cross-hatching method ensures that any tiny pinholes, roller track voids, or missed spots from the first pass are filled completely by the second coat.
Take a small, stiff-bristled brush and work the liquid into pipe penetrations, showerhead drops, and mixing valve cutouts. Let the final coat cure for the full duration specified by the manufacturer—typically 12 to 24 hours—before subjecting the shower to a flood test or setting tile.
Weak Points and Common Failure Mechanisms
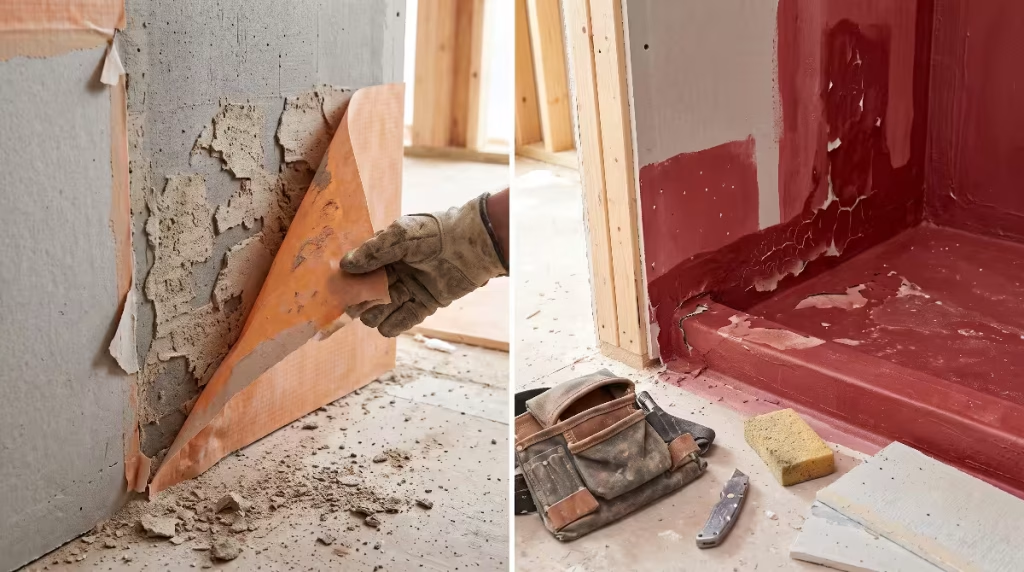
Understanding where shower waterproofing membranes commonly fail in real-world homes helps builders and homeowners prevent expensive repairs down the road. Both systems can perform reliably for decades, but they each have specific weak spots during installation.
Where Sheet Systems Typically Fail
Hollow Embedment and Mortar Bridging
The most common mistake with sheet shower waterproofing membranes is failing to achieve full, continuous mortar coverage behind the sheet. If an installer uses mortar that has begun to dry out, uses the wrong trowel size, or fails to apply firm pressure with a float, the sheet will not bond securely to the wall.
This leaves hollow air voids behind the membrane. When a heavy tile is set on top, the mortar bed can pull away from the backer board, leading to cracked grout lines, loose wall tiles, and hollow-sounding spots when tapped.
Compromised Corners and Bulky Overlaps
Achieving a clean, 90-degree bend with a thick plastic sheet requires patience. If an installer forces a sheet tightly into an inside corner without a clean fold, the sheet can pull away from the corner like a bowstring. This creates a rounded hollow space behind the waterproof layer.
When the tile installer pushes tile into that corner later, the pressure can tear the membrane or break the bond. Additionally, stacking multiple layers of sheets, pre-formed corners, and seam tapes in a small area can create a thick hump that makes it difficult to install tile flat and plumb.
Drain Flange Bonding Failures
The connection point between the sloped shower floor and the drain body is the most critical junction in the entire bathroom. Modern sheet shower waterproofing membranes require an integrated bonding-flange drain assembly. The sheet must be glued or clamped securely to this wide, flat plastic or stainless-steel flange using manufacturer-approved adhesives or mortars.
If an installer trims the sheet too short, fails to clean the drain flange before bonding, or leaves wrinkles around the drain opening, water will bypass the drain pipe entirely and soak directly into the subfloor framing below.
Where Liquid Systems Typically Fail
Inadequate Coating Thickness
The number one reason liquid shower waterproofing membranes fail in residential showers is under-application. An inexperienced installer might buy a single one-gallon bucket of liquid coating to cover an entire shower that realistically requires three or four gallons to reach the required dry film thickness.
When rolled out too thin, the dried membrane looks colorful and continuous, but it contains microscopic pinholes and thin spots. Under the constant spray of daily showers, water works its way through those microscopic gaps and into the backer board behind it.
Contaminated or Unprimed Substrates
Liquid polymers need a clean, sound surface to form a permanent bond. If cement backer board is covered in drywall dust, sawdust, or construction dirt, the liquid coating will bond to the dust layer rather than the structural board.
Once the shower is put into daily use, the coating can blister, delaminate, and peel right off the wall, carrying the tile with it. Highly porous boards can also rob the liquid coating of moisture too quickly, weakening the polymer bond.
Rushing the Cure Time and Trapping Solvents
Liquid shower waterproofing membranes cure through the evaporation of water. In unheated winter job sites or humid summer builds, drying times slow down considerably. If an installer applies a heavy second coat before the first coat has released its moisture, water gets trapped inside the polymer skin.
Worse yet, if an installer sets tile over a gummy, partially cured membrane, the wet thinset mortar seals the surface, preventing the liquid membrane from curing. Trapped moisture can soften the membrane, leading to complete adhesive failure beneath the tile.
Movement at Changes of Plane
A house is a dynamic structure that settles over time. The joint where a framed shower wall meets the subfloor or another wall is an active movement joint. If a contractor simply paints liquid membrane over an open corner without embedding woven reinforcing fabric or mesh tape, that joint will tear as the house moves. Once the thin liquid film splits, the waterproof barrier is broken, creating an open path for moisture to enter the wall framing.
Frequently Asked Questions about Shower Waterproofing Membranes
Can you use liquid membrane over a sheet membrane?
Yes, you can use liquid-applied coatings over sheet shower waterproofing membranes, but only when done with careful planning and full manufacturer compatibility. Builders often use a hybrid approach to save time and improve detailing around tricky areas.
For instance, an installer might hang sheet membrane across the large, flat shower walls to guarantee uniform thickness, and then use a compatible liquid membrane to detail complicated areas like shampoo niches, small mosaic benches, or pipe penetrations.
However, you must verify that the products are approved to work together. The liquid membrane must be chemically compatible with the fleece and plastic core of the sheet system so it bonds securely without breaking down the material.
Many major manufacturers offer integrated systems where their liquid product is officially certified to seal the seams and fastener heads of their sheet membrane. Always stick within a single manufacturer’s product family so your installation is fully backed by their system warranty.
Which is better for a steam shower: sheet or liquid?
For a residential or commercial steam shower, sheet shower waterproofing membranes are almost always the superior choice. Steam behaves much differently than liquid water. Liquid water drops are relatively large and rely on gravity to drain down the walls.
Steam, however, consists of tiny vapor molecules driven by high temperature and intense pressure. This vapor will push through materials that are otherwise completely impervious to liquid water.
To prevent steam from penetrating deep into your wall cavities, an installation requires a vapor retarder with an extremely low permeance rating, typically 0.5 perms or lower when tested under ASTM E96 Procedure E. Most standard liquid shower waterproofing membranes are designed strictly to stop liquid water and carry vapor ratings between 1.0 and 3.0 perms, which is not low enough for a dedicated steam room.
Specialized sheet systems engineered with heavy aluminum or dense polyethylene vapor-barrier cores easily achieve ratings below 0.1 perms, ensuring that pressurized steam cannot push through into your timber framing.
How long does a shower waterproofing membrane last?
When properly installed, high-performance shower waterproofing membranes should easily last the entire lifetime of your bathroom remodel, typically 25 to 40 years or more. The polymers, polyethylenes, and synthetic rubbers used in modern membranes are inorganic materials that do not rot, rust, mold, or break down on their own when protected from ultraviolet sunlight and physical damage.
The lifespan of the installation depends almost entirely on the quality of the initial workmanship. If the substrate was properly braced, the mortar mixed correctly, the seams securely bonded, and the membrane kept safe from puncture during tile setting, your waterproofing will outlast your aesthetic preference for the tile.
Most premature shower failures happen within the first two to five years of construction, and they are almost always traceable back to poor installation practices rather than material failure.
Do I need to flood test before tiling?
Yes, absolutely. A flood test is non-negotiable on any custom shower project, whether you are using sheet or liquid shower waterproofing membranes. The Tile Council of North America guidelines and international plumbing codes call for a 24-hour standing water test before a single floor tile is installed.
To perform a flood test, the contractor inserts an inflatable pneumatic test plug or mechanical expanding plug into the shower drain pipe below the membrane level. The shower pan is then filled with clean water up to the top of the curb, or roughly 2 inches deep across the floor.
Mark the exact water level on the membrane with a grease pencil. Let the water sit undisturbed for 24 hours. If the water level drops, and you have ruled out minor evaporation, you have a leak that must be found and fixed while the membrane is still exposed. Performing a flood test before tiling takes a little extra time, but it protects you from discovering a hidden leak after thousands of dollars of custom tile work have been completed.
Can thinset bond directly to both membrane types?
Yes, cementitious thinset mortar is engineered to bond directly to both sheet and liquid shower waterproofing membranes, provided you follow the manufacturer’s mortar guidelines. Sheet membranes feature a textured polyester or polypropylene fleece surface that provides a strong mechanical keyway for wet mortar to lock into.
Liquid membranes cure into a slightly textured, high-surface-energy rubber finish that allows the chemical polymers in modern mortars to form a direct bond.
However, you must use the correct classification of thinset mortar. Many sheet systems specifically require an unmodified mortar meeting ANSI A118.1 because the waterproof plastic sheet stops air and moisture from escaping. In those assemblies, unmodified mortar relies on the moisture absorbed by the tile to hydrate and cure properly.
Liquid membranes and other modern sheet systems, by contrast, often perform best with polymer-modified mortars meeting ANSI A118.4 or ANSI A118.15, which deliver superior shear-bond strength and flexural capability. Always consult the product technical data sheet to ensure your mortar matches your membrane.
Decision Matrix: Which Membrane Fits Your Project?
Choosing the right system comes down to matching the physical demands of your bathroom design with the skills and timeline of your installation team. Here is how to make the right call for your project:
Choose Sheet Membranes If:
- Guaranteed Thickness Is Your Top Priority: If you want absolute peace of mind that your waterproofing layer has a uniform thickness across every square inch of the shower, factory-calibrated sheets take human error out of the equation.
- You Are Building a Steam Shower: If your plans include an enclosed steam generator, a sloped ceiling, and heavy vapor loads, specialized sheet shower waterproofing membranes are the industry gold standard for meeting low perm ratings.
- You Have a Tight Construction Schedule: If your tile setter needs to start laying tile the exact same day the waterproofing goes in, sheets allow you to work continuously without waiting for wet coatings to dry.
- The Shower Has Long, Flat, Open Walls: For large walk-in showers with straightforward rectangular footprints, hanging wide rolls of sheet membrane is fast, efficient, and cost-effective.
Choose Liquid-Applied Membranes If:
- Your Design Features Complex Geometries: If your shower includes multiple recessed shampoo cubbies, wrap-around sitting benches, diagonal walls, shaving ledges, and custom curves, liquid coatings flow over these details without bulky folds.
- You Want a Completely Seamless Surface: If you want to eliminate overlapping field seams and minimize transition joints across your walls, liquid coatings provide a clean, monolithic rubber shield.
- Budget Optimization Is a Key Factor: If you are watching material costs closely, liquid membranes and simple reinforcement tape generally cost less per square foot than premium sheet membranes and pre-formed corner patches.
- You Are Working in Tight, Constrained Spaces: In a compact guest bathroom where wrestling with a wide roll of stiff plastic is awkward, rolling on a fluid membrane with a standard paint roller is much simpler to manage.
The Hybrid Approach
Many seasoned tile contractors choose not to limit themselves to one single system. A popular approach in custom home building combines the strengths of both technologies into a single installation.
Installers often use a heavy-duty, factory-gauged sheet membrane across the shower pan floor, up over the entry curb, and up the first 12 inches of the wall framing. This guarantees uniform thickness and water resistance across the bottom basin where standing water pressure is highest.
Then, they switch to a compatible liquid membrane on the upper walls, ceiling, and inside complex recessed niches. This hybrid method gives you the best of both worlds: robust, factory-guaranteed protection where water pools, along with easy, seamless detailing around intricate shapes higher up on the walls.
Architectural Details: Understanding Pan Construction and Drains
To fully understand how shower waterproofing membranes function, we need to look at how they connect to the shower floor and plumbing drain. A tiled shower floor faces far more moisture stress than the walls. Water hits the floor directly, pools temporarily as it flows toward the drain, and sits against the lowest joints throughout your shower.
Traditional Three-Piece Clamping Ring Drains
For decades, the standard way to build a shower floor in North America relied on a traditional three-piece clamping ring drain paired with an unbonded pan liner, such as thick PVC or CPE plastic sheeting. In this older method, an installer builds a sloped mortar pre-pan over the subfloor, lays the loose plastic sheet across the floor, folds the sheet at the corners, and clamps it tightly between the bottom and middle pieces of a heavy three-piece drain body. A final mortar bed is then packed over the plastic liner, and the tile is set on top.
While this system has served the industry for a long time, it comes with an inherent limitation: the actual waterproof liner sits two to three inches below the tile floor, hidden beneath a thick bed of porous mortar. Every time you shower, water passes through the grout and tile, saturating that entire sand-and-cement mortar bed before it finally hits the plastic liner and slowly works its way through tiny weep holes in the drain body.
If those weep holes clog with minerals, soap scum, or stray thinset, that thick bed of mortar stays damp indefinitely, leading to musty odors, efflorescence along the grout lines, and persistent moisture issues.
Modern Integrated Bonding Flange Drains
Modern shower waterproofing membranes have transformed shower floor construction through the use of integrated bonding flange drains. Instead of clamping a loose membrane beneath several inches of packed sand and cement, an integrated bonding drain features a wide, flat, rigid flange that sits flush with the top surface of the sloped floor.
Because modern sheet and liquid shower waterproofing membranes are surface-applied, they bond directly to this wide flange using mortar or specialized sealants. The tile is then set directly on top of the membrane using a thin layer of thinset mortar.
This modern assembly keeps all moisture right at the surface plane. Water cannot soak into a thick, hidden mortar bed because there is no buried mortar bed; the water hits the tile, reaches the surface membrane, and flows immediately into the drain opening.
This design dries out much faster after use, virtually eliminates the risk of damp, sour shower pans, and simplifies routine cleaning. Whether you choose sheet or liquid shower waterproofing membranes, pairing them with an integrated bonding flange drain provides a clean, modern water-management profile.
Environmental Conditions: Temperature, Humidity, and Substrate Compatibility
When planning your bathroom remodel, keep in mind that the environment inside the house during construction directly affects how shower waterproofing membranes cure and perform. Job site conditions can vary dramatically from dry winter days to hot, humid summer afternoons, and those swings impact how these materials behave.
Temperature and Air Movement
Liquid-applied membranes rely on evaporation to dry, which makes them sensitive to ambient job site temperatures. Most manufacturers state that fluid products should never be applied when room temperatures fall below 50 degrees Fahrenheit, and they cure best between 65 and 80 degrees.
If you apply a liquid membrane in an unheated house during winter, the polymers cannot coalesce properly into a continuous, tough film. The material stays soft, gummy, and weak.
On the other hand, high heat and direct summer breezes blowing through an open window can cause liquid membranes to skin over too quickly on the surface, trapping moisture down inside the film.
For sheet shower waterproofing membranes, ambient temperature mainly affects the open time of the thinset mortar used to embed the sheets. On hot, dry days, mortar spread onto a wall can skin over within minutes, preventing the non-woven fleece from locking into the cement ridges. Keeping the home at a consistent, climate-controlled temperature during installation ensures both systems perform as designed.
Substrate Compatibility and Deflection
Your waterproofing system is only as stable as the structural wall or floor beneath it. Shower waterproofing membranes are engineered to block water, not to add structural strength to a weak wall or a bouncy subfloor.
Before installing any membrane, check that the framing studs are plumb, square, and spaced no more than 16 inches on center. If you are attaching backer boards over bowed or twisted timber framing, plane down the high studs or sister new, straight studs alongside them.
Cement backer units, high-density foam boards, and gypsum-based wet-area panels all expand and contract at different rates when exposed to temperature swings. Always verify that your chosen membrane is approved for use over your specific substrate.
For example, high-density waterproof foam backer boards are popular because they are lightweight and easy to cut. While sheet membranes bond well to these panels when installed with proper mortar, some liquid membranes require specialized primers before they can bond securely to the facings of coated foam boards. Checking these technical details early prevents headaches once construction is underway.
Detailed Tooling: Equipping for Success
Using the right tools makes a tremendous difference in how smoothly your installation proceeds. Here is an overview of the tools required for both approaches:
Essential Tools for Sheet Installations
- Notched Trowels: Keep several clean trowels on hand, including 1/8-inch by 1/8-inch square-notch and 3/16-inch V-notch profiles. Clean the teeth regularly with a wire brush so your mortar ridges remain consistent.
- Embedding Tools: A stiff plastic drywall taping knife (8-inch or 10-inch) with rounded corners, a smooth wooden float, or a firm rubber hand roller. Rounded corners on your taping blade prevent you from accidentally snagging or puncturing the wet sheet as you smooth it down.
- Cutting Instruments: A heavy-duty utility knife with sharp replacement blades, along with a pair of sturdy construction shears for making clean, precise cuts around pipe penetrations, niche corners, and sloped floor transitions.
- Mixing Equipment: A variable-speed heavy-duty drill equipped with an eggbeater or spiral mortar mixing paddle, paired with clean five-gallon buckets. Mixing mortar by hand with a margin trowel rarely breaks up dry polymer clumps effectively.
Essential Tools for Liquid Installations
- Wet-Film Thickness Gauge: A graduated aluminum or stainless-steel comb gauge is essential. It lets you measure your wet coating thickness instantly so you can adjust your roller pressure before the material sets up.
- Rollers and Frames: Heavy-duty paint roller frames paired with 3/8-inch or 1/2-inch synthetic nap roller covers. Avoid cheap foam rollers, which can slide rather than roll across smooth substrates, creating thin, uneven streaks.
- Detailing Brushes: Stiff-bristled 2-inch and 3-inch angled paintbrushes for cutting into inside corners, sealing around plumbing rough-in pipes, and coating niche interiors where a roller cannot reach.
- Substrate Prepping Supplies: A clean shop vacuum with a fine-dust HEPA filter, along with large commercial grouting sponges for cleaning boards and dampening porous surfaces before application.
Cost Analysis: Long-Term Value and Budgeting
When budgeting for a custom bathroom build, it is easy to look only at the initial price tags of materials sitting on the store shelf. A five-gallon bucket of liquid coating might seem less expensive at first glance than multiple rolls of premium sheet membrane, dedicated seam bands, pre-formed corners, and specialty drain flanges.
However, a realistic cost analysis must consider both raw material costs and the labor time required to install them properly. Sheet systems carry a higher upfront material cost. You are paying for precision factory manufacturing, non-woven fleece lamination, and pre-formed corner accessories.
Yet, on the job site, a skilled installer can hang sheets, seal the seams, and start setting wall tile that very same afternoon. The labor hours are compact, and there is no waiting between coats for the material to dry.
Liquid systems have a lower initial material cost per square foot, but they demand more trips to the shower enclosure. The installer must tape and treat the joints, wait for that detail work to dry, roll the first coat, wait several hours for it to cure, roll the second coat perpendicular to the first, and then return the following day to perform the flood test and begin tiling.
In custom remodeling, where professional labor is often the largest line item on your invoice, the extra time required for multiple drying cycles can offset the savings on raw materials.
Ultimately, the cost of either waterproofing method is small when compared to the cost of fixing a leaking shower down the road. Tearing out a rotted subfloor, rebuilding structural joists, remediating mold inside wall framing, and replacing custom tile work can easily cost thousands of dollars.
Investing in high-grade shower waterproofing membranes and paying a qualified professional who takes the time to install them with care is some of the best insurance you can buy for your home.
Regional Considerations: Building in Northeast Tennessee
Building a custom home in the Tri-Cities area of Northeast Tennessee comes with its own unique climate and geographic factors. Our region experiences four distinct seasons, ranging from freezing winter nights in the mountains to warm, humid summer afternoons across our valleys. These seasonal shifts cause timber framing to expand, contract, and adjust throughout the year.
If you are building on a crawlspace foundation or a sloping mountain lot—as many of our local custom builds do—your subfloor framing responds directly to seasonal humidity swings. As framing timbers breathe, your shower assembly must be able to handle minor structural shifts without cracking.
Using high-performance shower waterproofing membranes that incorporate proven crack-isolation properties ensures that normal seasonal settling will not compromise your moisture barrier or crack your tile grout.
Additionally, our regional water supplies vary depending on whether your home is hooked up to municipal city water in Johnson City, Kingsport, or Bristol, or draws from a private mountain well. Well water in our area can carry natural minerals that gradually work their way into porous cement mortars over time.
By utilizing modern surface-applied shower waterproofing membranes and integrated bonding drains, you keep shower water right at the surface of the tile assembly, preventing mineral-laden water from sitting inside a thick, saturated mortar bed beneath your feet.
Summary and Professional Takeaways
The Golden Rule of Waterproofing
When diagnosing shower failures in the field, one reality becomes clear very quickly: showers rarely fail in the middle of a wide, flat wall. Failure almost always occurs at the critical transition points—at the drain throat, across the floor-to-wall joint, inside corner seams, and around the shower entry curb.
The most expensive roll of sheet membrane or the highest-grade bucket of liquid rubber will fail if these critical areas are treated as an afterthought. Success is 90% careful preparation and attention to detail, and only 10% the product you select.
Whichever path you choose, take your time, keep your work clean, and follow the manufacturer’s installation manual down to the millimeter. When you invest in quality shower waterproofing membranes and install them with care, you build a bathroom that stays dry, clean, and structurally sound for decades to come.
Actionable Quality Checklist for Your Project
To make sure your installation goes smoothly from start to finish, run through this practical checklist before setting your first piece of tile:
- Substrate Deflection Check: Ensure the subfloor framing is stiff enough to prevent movement. Standard ceramic tile installations require a minimum structural stiffness of L/360, while heavy natural stone demands a stiffer standard of L/720. Secure your backer boards with approved corrosion-resistant screws according to the specified fastening pattern.
- Surface Cleaning and Prep: Thoroughly vacuum all construction dust, drywall compound, and loose grit off your backer boards. If using cement board with sheet membrane mortar, wipe down the dry boards with a damp sponge immediately before spreading thinset.
- Corner and Seam Reinforcement: Confirm that every inside corner, outside corner, and backer board joint is reinforced with approved fabric, mesh tape, or pre-formed waterproof corner seals embedded in mortar or liquid coating.
- Thickness and Overlap Verification: If using sheet shower waterproofing membranes, ensure every joint maintains at least a 2-inch overlap or is covered with a 5-inch waterproof band. If using liquid membranes, use a wet-film mil gauge across multiple wall areas to confirm you hit the manufacturer’s required film thickness on every coat.
- Mandatory 24-Hour Flood Test: Plug the drain below the membrane level, fill the shower basin with water up to the top of the curb, mark the waterline with a grease pencil, and wait a full 24 hours. Confirm zero drop in the water level before mixing thinset to lay your tile.
Final Thoughts: Craftsmanship and Longevity
Building a home that stands the test of time requires making sound decisions on the details that nobody will ever see once the drywall is finished and the tile is polished. A bathroom should be an oasis of relaxation, designed to bring comfort and utility to your family for decades without giving you a moment of worry about hidden framing leaks or moisture issues.
Whether you choose the factory-calibrated reliability of bonded sheet systems or the seamless flexibility of liquid-applied coatings, the secret to a leak-free shower always comes down to integrity, patience, and precision during installation.
Take the time to evaluate your shower’s geometry, verify your substrate is flat and rigid, follow the manufacturer’s directions without skipping steps, and always run a 24-hour flood test before you lay your first tile. When you approach bathroom construction with an engineering mindset and respect for the movement of water, your home will remain sturdy, beautiful, and completely dry for generations to come.