

Natural Rock Outcrops in Design
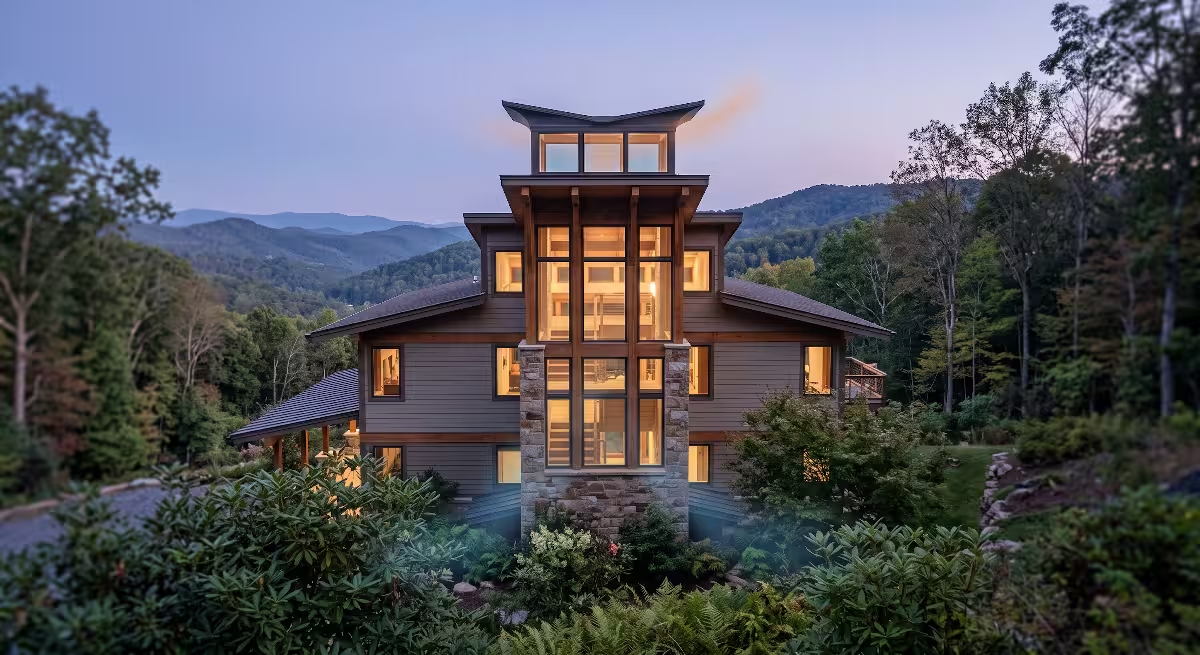
Building a home in the Appalachian highlands of East Tennessee means meeting the earth on its own terms. When you look across the ridges of Sullivan, Washington, and Carter counties, you see limestone, dolomite, and sandstone rising directly out of pasture grass and mountain slopes. For generations, traditional builders treated these stone shelves as stubborn obstacles. They brought in heavy bulldozers, hydraulic jackhammers, and dynamite charges to shatter the stone, scrape the site flat, and haul away hundreds of tons of native material. This conventional approach wastes money, ruins topsoil, and destroys the visual spirit of the land.
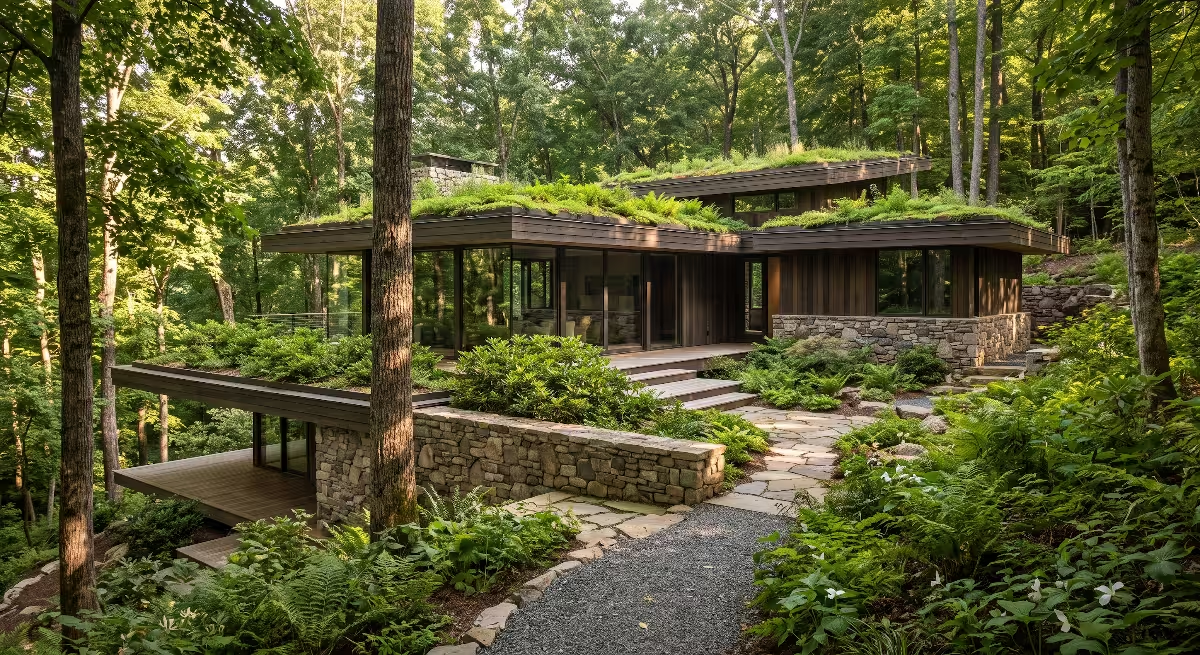
Biophilic design offers a far better path. Instead of fighting the ancient bones of the land, biophilic design invites natural rock outcrops directly into the architecture of your house. When you build around natural rock outcrops, you tie your home into the deep history of our region. The stone becomes a primary design feature, a source of free heating and cooling, and a steady anchor for native plants. Natural rock outcrops turn ordinary foundations into works of living art.
In this article we will show the exact steps, science, and building techniques required to preserve natural rock outcrops and integrate natural rock outcrops into your residential site plan.
The Lithic Context: Overview of Regional Karst, Knox Group Dolomite, Honaker Dolomite, and Sandstone Formations
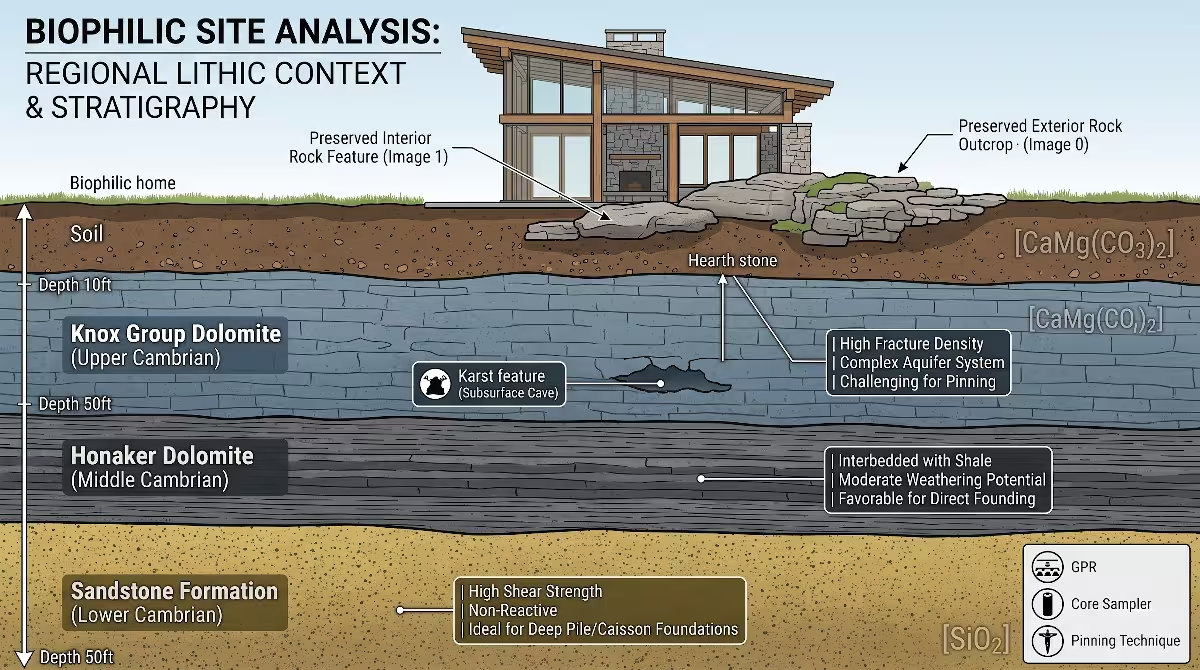
To work successfully with natural rock, you must first know what kind of stone sits under your boots. The Tri-Cities region rests within the Ridge and Valley geologic province of the Southern Appalachians. Our mountain chains and valley floors formed hundreds of millions of years ago during continental collisions. These ancient pressures folded, cracked, and tilted enormous sheets of sedimentary stone.
In our valleys and rolling knobs, you will encounter distinct formations that produce natural rock outcrops:
- The Knox Group: This massive geological formation consists of dense dolomite and limestone. Natural rock outcrops made of Knox dolomite are tough, gray, and often heavily pitted by water erosion. Because limestone and dolomite dissolve slowly in acidic rainwater, Knox formations often sit inside karst landscapes. Karst terrain features sinkholes, underground caves, and subterranean springs. When you find Knox natural rock outcrops on a home site, you are standing on very hard stone that can bear incredible structural weight, but you must look closely for hidden cavities beneath the surface.
- The Honaker Formation: Found widely across our valleys, Honaker dolomite is a darker, fine grained carbonate stone. Honaker natural rock outcrops often weather into rounded ledges, blocky steps, and deep crevices. These natural rock outcrops hold moisture in their fissures, creating sheltered pockets where ferns and moss flourish.
- Sandstone Ridges: As you climb higher toward Buffalo Mountain, Holston Mountain, or Roan Mountain, the chemistry changes. Here, carbonate rocks give way to tough, silica cemented sandstones and quartzites. Sandstone rock outcrops weather far more slowly than limestone. They feature sharp, angular fractures, gritty surface textures, and acidic soil pockets.
Each stone type behaves differently. Carbonate rock outcrops interact with groundwater and can change shape over long geologic spans. Sandstone rock outcrops remain rigid and chemical neutral, shedding water rather than absorbing it. Knowing the exact geological identity of your natural rock outcrops lets you design foundations, drainage systems, and interior details that will last for generations without cracking, shifting, or rotting.
Preservation vs. Blasting: Financial, Structural, and Ecological Costs of Conventional Excavation
When an excavation contractor arrives at a site covered in natural rock outcrops, their first instinct is often to call in a blasting crew or mount a hydraulic ram on a thirty ton excavator. Blasting and breaking natural rock outcrops costs an enormous amount of money. In East Tennessee, removing heavy ledge stone through hydraulic hammering or explosive blasting can add $20,000 to $60,000 or more to an excavation budget. Every hour a heavy breaker pounds on stubborn natural rock outcrops burns expensive diesel fuel, wears out expensive steel bits, and shakes the ground for hundreds of feet around.
The financial cost is only the first penalty. Blasting natural rock outcrops introduces severe structural risks:
- Shockwaves shatter surrounding stone. The shock from high explosives travels deep into the bedrock. It opens hidden fractures inside natural rock outcrops that you planned to leave untouched. These artificial fractures create new, unpredictable pathways for groundwater to flow directly toward your future basement or crawl space.
- Dynamic shaking destabilizes nearby soil. When you blast natural rock outcrops on a steep mountain slope, the shock can loosen nearby colluvial soils, triggering future slope slip and foundation settlement.
- Heavy machinery destroys site ecology. The heavy equipment required to haul away broken natural rock outcrops compacts the forest floor. Soil compaction chokes the roots of mature oak, hickory, and tulip poplar trees, causing them to decline and die five years after construction ends.
Preserving natural rock outcrops completely eliminates these expenses and damages. When you leave rock outcrops intact, you keep the original strength of the earth. The money you save by skipping mass excavation and rock hauling stays in your building budget. You can invest those funds into high performance windows, timber frames, custom masonry ties, and premium insulation systems.
Thermal Mass Dynamics: Utilizing Exposed Rock for Passive Solar Heat Sink Capacity and Microclimate Moderation
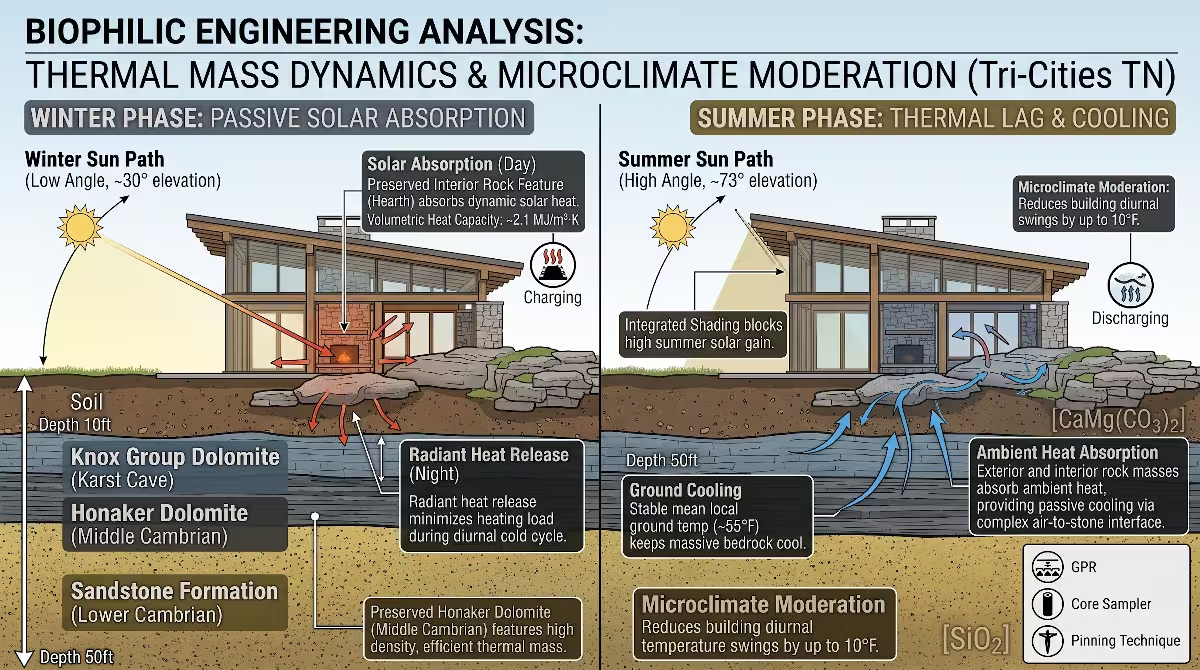
One of the most practical engineering advantages of building against natural rock outcrops is their incredible thermal capacity. Stone is dense. Dense materials possess high volumetric heat capacity, meaning they absorb, store, and slowly release huge amounts of thermal energy.
In our region, winter nights can drop well below freezing, while sunny summer afternoons bring intense heat and humidity. Natural rock outcrops act as steady thermal batteries. During winter months, low angle sunlight streams through south facing glass and strikes dark natural rock outcrops located along an exterior patio or extending inside a sunroom. The natural rock outcrops absorb this radiant heat all day without heating up too fast. As the sun sets and the outside air temperature plunges, these natural rock outcrops radiate their stored warmth back into the living space. This passive solar cycle keeps room temperatures steady and lowers heating bills.
During hot summer months, the opposite benefit occurs. The sun sits high overhead, where properly sized roof overhangs shade the natural rock outcrops. Because natural rock outcrops remain connected to deep bedrock, their core temperature stays close to the local annual mean ground temperature, which hovers around 55 degrees Fahrenheit in our valleys. The natural rock outcrops act as natural heat sinks, soaking up ambient heat from indoor air and providing passive cooling.
On the exterior of your home, large natural rock outcrops moderate local microclimates:
- Heat storage in cold winds: Massive natural rock outcrops on the northwest side of a home block biting winter winds while storing daytime ambient heat.
- Frost protection: The slow release of warmth from south facing natural rock outcrops creates a protected micro-zone where frost sensitive plants can survive longer into autumn.
- Humidity balancing: Pitted limestone natural rock outcrops absorb minor surface moisture during heavy summer humidity and release it slowly when dry air moves across the site.
Non-Destructive Subsurface Mapping: Ground Penetrating Radar and Core Sampling Protocols
You cannot design a house around natural rock outcrops based on surface appearances alone. What looks like a small, flat stone shelf might be the top of a twenty foot subterranean cliff. Conversely, what looks like massive natural rock outcrops might turn out to be loose floaters or boulders sitting on top of soft clay. Before drawing structural plans, you must conduct non-destructive subsurface mapping.
The most effective tool for mapping natural rock outcrops is Ground Penetrating Radar, known as GPR. A geotechnical technician rolls a radar antenna across your building footprint. The unit sends high frequency radio waves down into the soil. When these waves hit the boundary between soft clay and hard stone, they bounce back to the surface. A receiver records the travel time and plots a clean cross section of the subterranean profile of your natural rock outcrops.
GPR mapping reveals critical hidden data:
- Subsurface profile: It shows the true three dimensional shape and slope of buried natural rock outcrops.
- Void detection: GPR detects air pockets, clay filled voids, or water channels lurking inside or under carbonate natural rock outcrops.
- Bedding planes: It identifies the strike and dip angles of rock layers, showing whether the natural rock outcrops tilt toward or away from your foundation.
Along with GPR, targeted core drilling confirms rock strength. A drilling rig extracts solid cylinders of stone from select spots across the natural rock outcrops. A laboratory tests these cores for unconfined compressive strength and assigns a Rock Quality Designation score. High quality natural rock outcrops in our area easily show compressive strengths exceeding 10,000 pounds per square inch. That is more than double the strength of standard poured concrete. These tests give your structural engineer the hard data needed to design foundation footings that rest directly on natural rock outcrops with total confidence.
Hydrogeology and Moisture Mitigation: Addressing Hydrostatic Pressure, Perched Water Tables, and Freeze-Thaw Cycles
Water and rock are constant companions. When you build near natural rock outcrops, understanding groundwater behavior is vital. Stone does not absorb water like a sponge, but water flows freely across its surface and travels through its internal fissures. If you make a mistake with hydrogeological planning, natural rock outcrops will funnel gallons of groundwater straight into your building envelope.
Three main moisture challenges exist around natural rock outcrops:
- Perched water tables: Rainwater filters down through loose surface soil until it strikes impervious natural rock outcrops. The water cannot pass quickly through the dense rock, so it gathers on top of the stone shelf, forming a perched water table. This shallow water flows along the slope of the natural rock outcrops, heading downhill toward whatever sits in its path.
- Hydrostatic pressure: When water pools against a foundation wall built tight to natural rock outcrops, it builds up tremendous physical pressure. This hydrostatic force pushes liquid water through hairline concrete cracks, masonry cold joints, and around plumbing pipes.
- Freeze-thaw cycles: In East Tennessee, winter temperatures regularly climb above freezing during the day and drop below freezing at night. Water trapped in small gaps between natural rock outcrops and foundation concrete expands by nine percent as it turns to ice. Over several seasons, this expanding ice can crack concrete walls, pop mortar joints, and shift framing members.
To solve these issues, you must intercept water before it touches your home. Always install a gravity cut off trench uphill from any natural rock outcrops that slope toward your foundation. Dig this trench down to solid rock, line it with heavy non woven geotextile fabric, and bed a perforated drainage pipe in washed crushed stone. This perimeter interceptor captures surface runoff and subsurface perched water, routing it safely around the natural rock outcrops and discharging it downhill into daylight.
Where foundations make direct contact with natural rock outcrops, install heavy duty dimple drainage boards and bentonite waterstop strips. Bentonite clay expands when wet, creating a tight, impermeable gasket between your poured concrete footing and the rough face of the natural rock outcrops.
Stepped Footings and Pinning: Pinning Reinforced Concrete Stem Walls to Bedrock Using Epoxied Rebar Anchors
Standard flat foundation trenches make no sense on sites with rolling natural rock outcrops. Digging a continuous flat trench requires breaking the very stone you want to celebrate. Instead, smart biophilic design uses stepped footings and mechanical pinning to tie the building directly to the natural rock outcrops.
A stepped footing follows the natural elevation profile of the stone. Where the natural rock outcrops rise two feet, the concrete footing steps up two feet. Where the stone drops, the footing steps down. This keeps the structural weight centered over the strongest areas of the natural rock outcrops without requiring deep excavation cuts.
The critical connection between concrete and stone relies on epoxied rebar pinning:
- Step 1: Cleaning the stone. The crew washes all loose dirt, clay, weathered shale, and debris off the natural rock outcrops using high pressure water and stiff wire brushes. The stone must be completely clean to allow a strong chemical and mechanical bond.
- Step 2: Drilling anchor holes. Using heavy rotary hammer drills with carbide or diamond bits, workers drill vertical holes directly into the solid natural rock outcrops. These holes typically run three quarters of an inch to one inch in diameter, extending twelve to twenty four inches deep into sound stone.
- Step 3: Evacuating dust. The team blows compressed air into each hole and scrubs the interior walls with wire brushes to remove all stone dust. If dust remains inside the hole, the structural epoxy will stick to the dust rather than the natural rock outcrops.
- Step 4: Injecting structural epoxy. A two part, high strength structural epoxy goes into the back of each clean hole.
- Step 5: Setting rebar dowels. Grade 60 steel rebar dowels are inserted with a slow twisting motion, forcing epoxy into every crevice of the natural rock outcrops. Once the epoxy cures, these steel pins possess tensile capacities exceeding 15,000 pounds each.
- Step 6: Pouring the stem wall. Formwork is built directly over the natural rock outcrops, boxing in the protruding rebar dowels. Concrete is poured into the forms, locking the stem wall and the natural rock outcrops together into a single, unshakeable structural assembly.
By pinning your foundation to natural rock outcrops, your home gains incredible resistance against high winds, earthquakes, and soil erosion. The house does not merely sit on top of the ground; it becomes a physical extension of the bedrock.
Interior vs. Exterior Envelopes: Architectural Details for Allowing Rock Faces to Breach Building Thermal Envelopes
Few design choices create a stronger biophilic impact than allowing exterior natural rock outcrops to pass directly through an exterior wall and emerge inside your living space. When a visitor walks into a great room and sees the same limestone shelf continuing from the wild outdoor patio straight into the interior hearth room, the boundary between inside shelter and outside nature vanishes.
However, carrying natural rock outcrops through a building envelope introduces a severe building science hazard: thermal bridging. Because natural rock outcrops conduct heat efficiently, an uninsulated rock shelf acts as an open highway for thermal energy. In winter, interior heat moves rapidly through the stone to the freezing outdoor air. The stone inside your room becomes icy cold. When warm, humid indoor air touches this cold rock, moisture condenses on the stone face. Within weeks, you face water damage, peeling finishes, and toxic mold growth.
To bring natural rock outcrops through the wall safely, you must design a discontinuous thermal break:
- Saw cutting an isolation kerf: Structural masons use diamond saws to cut a clean, continuous slot across the natural rock outcrops right along the exterior wall plane. This slot separates the exterior section of stone from the interior section, physically breaking the thermal bridge.
- Installing rigid insulation: The saw cut slot is filled with high density closed cell foam insulation or aerogel insulation strips. Aerogel provides extremely high insulating values in very thin gaps, preventing cold exterior natural rock outcrops from chilling interior living spaces.
- Flexible elastomeric gaskets: Because natural rock outcrops expand and contract at different rates than timber and drywall, you must never bond plaster or siding tightly to the rock face. Instead, leave a half inch expansion gap around the profile of the natural rock outcrops. Fill this joint with a closed cell foam backer rod and seal it with high grade polyether or silicone elastomeric sealant. This joint allows your house framing to move naturally with seasonal humidity changes while maintaining an airtight, watertight seal against the rough natural rock outcrops.
Interior Bedrock Features: Managing Radon Abatement, Vapor Barriers, and Passive Subterranean Ventilation
Bringing natural rock outcrops inside a living space requires close attention to indoor air quality. In East Tennessee, the earth contains naturally occurring trace amounts of uranium. As uranium breaks down over time, it produces radon gas. Radon is an invisible, odorless, radioactive gas that seeps out of bedrock fissures and soil pores. Washington, Sullivan, and Carter counties fall into EPA Radon Zone 1, where average indoor radon levels can easily exceed the action threshold of 4.0 picocuries per liter.
Exposed interior natural rock outcrops present open escape routes for radon gas and subterranean water vapor. You cannot simply leave raw bedrock exposed in a finished room without a comprehensive air quality control plan.
Implement these three critical systems:
- Perimeter sub-slab suction loops: Beneath the concrete floor slabs surrounding your interior natural rock outcrops, lay perforated gas collection pipes embedded in clean, washed gravel. Route these pipes to a three or four inch PVC vent stack that runs up through the roof. An inline fan mounted in the attic creates continuous negative air pressure under the slab. This active soil depressurization system intercepts radon gas moving up along the sides of the natural rock outcrops and vents it harmlessly into the open sky.
- Subterranean perimeter chase troughs: Around the exact base where interior natural rock outcrops rise through the floor, form a shallow, recessed concrete trough. Line this trough with a flexible, continuous EPDM membrane tied into the under slab vapor barrier. Cover the trough with decorative river stone or removable steel grates. Any minor water vapor or moisture that condenses on the lower edges of the natural rock outcrops drains down into this trough and leaves through a trapped gravity drain pipe.
- Penetrating siloxane sealers: Raw natural rock outcrops can shed stone dust and release small amounts of surface moisture into the air. Treat interior rock surfaces with a deep penetrating, vapor permeable silane-siloxane sealer. These sealers soak into the microscopic pores of the natural rock outcrops, binding loose particles and repelling liquid water without trapping moisture behind an artificial, shiny plastic film. The stone retains its natural matte look and can still breathe safely.
Indoor-Outdoor Continuity: Aligning Sightlines, Floor Thresholds, and Exterior Terraces with Natural Strata
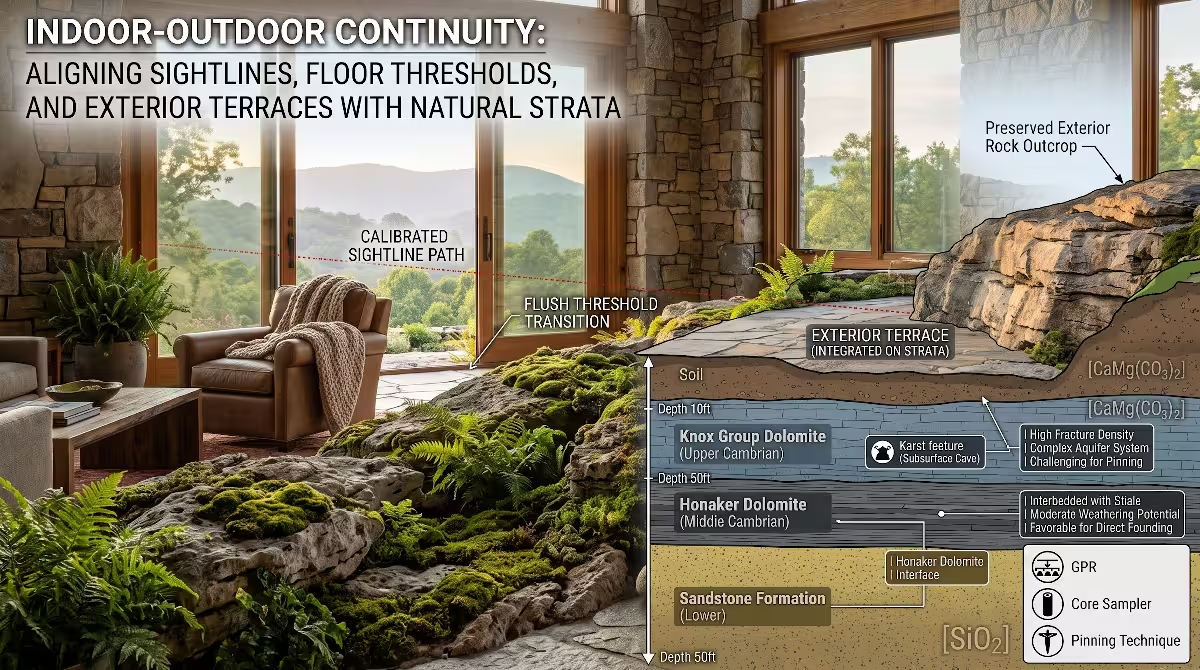
Biophilic design works best when every architectural choice reinforces human connections to the natural world. Natural rock outcrops provide the ideal anchor for establishing indoor-outdoor continuity. Our brains respond positively to patterns that reflect natural order, geological permanence, and raw textures.
To achieve harmony with natural rock outcrops, align your interior floor plans with the natural strike and dip of the stone strata:
- Strata alignment: Look closely at the layers running through your natural rock outcrops. If the rock beds tilt fifteen degrees toward the southeast, orient your main exterior walls, timber ridge beams, or hallway sightlines parallel to that geological angle. This subtle alignment makes the house feel like it grew naturally out of the stone ridges.
- Flush floor thresholds: Set your finished interior floor heights so they match the natural shelves of exterior natural rock outcrops. When you install large sliding glass doors or lift-and-slide glass walls with flush, recessed tracks, the interior wood or stone flooring appears to merge directly into the natural rock outcrops on the terrace outside. The visual barrier disappears completely.
- Prospect and refuge framing: Biophilic design emphasizes the concepts of prospect and refuge. Prospect refers to wide, open views across landscapes, while refuge refers to feeling safe, protected, and sheltered from behind. You can position your home so massive natural rock outcrops sit directly behind bedrooms, reading nooks, or study areas, providing a strong feeling of solid refuge. Meanwhile, living areas and dining spaces can open outward, looking across lower natural rock outcrops toward distant mountain ridges.
When indoor materials echo nearby natural rock outcrops, the whole home feels grounded. Use stone for fireplace surrounds, hearths, and landscape steps that matches the mineral family and color profile of the natural rock outcrops outside your windows.
Calcareous vs. Acidic Flora: Identifying Lithophytic Plant Communities Native to East Tennessee Rock Outcrops
Natural rock outcrops are living ecological islands. In nature, stone ledges provide rare, specialized environments where unique lithophytes, plants that grow directly on or within rock fissures, thrive without deep soil. When you preserve natural rock outcrops on your building site, you protect fragile botanical communities that took centuries to establish.
The plant species that live on your natural rock outcrops depend entirely on the stone chemistry:
Plants on Calcareous (Alkaline) Natural Rock Outcrops
Limestone and dolomite natural rock outcrops create alkaline growing conditions with high calcium and magnesium levels. These calcareous natural rock outcrops host a specialized group of native plants:
- Walking Fern (Asplenium rhizophyllum): A delicate, evergreen fern that spreads across shaded, mossy limestone natural rock outcrops. The tips of its long, arching fronds bend down to touch the damp stone, sending out new roots and creating young clones.
- Wild Stonecrop (Sedum ternatum): A native succulent that blankets shallow soil depressions across moist natural rock outcrops. It produces small, starry white blossoms in spring and stays bright green through hot summers and chilly winters.
- Purple Cliffbrake (Pellaea atropurpurea): A tough, blue-green fern that roots deeply into dry, sunny vertical cracks across limestone natural rock outcrops. Its dark purple-black stems contrast against light gray dolomite.
- Early Saxifrage (Micranthes virginiensis): Rising out of rock fissures in early spring, this small perennial opens clusters of white flowers long before surrounding trees produce leaves.
Plants on Acidic (Siliceous) Natural Rock Outcrops
Sandstone and quartzite rocks produce acidic, nutrient poor growing conditions. These rough surfaces support different native specialists:
- Mountain Stonecrop (Sedum glaucophyllum): A low creeping succulent that thrives in acidic grit on shaded sandstone natural rock outcrops.
- Rock Polypody (Polypodium virginianum): An evergreen fern that forms dense mats across boulder tops and acidic natural rock outcrops throughout the Blue Ridge foothills.
- Mountain Spleenwort (Asplenium montanum): A small, leathery fern that grows exclusively in sheltered crevices on acidic natural rock outcrops and cliffs.
- Reindeer Lichens (Cladonia species): Branching lichens that cover bare sandstone natural rock outcrops, turning pale gray-green when wet and crunchy silver when dry.
Never strip these native plants away during construction. Protect the delicate communities clinging to your natural rock outcrops by setting up protective snow fences during building activity. A single careless scrape from an excavator bucket can destroy a patch of moss and lichens on natural rock outcrops that required two hundred years to grow.
Soil Depressions and Pocket Planting: Designing Custom Moisture Retention Pockets and Micro-Swales
Where natural rock meets outdoor patios, entry walks, and garden spaces, you can enhance their visual charm through pocket planting. Over thousands of years, weathering creates natural hollows, depressions, and grooves across the faces of natural rock outcrops. In the wild, wind blown organic matter and rock dust collect in these hollows, forming shallow, fertile soil pockets where native plants root.
You can replicate this process around your home:
- Sculpting soil pockets: In natural hollows across your natural rock outcrops, blend a light, well-draining soil mix consisting of thirty percent composted leaf mold, forty percent coarse sand or crushed expanded shale, and thirty percent local loam. This mix holds just enough moisture while allowing extra rainwater to drain away rapidly, preventing plant roots from rotting during wet spring rains.
- Building micro-swales: Around the upper perimeter of sloping natural rock outcrops, shape subtle earthen berms or small stone swales. These micro-swales intercept surface rainwater, slow its downhill rush, and guide it gently into the root zones of your pocket plantings.
- Planting in rock fissures: Look for vertical cracks in the natural rock outcrops that run at least six inches deep. Pack these fissures with damp, gritty compost and tuck in rooted plugs of native ferns, stonecrops, or alumroot (Heuchera americana). The deep roots will follow the crack down into the stone, where groundwater stays cool even during summer dry spells.
- Selecting drought hardy companions: For exposed, sunny natural rock outcrops, choose native perennials adapted to dry, shallow soils, such as Eastern Prickly Pear (Opuntia humifusa), Threadleaf Coreopsis (Coreopsis verticillata), and Wild Columbine (Aquilegia canadensis). These tough species thrive in four inches of soil on baking summer stone.
By carefully planting around natural rock outcrops, you soften hard stone edges and blend your new home into its mountain setting.
Living Geology: Mitigating Disruption to Native Mycorrhizal Networks, Lichens, and Local Reptile Micro-Habitats
Natural rock outcrops are not dead stone. They serve as the structural framework for complex biological networks that support entire micro-ecosystems. When planning your site, treat your natural rock as living geology that deserves protection and respect.
Consider the biological systems anchored by natural rock outcrops:
- Mycorrhizal networks: In native Appalachian woodlands, underground fungal networks link tree roots together, sharing nutrients, water, and biochemical signals. Massive natural rock outcrops act as stable anchors for these fungal threads. The protected soil beneath the edges of natural rock outcrops remains undisturbed for centuries, harboring old growth mycorrhizal fungi that help nearby oaks and pines survive droughts. If you blast or rip up the outcrops, you tear these vital fungal webs apart.
- Crustose and foliose lichens: The colorful crusts covering undisturbed natural rock outcrops are living partnerships between fungi and algae. Lichens produce weak organic acids that break down rock minerals into bioavailable nutrients. They also fix atmospheric nitrogen, feeding nearby soil. Lichens grow slowly, often less than one millimeter per year. Once destroyed by construction traffic or chemical washings, lichens on natural rock outcrops take decades to return.
- Reptile and amphibian micro-habitats: In our highlands, rock outcrops provide thermal shelter for native wildlife. Eastern fence lizards and five-lined skinks bask on sunny natural rock outcrops to raise their body temperature, slipping into rock crevices when predators appear. Rare green salamanders live inside deep, damp, shaded fissures in sandstone natural rock outcrops. Timber rattlesnakes and copperheads sometimes use deep rock crevices for winter dens, though common residential building sites are more likely to host harmless garter snakes and ringneck snakes that control garden pests.
To protect this living geology:
- Define strict non-disturbance zones: Mark a fifteen foot protection boundary around all natural rock outcrops outside the immediate building footprint. Forbid contractors from parking trucks, storing building materials, or cleaning tools inside this zone.
- Ban chemical washdowns: Never use harsh acids, bleach, or pressure washers to clean moss and lichens off natural rock outcrops. If a stone face needs light cleaning after construction, use clear, non-chlorinated water and soft nylon bristle brushes.
- Preserve natural rock crevices: When building walls or terraces near natural rock, leave deep horizontal crevices open. These gaps allow harmless native lizards, toads, and beneficial insects to keep using their ancestral homes.
Can You Build a House Directly on Bedrock or Rock Outcrops?
Homeowners often ask whether building a home directly on solid bedrock or natural rock outcrops is safe and practical. The answer is an absolute yes. In fact, resting a foundation directly on sound bedrock provides the most stable structural base possible.
Unlike soft clay soils that swell when wet and shrink during droughts, solid natural rock outcrops will never settle, wash out, or sink. Building on stone eliminates the common foundation settlement cracks that plague standard homes built on loose backfill.
To build safely on bedrock:
- Assess rock soundness: An engineer must confirm the rocks are part of solid bedrock, not large surface boulders resting on top of unstable soil.
- Anchor with steel pins: The foundation concrete must be mechanically tied to the natural rock outcrops using high strength rebar pins epoxied into drilled holes. This prevents the building from sliding sideways during severe windstorms or seismic activity.
- Match foundation types: Builders use stepped stem walls, pinned grade beams, or concrete piers that rest on custom leveled pads poured directly over the natural rock outcrops.
By building directly on bedrock, you gain unmatched structural permanence while cutting out the heavy cost of digging deep, continuous foundation trenches into the earth.
How Do You Prevent Water Seepage When Building into Natural Rock?
Preventing water intrusion is the single most important technical challenge when building into or against natural rock outcrops. Because stone cannot absorb the large volumes of water dumped by Appalachian summer storms, water sheets across rock faces and looks for any gap to enter your home.
Prevent water seepage using this four layer defense system:
- Surface slope grading: Shape the ground around your home so topsoil slopes away from the foundation at a minimum pitch of six inches over the first ten feet. Never allow surface rainwater to flow downhill toward the contact zone between your foundation and the natural rock outcrops.
- Perimeter cut-off gravity trenches: Dig a deep drainage trench uphill from the rock. Extend the trench down to solid rock, lay a four inch perforated drain pipe wrapped in filter fabric, and fill the trench with clean, washed river gravel. This cut off trench captures subsurface water running along the rock surface and routes it around the house.
- Swelling bentonite waterstops: Where your poured concrete footing meets the natural rock outcrops, install a continuous strip of bentonite waterstop. When moisture touches bentonite, the natural sodium clay expands up to fifteen times its dry volume, packing tightly into every micro-fissure in the natural rock outcrops and forming a waterproof seal.
- Dimple board drainage mats: Fasten heavy duty, dimpled polyethylene drainage mats against the exterior face of foundation walls that touch natural rock. The dimples create a permanent air gap that relieves hydrostatic pressure, allowing any trapped water to trickle down into the footing drain pipes rather than pushing through the concrete.
Does Building Around a Rock Outcrop Increase Construction Costs?
Many property owners assume that designing a home around natural rock outcrops will automatically drive up their total construction costs. In reality, the financial outcome depends entirely on your design strategy.
If you attempt to force a standard, off-the-shelf rectangular house plan onto a site covered in natural rock outcrops, costs will rise. You will spend tens of thousands of dollars fighting the stone through blasting, rock hammering, hauling fees, and massive concrete retaining walls.
However, when you embrace biophilic site planning and work with the natural rock outcrops, total site development costs often end up equal to or lower than conventional building:
- Excavation savings: Avoiding rock blasting and heavy hydraulic hammering typically saves between $15,000 and $45,000 on site preparation.
- Foundation savings: Resting stepped footings and pinned concrete piers directly on sound natural rock reduces the total volume of concrete and structural fill dirt required for the foundation.
- Design premiums: Custom architectural detailing, non-destructive site surveying, and precision flashing around natural rock outcrops do require a modest design premium. You may spend an extra $4,000 to $8,000 on advanced geotechnical engineering and specialized masons.
When you subtract the large excavation savings from the modest design fees, biophilic integration of natural rock outcrops frequently yields a net savings on total sitework. Even better, your finished home gains high market value and architectural character that no flat, bulldoze cleared lot can match.
How Do You Seal an Interior Rock Wall to Prevent Dust and Moisture?
Exposing natural rock outcrops inside a bedroom, great room, or wine cellar creates an incredible architectural focal point. However, homeowners often worry about stone dust shedding onto furniture and damp air causing moisture problems.
Sealing an interior rock wall requires the correct chemical chemistry. You must never coat interior natural rock outcrops with shiny polyurethane, acrylic paints, or standard clear coats. These film forming coatings seal the stone surface tightly, trapping subterranean moisture behind an airtight plastic film. Within a year or two, moisture pressure causes the film to turn milky, bubble up, and peel off in ugly patches, leaving chalky mineral deposits underneath.
Follow this process to seal interior natural rock outcrops correctly:
- Step 1: Clean with water and nylon brushes. Wash away all loose soil, dried mud, and efflorescence using clean water and stiff nylon brushes. Avoid wire brushes, which can leave tiny steel fragments that rust and stain the stone. Let the rock dry completely for several days.
- Step 2: Apply a penetrating silane-siloxane sealer. Choose a premium, water based, penetrating silane-siloxane sealer designed for dense masonry and stone. These sealers do not form a surface film. Instead, their tiny molecules penetrate deeply into the microscopic pores of the natural rock outcrops, chemically bonding with the silica and calcium inside the stone.
- Step 3: Enjoy breathable protection. The penetrating sealer creates a hydrophobic barrier that stops dusting and repels liquid moisture while leaving the microscopic pores open. This allows water vapor to pass through safely without building up hydrostatic pressure behind the surface. The treated rocks keep their natural texture, depth, and matte appearance without ever peeling or flaking.
Phase 1: High-Density Topographic and LiDAR Surveying
The successful integration of an outcrop into an architectural plan begins with extreme precision. You cannot design a custom biophilic foundation using standard twenty foot contour survey maps. Standard surveys overlook small elevation shifts, rock angles, and surface fissures.
Phase 1 requires high density topographic and LiDAR surveying:
- Drone photogrammetry and terrestrial LiDAR: A surveyor flies a high resolution camera drone over the building envelope or sets up a ground based terrestrial LiDAR scanner on several sides of the natural rock outcrops. The LiDAR unit shoots hundreds of thousands of laser pulses per second at the ground, recording the exact spatial position of every square inch of exposed stone.
- 3D point cloud creation: The survey software processes these laser reflections into a dense 3D point cloud. This digital model maps the shape, vertical height, slopes, and fissures of the natural rock outcrops with accuracy down to a fraction of an inch.
- CAD integration: The 3D model of the natural rock outcrops imports directly into building information modeling software used by your architect and structural engineer. Designers can rotate the digital building model in three dimensions, placing walls, floor joists, and glass openings directly over the digital natural rock outcrops with total confidence before a single spade of dirt is turned.
This detailed survey catches physical conflicts early, ensuring that foundation forms fit the irregular surfaces of your natural rock outcrops on the very first try.
Phase 2: Sun Path and Wind Vector Analysis
Once you possess an accurate 3D model of your natural rock outcrops, you must evaluate how environmental forces interact with the site throughout the seasons. Sun angles, prevailing winds, and shadow patterns change dramatically across mountain terrain.
Conduct these two critical analyses:
Sun Path Analysis
Plot the sun path across your site for the summer solstice, winter solstice, and spring and autumn equinoxes:
- Winter solar gain: In December, the sun rises low in the southern sky, reaching an altitude of only about thirty degrees at midday in our region. Position south facing living spaces so low winter sunlight hits large, dark natural rock. The stone will absorb this free solar energy and heat your home naturally.
- Summer solar shading: In June, the midday sun climbs high, reaching an altitude of seventy-three degrees. Calculate the depth of your roof eaves, trellis systems, and exterior pergolas so high summer sun cannot strike the natural rock outcrops directly. Keeping the natural rock in deep shade prevents them from overheating your home during hot summer days.
Wind Vector Analysis
East Tennessee experiences two primary wind patterns. Harsh, cold winter winds blow out of the west and northwest, while warm, moisture laden summer breezes drift up from the southwest:
- Winter windbreaks: Massive natural rock outcrops sitting on the northwest side of your building pad act as natural wind deflectors. Siting your home just downhill from these natural rock outcrops cuts wind chill against your siding and reduces home heat loss.
- Summer ventilation: Keep sightlines open to the southwest so gentle summer breezes can flow over low natural rock outcrops, cooling down outdoor seating patios and entering open windows for passive cross ventilation.
Phase 3: Structural Detailing and Flashings
Connecting human built structures to irregular, living geology demands careful structural detailing. Wood and steel move constantly, expanding and contracting with seasonal humidity and temperature shifts. In contrast, natural rock remains rigid and still. If you fasten framing lumber directly to raw stone without proper joints, structural stresses will crack your trim, break your window seals, and let water into your walls.
Phase 3 establishes reliable structural details:
- Non-rigid, multi-stage counter flashings: Where an exterior roof or siding wall terminates against natural rock outcrops, use a two piece counter flashing system. A mason cuts a one inch deep horizontal slot, or reglet, into the face of the outcrop using a diamond wheel. The upper copper or lead-coated copper flashing bends into this reglet slot and locks in place with lead wedges and polyurethane sealant. A separate base flashing attaches to the roof or wall and slips up underneath the counter flashing. This allows your building framing to expand, shrink, and settle freely without pulling the flashing away from the natural rock outcrops.
- Custom timber scribing: When timber posts or heavy wood beams sit directly on natural rock, master carpenters use precision scribing tools. The carpenter traces the exact, bumpy profile of the natural rock outcrops onto the bottom of the wood post, then carves the wood away with gouges and planes. The carved timber fits over the natural rock outcrops like a hand into a glove.
- Neoprene isolation pads: Always place a durable neoprene or EPDM rubber bearing pad between structural wood members and natural rock. This rubber pad prevents wood from soaking up ground moisture out of the stone, stopping wood rot and termite access while dampening acoustic vibrations.
Phase 4: Site Restoration and Botanical Reintegration
The final phase of biophilic site planning brings the land back to full health. Once foundation work, framing, and roofing are complete, you must repair any ground disturbance and restore the native plant communities around the outcrop.
Execute these ecological restoration steps:
- Remove construction protection carefully: Take down the protective fencing surrounding your natural rock outcrops. Inspect the stone surfaces for any accidental concrete splashes or mortar drops. Chip mortar away gently using wooden chisels, washing the spots with plain water to protect native lichens.
- Re-establish native ground covers: Construction foot traffic strips away shallow forest topsoil. Restore disturbed edges around natural rock outcrops by spreading two inches of composted native leaf mulch. Seed or plant native, drought hardy ground covers like Pennsylvania Sedge (Carex pensylvanica), Wild Stonecrop (Sedum ternatum), and Partridgeberry (Mitchella repens). These plants knit the soil together and stop erosion into underlying karst fractures.
- Install rain gardens below rock runoff zones: Smooth natural rock outcrops shed rainwater rapidly. Where runoff sheets off a large rock shelf, dig a shallow, bowl-shaped rain garden filled with sandy topsoil and native river stone. Plant water loving native species such as Cardinal Flower (Lobelia cardinalis), Cinnamon Fern (Osmundastrum cinnamomeum), and Virginia Sweetspire (Itea virginica). This rain garden catches the quick runoff from the rock, filtering the water into the earth and recharging local groundwater tables.
- Recreate wildlife micro-habitats: Place fallen cedar logs, flat fieldstones, and native hollow branches along the shady margins of your natural rock outcrops. These additions restore essential nesting cover for local songbirds, toads, and harmless woodland snakes, completing the circle of living geology.
Final Thoughts on Building with Nature
Integrating natural rock outcrops into your home design transforms residential building from an act of destruction into an act of stewardship. When you preserve and celebrate natural rock outcrops, you build a home that honors the ancient Appalachian geology beneath your feet. You lower sitework costs, gain free thermal mass, protect rare native lithophytes, and create living spaces with unmatched character.
By grounding your home against natural rock outcrops, you create a place of refuge, beauty, and permanence that belongs completely to the mountains of East Tennessee.