Custom Garage or Workshop for Your Special Projects
Many homeowners dream of having that perfect space to work on special projects. It might be a dedicated workshop for their passions or a custom garage that does more than just shelter a car. That dream is a common one, whether you live on a spacious lot outside of Kingsport or in a neighborhood in Johnson City. The path from that dream to a finished, functional structure, however, requires precision, planning, and the right partner.
Too often, I see people get excited about the idea but overwhelmed by the process. They are not sure where to start, who to trust, or what questions to ask.
This guide is designed to change that. Here, we want walk you through the entire process, from the first sketch on a napkin to the final inspection. Our goal is to give you the knowledge and confidence you need to navigate the construction of custom garages and workshops. We’ll cover everything you need to know about building in our corner of Tennessee, ensuring you find the right builder and have the best possible experience creating a space that will serve you for decades to come.
Watch a Video of this Article
First Things First: Defining the Purpose of Your New Space

Before you pick up the phone to call a builder, the most important work happens inside your own head. You need to be crystal clear about the primary purpose of your new building. A structure designed simply to park two cars is fundamentally different from a space designed for woodworking, welding, or restoring a classic car. Trying to make one space do everything without proper planning often results in a space that does nothing particularly well. Thinking this through is the first step in designing truly functional custom garages and workshops.
Multi-Car Garage
Let’s break down the different needs. A multi car garage is primarily concerned with dimensions and durability. You need enough width not just for the cars, but to open their doors without hitting a wall or the other vehicle. You need enough depth for longer trucks or SUVs. Ceiling height is another consideration, especially if you think you might one day want a vehicle lift. Storage is also key. Many people want attic trusses that create a large, open storage area overhead for seasonal items. The flooring needs to be durable and easy to clean. A professionally applied epoxy coating, for instance, can resist oil stains and road salt.
A Hobbyist Workshop
A hobbyist’s workshop, on the other hand, is all about workflow and utilities. The layout should be designed around how you work. For a woodworker, this might mean creating a logical path from your lumber storage to your saws, then to your assembly table, and finally to your finishing area. This minimizes movement and maximizes efficiency. Power is a huge factor. You will need more than just a couple of standard outlets. You’ll likely need numerous 110V outlets spaced strategically along the walls and possibly even in the floor or ceiling. For larger equipment like a cabinet saw, jointer, or a serious dust collection system, you will need dedicated 220V circuits.
Other Considerations
Lighting is also different. You need bright, even overhead light for general visibility, combined with focused task lighting directly over your workbenches and machinery. Proper ventilation is critical if you plan on painting, staining, or doing any work that creates fumes. Designing these types of custom garages and workshops requires a builder who understands these specific needs.
Many people want a hybrid model, a space that is both a garage and a workshop. This is entirely possible with smart planning. The key is to create zones. You might have one bay of the garage dedicated to parking and clean storage, while the other bay is set up as the workshop. A physical barrier, even a simple wall, can be incredibly effective at keeping sawdust and project clutter away from your clean vehicles. A good builder can help you think through this layout to create a hybrid space that gives you the best of both worlds, resulting in custom garages and workshops that are both practical and enjoyable to use.
Finding and Vetting Builders for Custom Garages and Workshops

Once you have a clear vision, the next step is finding the right professional to bring it to life. This is, without a doubt, the most important decision you will make in the entire process. Building a detached garage or workshop is not a small weekend project. It’s a permanent, structural addition to your property that must be built to the same standards as your home. This is not a job for a handyman or a jack of all trades. You need a qualified, experienced general contractor.
A general contractor, or GC, is the person responsible for the entire project. They manage the schedule, order materials, and hire and oversee all the specialized subcontractors. This includes the excavation crew, the concrete finishers, the framers, the electricians, the roofers, and everyone else. A good GC ensures that each part of the job is done correctly and in the right order.
So, how do you find a good one? Here is the checklist I would use if I were hiring someone to build on my own property.
First, and this is non negotiable, is proper licensing and insurance. In Tennessee, a contractor must be licensed by the state for any project over a certain dollar amount. You should ask to see their license and then verify it on the Tennessee Department of Commerce & Insurance website. It’s a simple step that takes five minutes. Equally important is insurance. Ask for proof of both general liability insurance and worker’s compensation insurance.
If a worker gets injured on your property and the builder is not insured, you could be held financially responsible. A reputable builder will have this paperwork ready and will not hesitate to show it to you. Any builder who cannot immediately provide these documents should be immediately removed from your list.
Second, look for a builder with deep local experience. A contractor who has been building custom garages and workshops in the Tri-Cities area for years knows things an outsider will not. They know the specific challenges of our regional soil, which is often heavy clay. They understand the local weather patterns and how to schedule a project around them.
Most importantly, they have established relationships with the local building code departments in Johnson City, Kingsport, and Bristol. They know the inspectors, they understand the local interpretations of the code, and they can navigate the permitting process smoothly. This local knowledge is invaluable and can save you from significant delays and headaches.
Third, a proven track record is essential. Don’t just rely on a slick website. Ask to see a portfolio of their completed work, specifically focusing on custom garages and workshops. A great home builder is not always a great outbuilding builder.
Then, ask for a list of recent references, and actually call them. Don’t just ask if they were happy. Ask specific, probing questions. How did the builder handle communication? Did they keep you informed about the schedule? Was the job site kept clean and organized at the end of each day? How did they handle unexpected problems or changes? Did the final cost match the initial quote? The answers to these questions will tell you far more than a simple “yes” or “no”.
Finally, pay close attention to the quoting process. A precise, detailed, itemized quote is the mark of a competent professional. It should break down the costs for each phase of the project: demolition and site prep, foundation, lumber and framing materials, roofing, siding, windows, doors, electrical work, and so on. A vague, one page estimate with a single number at the bottom is a major red flag. It tells you the builder hasn’t done their homework, and it leaves the door wide open for surprise costs down the road. Quality builders of custom garages and workshops are never afraid to show you exactly where your money is going.
The Design and Planning Phase: From Blueprint to Reality

With the right builder selected, you can move into the design and planning phase for your custom garage/workshop. This is where precision in the early stages prevents expensive mistakes and changes later on. Your builder will work with you, and possibly a draftsperson or architect, to create a detailed set of blueprints. These plans are the roadmap for your entire project.
One of the first decisions is whether your garage will be attached to your home or detached. An attached garage offers the convenience of direct access to your house, which is wonderful on rainy or cold days. It can also be less expensive to run utilities like electricity and water. However, an attached garage has to be carefully designed to match the existing roofline and style of your home. You also have to consider fire separation codes, which require specific types of drywall and self closing doors between the garage and the living space.
A detached structure offers more flexibility in terms of design, size, and placement on your property. It’s also ideal for noisy or messy hobbies, as it keeps the sound and dust away from the main house. The primary drawbacks are the cost of running underground utility lines and the lack of a covered walkway to your home, though a simple breezeway can often solve that problem. When designing custom garages and workshops, the attached versus detached decision is a crucial one that affects the entire project.
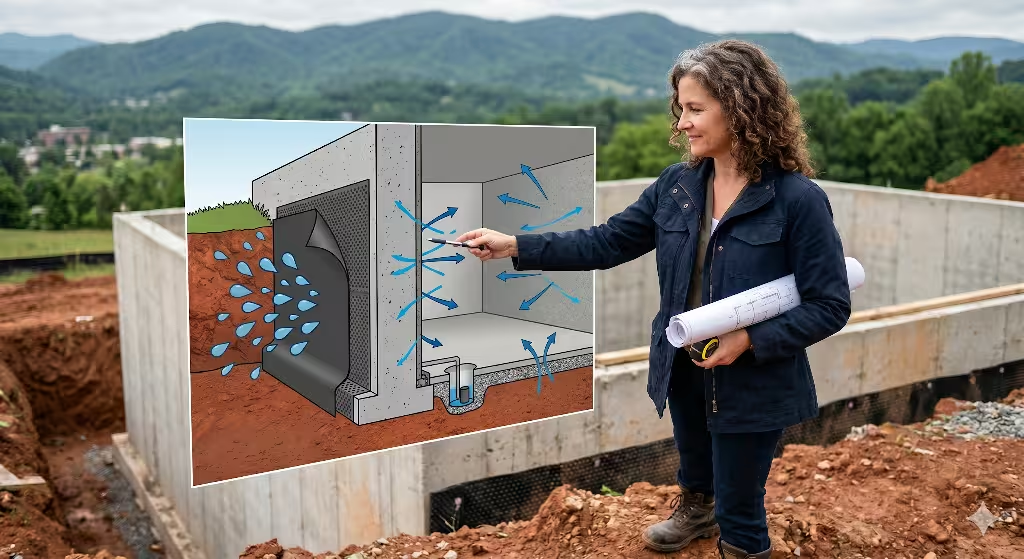
Next, you’ll decide on the foundation. In our region of Tennessee, you’ll typically encounter two main types. The most common for custom garages and workshops is a monolithic slab. This is a single, thick pour of concrete where the footing, which supports the walls, and the floor are all one piece. It’s cost effective and very strong. For properties with a slope, which are very common around here, a stem wall foundation might be necessary. This involves pouring the footings first, then building short concrete walls on top of them to create a level base before the floor slab is poured inside.
Material selection is where you can truly customize the look and function of your space. For siding and roofing, the goal is often to match your existing home for a cohesive look. This could mean brick, vinyl siding, or a durable fiber cement product. The same goes for the roof, where you’ll want to match the shingle color and style. For doors and windows, think about both aesthetics and performance.
An insulated garage door can make a huge difference in keeping the space comfortable year round. The R value of a door is like a warmth rating for a jacket; the higher the number, the better the insulation. The placement of windows is also important for providing natural light, which can make a workshop a much more pleasant place to be.
Navigating Permits and Regulations in the Tri-Cities
Many homeowners are intimidated by the idea of building permits, but you shouldn’t be. The permitting process is there to protect you. It ensures that your new building is designed and constructed safely, according to proven standards. It protects your financial investment by ensuring the structure is sound, and it protects your family’s safety. A good general contractor will handle the entire permitting process for you, but it’s important for you to understand what’s involved.
In Tennessee, a building permit is required for almost any new structure of this size. The exact rules on when a permit is needed can vary slightly between Johnson City, Sullivan County, and Washington County, but for any full size garage or workshop, you can be certain a permit is necessary. The process begins with submitting your detailed blueprints to the local codes department. An official plan reviewer will examine the plans to make sure they comply with the International Residential Code, or IRC. This is the standard building code used across most of the country. They check for things like proper foundation depth, correct lumber sizing for the frame, and adequate structural support for the roof.
The codes department will also review your site plan to check for compliance with local zoning laws. Two of the most important concepts here are setbacks and easements. A setback is the minimum distance your structure must be from your property lines, the street, and sometimes other buildings on your property. An easement is a legal right for a third party, often a utility company, to access a portion of your property. You cannot build a permanent structure on top of an easement. Your builder will be responsible for identifying these on your property survey and ensuring your new building is placed correctly.
Finally, if you live in a newer subdivision, you may be part of a Homeowners Association, or HOA. HOAs have their own set of rules and restrictions regarding new construction. You will likely need to submit your plans to the HOA for approval before you can even apply for a city or county permit. These rules can govern everything from the size and location of the building to the color of the paint and the type of siding you can use. This is another area where an experienced local builder can be a huge help, as they have likely worked with your HOA before and understand their specific requirements for custom garages and workshops.
The Construction Process: A Step-by-Step Overview

Once the plans are approved and the permit is issued, the real work can begin. It’s a fascinating process to watch a building go from a patch of grass to a finished structure. Here is the typical sequence of events you should expect to see on your property.
- Site Preparation: The first step is to prepare the ground. This involves excavating the area for the foundation, removing topsoil, and grading the land to ensure water will drain away from the building. If you’re building on a sloped lot, this phase will be more extensive.
- Foundation: Next, the concrete crew will come in. They will build the forms, which are like a mold for the concrete, and install any necessary reinforcement like steel rebar. Then, the concrete trucks will arrive to pour the slab or footings. This is a critical step, as the entire building relies on a strong, level foundation.
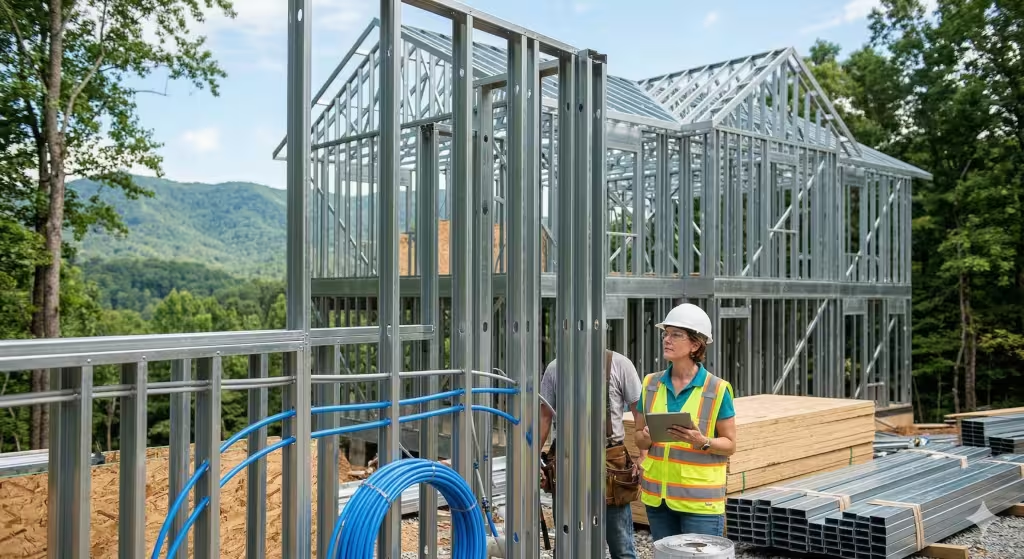
- Framing: This is the exciting part where your project starts to look like a real building. The framing crew will build the walls on the ground and then lift them into place. Then they will install the ceiling joists and the roof trusses. The precision here is key, as every piece of the skeleton must be square and plumb to support the rest of the structure.
- Sheathing and “Drying In”: Once the frame is up, it gets covered in sheathing, which is usually a type of plywood or oriented strand board (OSB). This adds immense strength to the walls and roof. The sheathing is then covered with a weather resistant barrier. After this, the windows, exterior doors, and roofing are installed. This stage is called “drying in” because it makes the building weathertight and protects the interior from rain.
- Rough-ins: With the interior protected, the subcontractors can begin their work inside the walls. The electrician will run all the wiring for outlets, lights, and switches. If your design includes plumbing for a sink or bathroom, the plumber will run the water supply and drain lines. This is called the “rough in” phase because the final fixtures are not installed yet.
- Insulation: After the rough in work passes inspection, the insulation is installed in the walls and ceiling. This is a crucial step for creating a comfortable space, especially if you plan to heat or cool your garage or workshop. Proper insulation will save you a lot of money on energy bills over the life of the building.
- Exterior Finishes: Now the exterior of the building is completed. This includes installing the siding, whether it’s vinyl, brick, or something else. The trim around the windows and doors is also installed and painted. This is when the new structure really starts to look like it belongs with your main house.
- Interior Finishes: With the exterior sealed up, work moves back inside to finish the space. The drywall is hung, taped, and finished, and then the walls are primed and painted. The electrician returns to install the outlets, switches, light fixtures, and the main electrical panel. The garage door and its opener are installed. Any final flooring or cabinetry is put in place.
- Final Inspection: Before the project is officially complete, a building inspector from the city or county will visit the site one last time. They will go through a detailed checklist to ensure that every aspect of the construction meets the building code. Once they approve the work, the project is officially finished.
What Does It Cost to Build a Custom Garage or Workshop?
This is usually the first question everyone asks, and it’s the hardest one to answer without a detailed set of plans. Anyone who gives you a simple price per square foot without knowing the specifics of your project is just guessing. However, I can explain the primary factors that will drive the final cost. When you start planning for custom garages and workshops, understanding these cost drivers is essential.
The biggest factor, by far, is the size and complexity of the design. A simple, rectangular two car garage will cost significantly less than a large, L shaped building with a second story loft. The type and quality of the materials you choose also have a huge impact. A brick exterior is much more expensive than vinyl siding. A high end insulated garage door with custom windows will cost many times more than a basic, uninsulated steel door.
The level of interior finish is another major cost driver. Do you want the interior to be just unfinished studs and sheathing? Or do you want it fully insulated, drywalled, and painted, with heating and air conditioning? For a workshop, the electrical system can be a significant cost. Adding multiple 220V circuits, a subpanel, and extensive lighting will cost more than a couple of simple outlets.
Finally, the conditions of your specific property can affect the price. If your lot is heavily sloped or has a lot of rock just below the surface, the cost of excavation and foundation work will be higher. If the new building is located far from your house, the cost to run underground electrical and water lines will be greater. A good builder will identify these potential issues early and include them in the quote, so there are no surprises when it comes to the cost of your custom garages and workshops.
Conclusion: Investing in a Space Built with Integrity
Building custom garages and workshops is a significant investment, both in your property and in your quality of life. It’s a project that provides decades of utility, enjoyment, and added value to your home. The process can seem complex, but it becomes straightforward and even enjoyable when you work with a competent, precise builder who values integrity.
By taking the time to clearly define your needs, carefully vetting your contractor, and understanding the key steps of the process, you can ensure your project is a resounding success. Here in the Tri-Cities, a well built detached structure is more than just an outbuilding; it’s a valuable addition to your home. If you are considering building a new space and have questions, I encourage you to seek out a straightforward conversation with an experienced local professional. It’s the best first step you can take.