

Every homeowner who dreams of a cozy breakfast nook runs into the exact same framing headache. The sunniest, most natural corner of your kitchen or dining room almost always sits directly on top of a perimeter HVAC floor vent.
There is one golden rule in residential construction that you must never break: never trap conditioned supply air inside a raw wood cavity. If you build a plywood bench straight over an open HVAC floor vent and hope the air finds its way out through cracks, you invite trapped moisture, warped woodwork, higher power bills, and a cold dining room.
Fortunately, you have two reliable structural paths to keep your air moving smoothly. First, if you have an open crawlspace or basement underneath the room, you can relocate the HVAC floor vent from below into the open floor in front of your bench. Second, if your home sits on a concrete slab or has a finished ceiling downstairs, you can extend the duct forward through the banquette base and out through the front toe kick. With a few basic tools, including aviation snips, a hand seamer, a cordless drill, a jigsaw, a tape measure, and a brush for duct sealant, you can route your HVAC floor vent cleanly and safely in a single afternoon.
Why You Cannot Simply Build a Banquette Over an Open HVAC Floor Vent
Builders place supply registers near exterior walls and windows for a very specific reason. Those spots lose the most heat in the winter and gain the most heat in the summer. When your furnace or air conditioner runs, that perimeter HVAC floor vent creates a curtain of conditioned air that keeps the whole room comfortable. Blocking that register or letting it blow into a closed wooden box creates three serious problems for your home.
Mechanical Code Violations
Residential building rules exist to protect your health and your wallet. Under the
Moisture, Mold, and Millwork Damage
In East Tennessee, our summers bring heavy humidity alongside 90-degree afternoons. When your air conditioner runs, the air coming out of an HVAC floor vent is usually around 55 degrees. If that cold air dumps into a dark, unsealed wooden bench cavity, it meets warm, damp indoor air trapped inside the wood. That temperature clash creates condensation, which is the exact same sweating you see on a cold glass of sweet tea on a July porch. Over a few months, that hidden moisture swells your oak or maple trim, pops wood glue joints apart, and feeds hidden mold growth under your
Static Pressure and Room Comfort
Think about what happens when you press your thumb over the end of a running garden hose. Pressure builds up inside the hose, and the water sprays out awkwardly or slows down. Your home ductwork works the exact same way. When you cap off or choke an HVAC floor vent under a bench, you raise the static pressure inside your duct system. Your blower motor has to work harder to push air through the remaining vents in your house, which wears out expensive equipment early. Even worse, your breakfast nook loses its main source of heating and cooling, leaving your family shivering during January breakfasts.
Pre-Build Assessment: Relocating From Below vs. Routing Through the Toe Kick
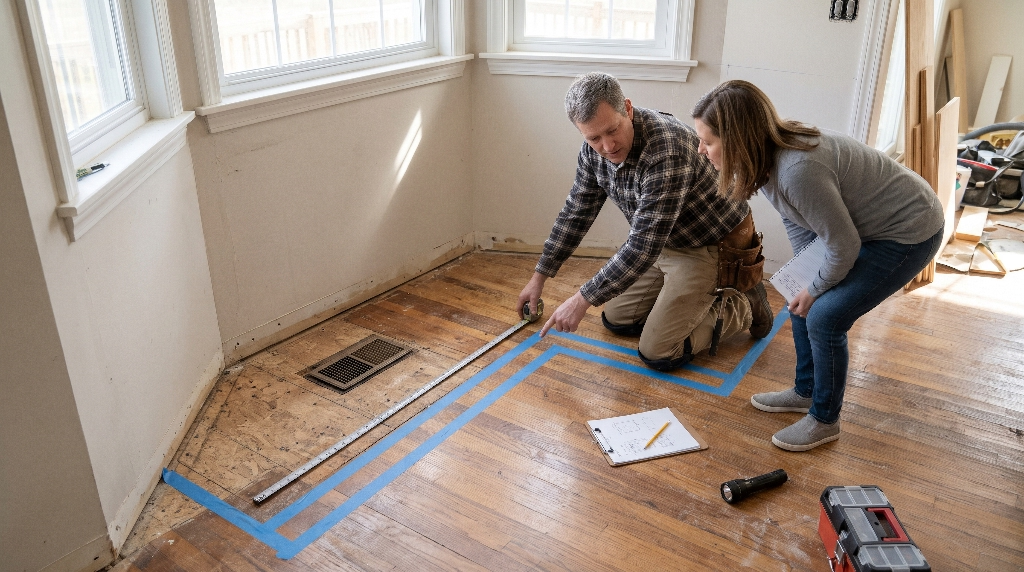
Before you cut a single piece of lumber, grab a flashlight and inspect how your floor is built. The space directly beneath your breakfast nook determines the cleanest, easiest way to handle your HVAC floor vent.
Option A: Subfloor Relocation From a Crawlspace or Basement
Many custom homes in the Tri-Cities area sit over block crawlspaces or full basements. If you can walk or crawl underneath your dining area and see the round metal pipe feeding your HVAC floor vent, relocating the boot from below is almost always your best choice.
To do this, you disconnect the metal boot beneath the subfloor, cut a clean rectangular opening in the hardwood or tile floor 12 to 18 inches forward of your planned bench front, and patch the old floor hole. Because the patch will sit completely hidden underneath your new built-in banquette, you do not have to stress over matching old wood stain or tile grout. Moving the HVAC floor vent out into the open floor eliminates sharp turns in the metal duct and preserves 100 percent of your airflow.
Option B: Above-Floor Toe-Kick Extension on a Slab or Finished Ceiling
Not every home offers easy access from underneath. If your house sits on a poured concrete slab, or if your breakfast nook sits above a finished basement ceiling with recessed lights and drywall, moving the duct from below requires messy demolition.
In those homes, routing the HVAC floor vent above the subfloor and out through the banquette toe kick is the smart, practical solution. You leave the existing floor opening right where it is, attach a low-profile metal transition boot over the hole, and run a sealed rectangular sheet-metal duct straight through the bottom base of your bench. The air exits cleanly through a slotted grille mounted in the recessed kick plate at the front of the seating.
Critical Clearance Check for Your Toe Kick
A standard kitchen cabinet or banquette toe kick measures 3.5 to 4 inches tall and sets back 3 to 4 inches from the front edge of the seat overhang. That recessed space gives people room for their heels when they sit down at the table.
Before framing your bench, measure the vertical height of your planned toe kick. Most standard toe-kick register grilles require a rough opening between 2.25 inches and 3.25 inches tall. If you build a short 3-inch toe kick, a standard grille will not fit without trimming the metal frame, which weakens the register. Building your banquette base with a true 4-inch or 4.5-inch toe-kick height gives you plenty of room to center a clean grille with solid wood trim above and below it.
Comparing the 3 Best Under-Banquette Ducting Methods
Once you decide to route your HVAC floor vent through the banquette base, you have three proven ways to build the air pathway. Each method works well in different framing situations.
| Ducting Method | Durability | Airflow Efficiency | Installation Difficulty | Best Use Case |
| Rigid Galvanized Sheet Metal + 90-Degree Boot | High (lasts decades) | Best (smooth interior walls) | Moderate (requires metal cutting) | Straight runs from a standard floor boot to the toe kick |
| Pre-Engineered Toe-Kick Duct Kit (Toe Ductor) | High (heavy molded polymer and metal) | Very Good (airtight gasket seals) | Easy (ideal for DIY homeowners) | Quick installation over standard 4×10 or 4×12 floor boots |
| Custom Sheet-Metal Plenum Box | High (custom fabricated) | Good (handles tight angles) | Advanced (shop-built or custom bent) | Off-center vents or registers turned sideways to the bench |
Rigid Galvanized Sheet Metal and a 90-Degree Boot
This is the gold standard method I use on custom builds. You attach a 90-degree galvanized steel register boot directly over the subfloor opening, connect a straight section of 26-gauge rectangular wall stack duct, and run it flush to the front toe kick. Smooth sheet metal creates almost zero friction, holds sheet-metal screws securely, and never sags or crushes over time.
Pre-Engineered Toe-Kick Duct Kits
If you are not comfortable cutting and bending sheet metal with aviation snips, a pre-engineered kit such as a Toe Ductor simplifies the job. These kits come with a low-profile floor flange that seals tightly over a standard 4-inch by 10-inch or 4-inch by 12-inch HVAC floor vent using foam gaskets, connected to a flexible or semi-rigid oval collar that snaps into a front register plate. They install fast and eliminate complex metal layout work.
Custom Sheet-Metal Plenum Box
Sometimes an existing HVAC floor vent sits sideways, or it lands right against a corner wall where a standard elbow cannot make the turn. In that case, a local sheet-metal shop in Johnson City or Kingsport can bend a shallow rectangular galvanized box for a modest fee. The box sits sealed over the subfloor hole and redirects the air 90 degrees sideways or forward toward your toe-kick opening.
Duct Materials You Must Avoid
Never use shiny accordion-style flexible foil duct or thin plastic slinky pipe under a banquette. To fit a 6-inch round flex pipe into a 4-inch toe kick, you have to squash it flat. Crushing flex duct cuts its air capacity in half and traps dust inside the deep ridges. Likewise, never build a tunnel out of two-by-four studs and plywood scraps. Wood shrinks, cracks at the seams, and violates mechanical codes.
Tools, Materials, and Duct Sizing Calculations
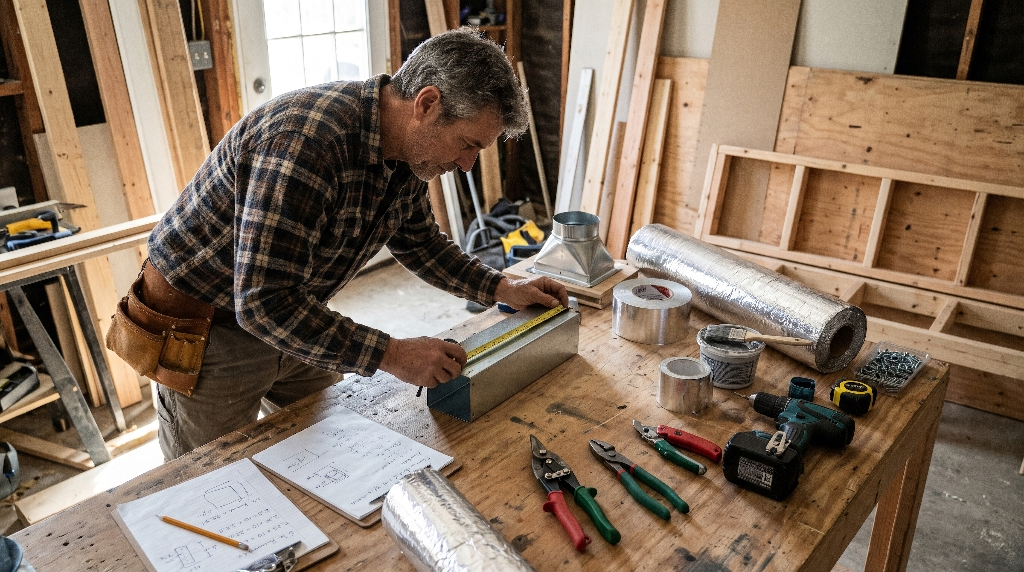
Good carpentry starts at the workbench with the right math and the right parts. Taking ten minutes to verify your duct size ensures your HVAC floor vent delivers the exact same warmth or cooling after the bench goes in.
The Cross-Sectional Area Rule
Airflow follows simple geometry. You must keep the inside opening area of your new rectangular duct equal to or larger than the round pipe feeding your HVAC floor vent from below.
Most residential branch ducts feeding a single floor register use 6-inch round metal pipe. Using basic circle math (pi times the radius squared), a 6-inch round pipe gives you about 28.3 square inches of open air space. Now look at standard rectangular wall stack duct, which measures 3.25 inches tall by 10 inches wide. Multiply 3.25 by 10, and you get 32.5 square inches of open area.
Because 32.5 square inches is slightly larger than 28.3 square inches, air flows through that low-profile rectangular duct without any choking or whistling noise. If your home uses a larger 7-inch round branch pipe (38.5 square inches), step up to a 3.25-inch by 12-inch or 3.25-inch by 14-inch rectangular duct to keep the air moving freely.
Complete Materials Checklist
Gather these exact supplies before you start framing your banquette base:
- 26-gauge galvanized rectangular duct: Choose 3.25-inch by 10-inch (or 3.25-inch by 12-inch) rigid wall stack long enough to reach from the floor vent to the front toe kick.
- 90-degree galvanized register boot or starter elbow: Matches your floor opening (typically 4×10 or 4×12) on the bottom and transitions to your 3.25-inch rectangular duct on the side.
- UL 181 rated foil tape: Real aluminum foil duct tape with acrylic adhesive, never cloth gray duct tape (which dries out and peels off within two years).
- Water-based duct mastic: Thick gray sealant brushed over all metal seams and screw heads for a permanent airtight lock.
- Half-inch hex-head sheet-metal screws: Self-piercing zip screws for fastening metal collars together securely.
- R-6 foil-faced duct insulation wrap: Fiberglass or foam insulation wrap that keeps heat or cold inside the metal duct rather than warming up your bench seat.
- Louvered toe-kick register grille: A heavy-duty steel grille sized to match your rectangular duct opening, ideally with a built-in damper lever.
Complete Tools Checklist
Keep these tools within arm’s reach at the job site:
- Aviation snips (straight and right-cut): Needed to notch tabs and trim rectangular sheet metal cleanly.
- Sheet-metal hand seamer: Wide-jaw pliers used to bend clean 90-degree attachment tabs on the ends of your metal duct.
- Cordless drill with a quarter-inch hex driver: Drives self-piercing sheet-metal screws into galvanized steel without slipping.
- Jigsaw with a fine wood-cutting blade: Cuts the rectangular register opening cleanly in your finished toe-kick board.
- Tape measure and carpenter’s pencil: Essential for laying out straight centerlines from the subfloor boot to the front face.
- Disposable 2-inch chip brush: Used to spread water-based duct mastic smoothly over every seam.
Step-by-Step Guide: How to Route an HVAC Floor Vent Under a Built-In Banquette
Before assembling your metal ductwork, look at how a properly framed banquette base leaves a clean, unobstructed channel around the floor register.
Notice how the two wooden base boxes sit cleanly to the left and right of the existing register, giving you straight-line access from the wall all the way to the front toe kick. Follow these six steps to complete the mechanical run before setting your upper seat box in place.
Step 1: Remove the Existing Register and Measure the Boot Throat
Lift the old metal floor grille straight out of the floor. Use your tape measure to check the exact width and length of the metal boot opening sitting flush with your subfloor. Most standard registers measure 4 inches by 10 inches or 4 inches by 12 inches. Shine a flashlight down into the boot to make sure no toys, construction sawdust, or loose insulation are blocking the pipe, and confirm that air blows outward when you turn the thermostat fan to the ON position.
Step 2: Frame the Banquette Ladder Base Around the Duct Path
Build your two-by-four or two-by-six banquette base in two separate ladder sections, leaving a clear gap in the middle that aligns directly with your HVAC floor vent. Leave at least 2 extra inches of width on each side of your metal duct so you have room to wrap insulation around the pipe and reach your hands in with a brush. Keeping the channel completely straight from back to front prevents extra elbows that slow down your airflow.
Step 3: Attach and Seal the Subfloor Transition Boot
Set your 90-degree register boot or starter collar directly over the existing floor opening. If you are using a standard sheet-metal transition, use your aviation snips to cut half-inch vertical slits around the bottom collar, then bend those tabs outward with your hand seamer so they lie flat against the subfloor. Fasten the tabs into the wood floor using wood screws, and drive half-inch sheet-metal screws through the overlapping metal collar into the existing subfloor boot. Coat every joint generously with water-based duct mastic, then wrap the seam with UL 181 foil tape.
Step 4: Extend and Insulate the Rigid Duct Run
Measure from the outlet collar of your 90-degree boot to the front face of your finished toe-kick board. Cut your 3.25-inch by 10-inch rectangular galvanized duct to length using your aviation snips. Slide the back end into the transition boot, secure the joint with three sheet-metal screws on top and three on the sides, and seal the seam with mastic and foil tape. Next, wrap the entire length of the rectangular metal duct in R-6 foil-faced insulation wrap, taping the insulation seams shut so the metal is completely covered.
Step 5: Cut the Toe-Kick Face and Install the Register Grille
Measure the exact centerline and height of your rectangular duct outlet, then transfer those measurements onto your finished toe-kick board (usually three-quarter-inch plywood or solid hardwood trim). Drill starter holes in the four corners and use your jigsaw to cut a crisp rectangular opening. Install the toe-kick board against the banquette frame, making sure the metal duct sits flush with or just inside the back edge of the wood opening. Slide your louvered toe-kick grille into the slot and fasten it tightly with matching painted screws.
Step 6: Test Airflow, Seal Integrity, and Balance
Before you fasten the heavy plywood seat deck or hinged lid on top of your banquette, turn your HVAC system fan on high. Run your bare hand slowly around every taped and mastic-sealed joint under the bench to feel for any escaping drafts. If you feel even a tiny pinhole leak, brush on an extra coat of mastic. Next, hold a tissue or ribbon in front of the new toe-kick grille to verify strong, steady airflow into the dining room, and adjust the grille damper louvers to balance the room temperature.
Special Considerations: Storage Banquettes and Return Air Grilles
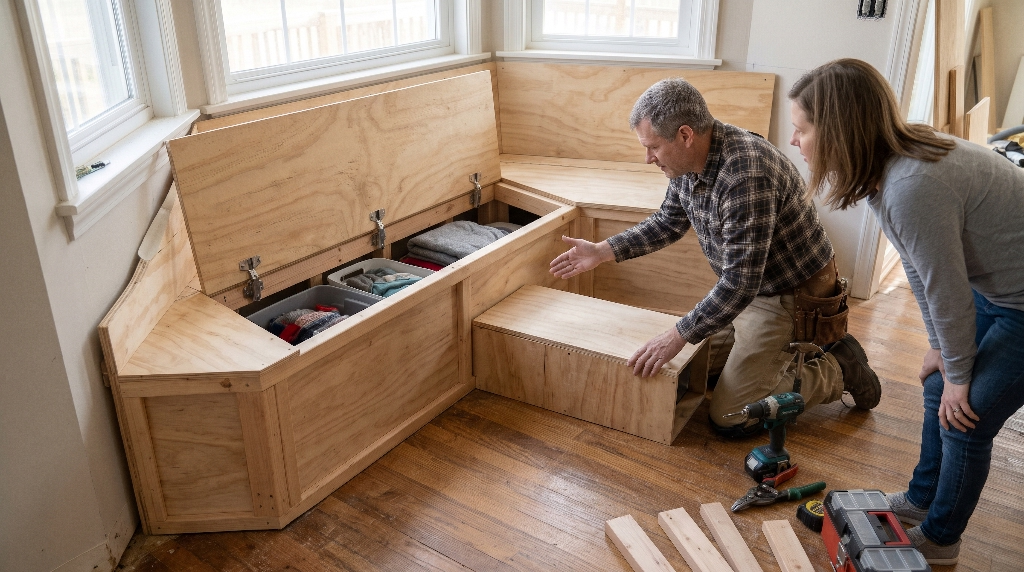
Not every built-in bench is a simple sealed box, and not every vent in your floor blows warm air out. Keep these two important variations in mind during your planning stage.
Hinged Lift-Top Storage Benches
Many homeowners love built-in banquettes because the hollow space beneath the seat holds extra blankets, holiday platters, or board games. If you plan to put a hinged lid on your bench for storage, wrapping your rectangular metal duct in R-6 insulation is mandatory. Without insulation, a bare metal duct carrying 120-degree furnace air in January will turn your storage bench into a warm dry box that warps wooden game boards or dries out leather items. For even better protection, nail a simple three-sided plywood cover box over the insulated duct run so heavy storage bins never bump or dent the ductwork when you slide them inside.
What If the HVAC Floor Vent Is a Return Air Grille?
Before you build anything, verify whether your floor opening is a supply register or a cold-air return grille. A supply vent is usually 4 inches wide and blows air out. A return air grille is usually much larger (often 10 inches by 20 inches or 14 inches by 20 inches) and pulls room air back toward your furnace filter.
Under International Mechanical Code Sections 601 and 602, return air systems require large, unobstructed free-air openings and cannot pull air through dusty wood framing cavities. If a large return air grille sits where you want to build a banquette, do not try to squeeze it down into a small 3-inch toe-kick slot. Choking a return duct starves your furnace of air and can crack a heat exchanger or freeze up your air conditioner coil. Instead, have an HVAC contractor relocate the return grille onto an adjacent vertical wall above the bench seat height.
Technical and Building Code Compliance Checklist
Review these four essential safety and code standards before closing up your banquette carpentry:
- Continuous Sealed Metal Pathway: Supply air must travel inside rigid galvanized sheet metal or an approved listed duct kit from the floor boot all the way to the toe-kick register. Never use raw framing lumber as a duct wall.
- Accessible Balancing Damper: Under International Mechanical Code Section 603.18, any damper used to adjust airflow volume must remain reachable without tearing apart furniture. Make sure your new toe-kick grille includes a built-in damper lever right behind the front louvers.
- Zero Crushed Flexible Duct: Never flatten round flexible pipe to fit beneath a low toe kick. Maintain full square-inch cross-sectional area from start to finish.
- UL 181 Approved Air Sealing: Seal every mechanical joint with water-based duct mastic and UL 181 foil tape so zero conditioned air leaks into the bench cavity.
Builder’s Field Notes for Real-World Installations
Blueprint drawings look neat on paper, but real houses always throw a few curveballs. Here are two field-tested fixes I rely on when remodeling older homes.
Handling Off-Center or Proud Floor Vents
Sometimes an existing HVAC floor vent sits 16 or 18 inches away from the back wall, which puts the metal register sticking out 2 inches past the front toe kick of a standard 18-inch-deep banquette. Never try to notch your bench frame half over the grille so half the vent blows under the bench and half blows into the room. That looks sloppy and ruins airflow. Instead, simply build your banquette seat 3 inches deeper (21 inches deep instead of 18 inches) and add a thicker upholstered back cushion. That small framing adjustment swallows the entire HVAC floor vent cleanly inside the bench footprint so you can run a clean, full-width toe-kick grille across the front.
Choosing Heavy-Gauge Steel for Long-Term Durability
When shopping at the hardware store or sheet-metal supply house, always ask for 26-gauge galvanized steel rather than lighter 30-gauge snap-lock duct. A banquette toe kick sits right at heel level in a busy kitchen. People kick the base with boots, kids bump it with dining chairs, and mops slide across it every week. Heavy 26-gauge steel holds screws tightly, resists denting if someone accidentally kicks the register grille, and keeps your mastic seals intact for the life of your home.
Frequently Asked Questions About Routing an HVAC Floor Vent Under a Banquette
Can you put a built-in banquette over an HVAC floor vent?
Yes, you can build a built-in banquette over an HVAC floor vent as long as you extend the ductwork out to the front toe kick using a sealed metal transition. You should never build a closed bench directly over an open floor register without ducting the air out into the room, because trapped air causes moisture damage, mold growth, and poor room heating and cooling.
How do you redirect an HVAC floor vent under a cabinet or bench?
To redirect an HVAC floor vent under a bench, remove the old floor grille and attach a 90-degree galvanized register boot or a pre-engineered toe-kick duct kit over the subfloor opening. Connect a rigid 3.25-inch by 10-inch rectangular metal duct to the boot, seal all joints with duct mastic and UL 181 foil tape, wrap the pipe in insulation, and terminate it at a louvered grille cut into the front toe kick.
Do you need to duct an HVAC floor vent to the toe kick, or can air just blow under the bench?
You must always duct an HVAC floor vent all the way to the toe kick using sealed sheet metal. Letting conditioned air blow loosely into an open wooden bench cavity violates mechanical building codes, starves your dining room of airflow, increases static pressure on your blower fan, and causes summer condensation that warps wood cabinetry.
What size duct do you need for a banquette toe-kick vent?
A standard 3.25-inch by 10-inch rectangular metal duct is the ideal size for most banquette toe-kick vents. It provides 32.5 square inches of open air space, which easily matches or exceeds the 28.3 square inches of a standard 6-inch round branch pipe without restricting airflow or creating whistling noises.
Will routing an HVAC floor vent under a banquette reduce airflow?
Routing an HVAC floor vent through a short, straight rectangular metal duct under a banquette causes very little airflow loss when sized and sealed properly. Using smooth 26-gauge galvanized steel, avoiding sharp sideways bends, and sealing every seam with mastic keeps your register blowing nearly as strong as it did through the original floor opening.
What happens if a cold-air return vent is under a built-in bench?
You cannot enclose a cold-air return vent inside a standard banquette toe kick because return ducts need large, unobstructed openings to pull enough air back to your furnace. Blocking or shrinking a return grille strains your HVAC system and reduces heating and cooling efficiency across the entire house. Relocate a floor return onto an open wall above the bench seat instead.
Building a custom breakfast nook adds lasting charm, family gathering space, and real resale value to your home. By treating the hidden ductwork beneath your seating with the same precision and care as your finish woodworking, you protect your home from moisture damage and keep your family comfortable through every season. Take your time measuring your clearances, seal every metal seam tightly, and your routed HVAC floor vent will perform quietly and reliably for decades to come.