
The High-Elevation Solar Advantage in East Tennessee
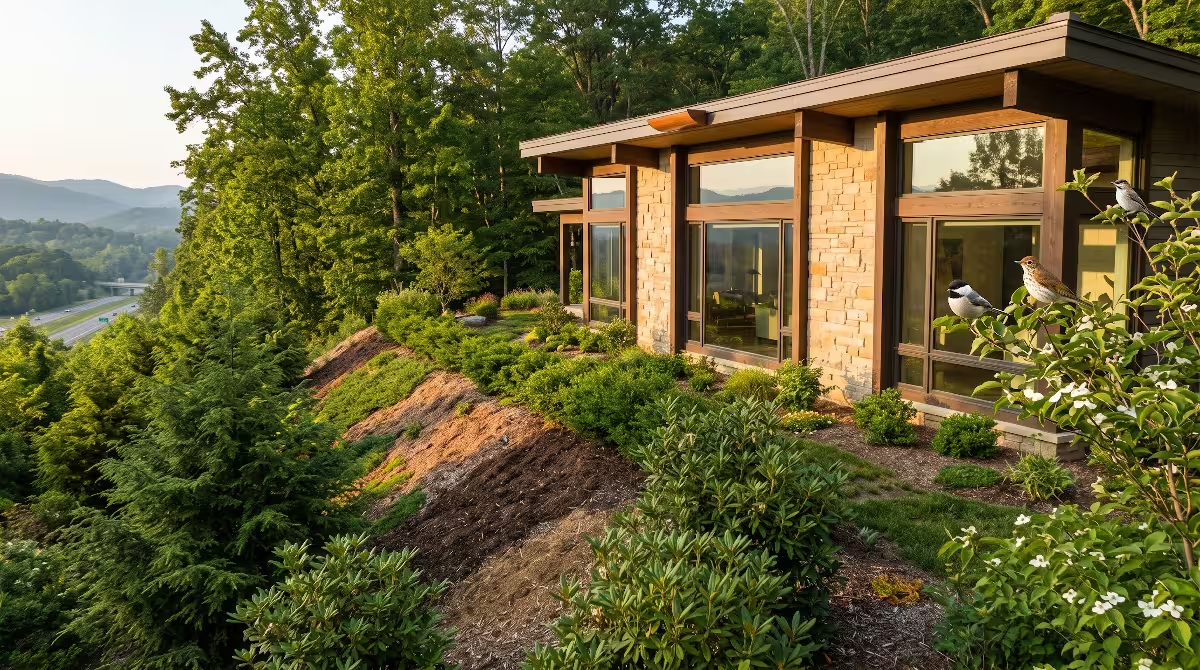
Building a home on a ridge top in the Appalachian Mountains offers sweeping views and vast sky access. However, living at high elevation also creates unique design challenges and opportunities. When you design a home on a ridge line in East Tennessee, you receive significantly more sunlight than homes sitting in the valley below. Valley homes often sit in the shadow of nearby hills during early morning and late afternoon hours. In contrast, a ridge-top home enjoys direct exposure to the sun from early sunrise to late sunset.
To take full advantage of this exposure, homebuilders need to understand passive solar lighting. Passive solar lighting is the practice of using natural sunlight to illuminate the interior of a house without relying on mechanical systems or electric lights. By carefully planning window placement, roof overhangs, and interior wall colors, you can flood your living spaces with clean, natural light throughout the day.
The Unique Physics of Ridge-Top Siting
The physics of sunlight changes as you move higher up the mountain slopes of the Southern Appalachians. At high elevations, sunlight passes through less atmosphere. This means the light hitting a ridge top is brighter and more direct than light at sea level. The surrounding topography also changes how light enters a building. In a valley, hills obstruct low-angle sunlight. On a ridge, the horizon is low and wide.
This exposure increases the total solar flux, which is the amount of sunlight energy reaching your roof and walls. While this gives you an abundance of natural light, it also means that uncontrolled light can quickly cause problems. Without proper design, an exposed home on a ridge can suffer from harsh glare, hot spots, and excessive brightness. Designing for passive solar lighting allows you to balance this intense natural sunlight so that it brightens your home evenly without causing discomfort.
Daylighting vs. Solar Heat Gain
A common mistake in home design is confusing passive solar heating with passive solar lighting. While both systems rely on the sun, they serve very different purposes. Passive solar heating focuses on capturing the warmth of the sun to heat indoor air and floors during cold winter months. Passive solar lighting focuses entirely on capturing visible light to illuminate rooms during the day so you do not need to turn on electric light bulbs.
In a well-designed ridge-top home, you want maximum passive solar lighting with controlled solar heat gain. During warm East Tennessee summers, bringing in too much solar heat will force your air conditioning system to work overtime. By using spectrally selective window glass and strategic shading, you can allow visible sunlight to pass into your living spaces while blocking unwanted infrared heat. This gives you all the benefits of passive solar lighting while keeping your indoor temperatures cool and comfortable.
+-------------------------------------------------------------------------+
|                         SUNLIGHT SPECTRUM                               |
|                                                                         |
|   [ Ultraviolet ]   |   [ Visible Light ]   |     [ Infrared Heat ]     |
|   Blocked by glass  |   ALLOWED INSIDE      |     BLOCKED BY GLASS      |
|   to prevent fading |   for daylighting     |     to prevent heating    |
+-------------------------------------------------------------------------+
The Biophilic Imperative
Biophilic design is the practice of connecting people with natural light, plants, and organic materials inside buildings. Humans evolved outdoors under the natural cycle of the sun. When we spend our days in dark rooms under flickering artificial lights, our health and energy levels often drop. Incorporating passive solar lighting into your home directly supports your circadian rhythm, which is the internal biological clock that regulates your sleep and wake cycles.
Morning sunlight contains higher levels of blue light, which signals your body to wake up, boosts your mood, and sharpens your focus. Late afternoon light shifts toward warmer red tones, telling your body that it is time to relax. By using passive solar lighting in your Appalachian ridge-top home, you align your indoor environment with the natural movement of the sun over the mountains. This connection to nature improves sleep quality, lowers stress, and creates a peaceful indoor atmosphere.
Solar Geometry & Microclimatic Conditions on Appalachian Ridges
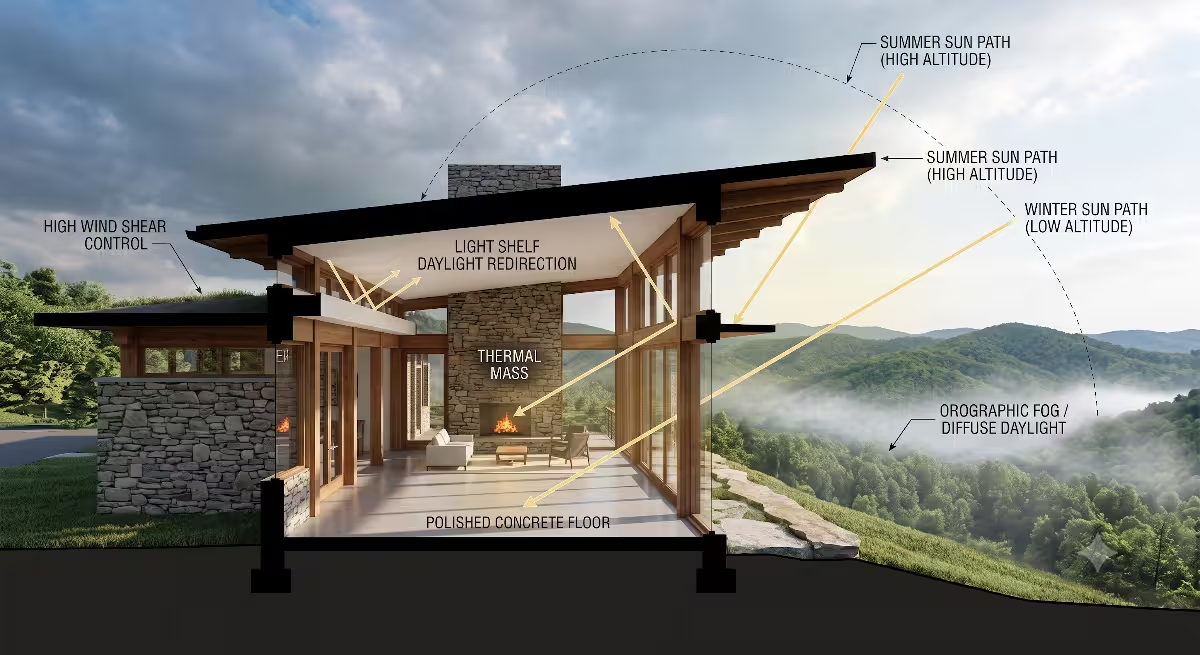
To use passive solar lighting effectively, you must understand how the path of the sun changes throughout the year in East Tennessee. Solar geometry refers to the angle and position of the sun relative to a specific spot on Earth. Because the Earth tilts on its axis, the sun sits much lower in the sky during winter than it does during summer.
              SUMMER SUN (High Angle: ~77°)
                   \
                    \
                     \
                      \  WINTER SUN (Low Angle: ~30°)
                       \      \
                        \      \
                         v      v
                 +-----------------+
                 |  Ridge-Top Home |
                 +-----------------+
Solar Azimuth and Altitude Dynamics
Two main angles define the location of the sun: solar altitude and solar azimuth. Solar altitude is the height of the sun above the horizon, measured in degrees. Solar azimuth is the compass direction of the sun, such as southeast or southwest.
In the Tri-Cities area, located near 36 degrees North latitude, the midday sun reaches an altitude of roughly 77 degrees in mid-June. In mid-December, the midday sun reaches a maximum altitude of only about 30 degrees. This huge difference changes how sunlight enters your windows:
- Winter Conditions: The low winter sun reaches deep into southern windows, bringing natural illumination far into interior rooms.
- Summer Conditions: The high summer sun strikes roofs and window overhangs from above, making it easy to block direct beam rays while still capturing soft, ambient light.
- East-West Ridge Alignment: Homes built along an East-West running ridge have a major advantage because their long south-facing walls can capture consistent passive solar lighting all day long.
Ridge-Top Environmental Factors
Building on top of a mountain ridge brings environmental conditions that you do not encounter in flatter regions. These local microclimates directly shape how you plan your passive solar lighting layout.
Orographic Fog & Cloud Cover
In the Southern Appalachian mountains, moist air rises as it moves over high ridge lines. As the air cools at higher elevations, it condenses into valley fog and low clouds. This phenomenon is known as orographic fog. On many mornings in East Tennessee, ridge-top homes are enveloped in thick mountain mist.
Orographic fog scatters direct sunlight into soft, diffuse light. Instead of receiving light from a single bright point in the sky, your home receives ambient daylight from every direction. To capture this scattered light during foggy mornings, your passive solar lighting plan must include high windows that can draw ambient skylight deep into the center of the house.
Wind Shear & Air Tightness
Ridge tops experience much higher wind speeds than protected valleys. Strong winds hitting large glass windows can cause air leaks and heat loss if the windows are not engineered properly. When selecting windows for passive solar lighting, you must choose high-grade frames with tight air seals and strong structural ratings. Achieving great passive solar lighting should never come at the cost of drafts or high heating bills.
Reflected Glare
Because ridge-top homes look down onto surrounding terrain, they are vulnerable to ground glare. Sunlight reflecting off morning fog in the valleys below, or off bright fall foliage, can bounce upward into your home. If your windows are not shielded, this upward glare can cause eye strain. Using strategic interior shades, deep window sills, and light shelves helps soften reflected light, making your passive solar lighting gentle and pleasant.
Core Fenestration & Spatial Engineering Strategies
Fenestration refers to the design, placement, and arrangement of windows, doors, and glass openings in a building. Designing a home for passive solar lighting requires a thoughtful approach to window engineering rather than simply installing large sheets of glass.
                        ROOF OVERHANG
                       +-------------+
                       |             |
                       |   CLERESTORY|
                       |   WINDOW    | ---> Soft, ambient light to ceiling
                       |             |
+----------------------+-------------+
|                                    |
|                      LIGHT SHELF   |
|                 ===================| ---> Bounces daylight deep indoors
|                                    |
|                      MAIN WINDOW   | ---> Views and lower level light
|                                    |
+------------------------------------+
True-South Alignment & Axis Orientation
The single most important rule for successful passive solar lighting is orienting the main axis of your home from East to West. This places the long sides of the house facing North and South.
Your main living spaces, such as the living room, kitchen, and dining area, should face within 15 degrees of True South. True South is slightly different from Magnetic South read on a standard compass, so you must account for local magnetic declination during site planning. Orienting your home toward True South gives you balanced passive solar lighting throughout the day. South-facing glass is the easiest to shade in summer and receives the most consistent light in winter.
Glazing Ratio Calculations
Installing too much glass leads to glaring light and severe temperature swings. Installing too little glass leaves rooms dark and dependent on electric lights. To find the right balance for passive solar lighting, architects calculate the Daylight Factor.
The Daylight Factor compares the amount of light inside a room to the total light available outdoors under an overcast sky. A room with a Daylight Factor of 2 percent to 5 percent feels bright and well-lit by natural daylight alone. To hit this target, your south-facing window area should equal roughly 7 percent to 12 percent of the total floor area of the room being lit.
Aperture Selection
Different types of glass apertures perform different roles in a passive solar lighting system. Choosing the correct window style for each side of your house ensures steady light levels throughout the day.
Clerestory Windows
Clerestory windows are high, vertical windows set near the top of a wall, often above an adjoining roofline. For an Appalachian ridge-top home, clerestory windows are far superior to horizontal skylights. Skylights on a roof gather too much harsh mid-summer heat and are vulnerable to leaks during heavy ridge-top mountain storms. Clerestory windows capture high-level passive solar lighting and cast it deep across ceilings without admitting harsh direct light at eye level.
Light Shelves
A light shelf is a horizontal board installed above eye level on the inside or outside of a south-facing window. The upper surface of the light shelf is painted white or made of reflective metal. When low-angle sunlight hits the light shelf, it bounces upward off the ceiling and reflects deep into the room. This transforms direct, glaring sunshine into soft, balanced passive solar lighting that reaches rooms located far from the exterior walls.
                LIGHT SHELF FUNCTION

        Sunlight Angle
             \
              \
               v
  +-----------------------+  (Ceiling)
  ^                       |
   \                      |
    \  Reflected Light    |
     \                    |
  ====\===================|  (Light Shelf)
       \                  |
        v                 |
  +-----------------------+  (Floor)
Eaves & Overhang Sizing
Properly sized roof overhangs act as natural light valves for passive solar lighting. At 36 degrees North latitude, a properly calculated overhang blocks high summer sun angles while allowing low winter sun angles to pass right through the window glass. A general rule for our region is to extend the overhang outward by an amount equal to roughly half the vertical height of the window, while placing the top of the overhang just above the window frame.
| Strategy | Primary Function | Ideal Placement | Performance Benefit |
| Clerestory Glazing | Deep room lighting | High South or North Wall | Soft ambient light; eliminates low eye glare |
| Light Shelves | Daylight redirection | Mid-wall South Window | Bounces light deep indoors; reduces electric lighting |
| Deep Eaves (24″-36″) | Summer heat rejection | South Roof Edge | Blocks steep summer sun; admits winter sun |
| Spectrally Selective Low-E Glass | Heat control | East and West Windows | Admits visible daylight while blocking solar heat |
Biophilic Materiality & Indoor Light Distribution
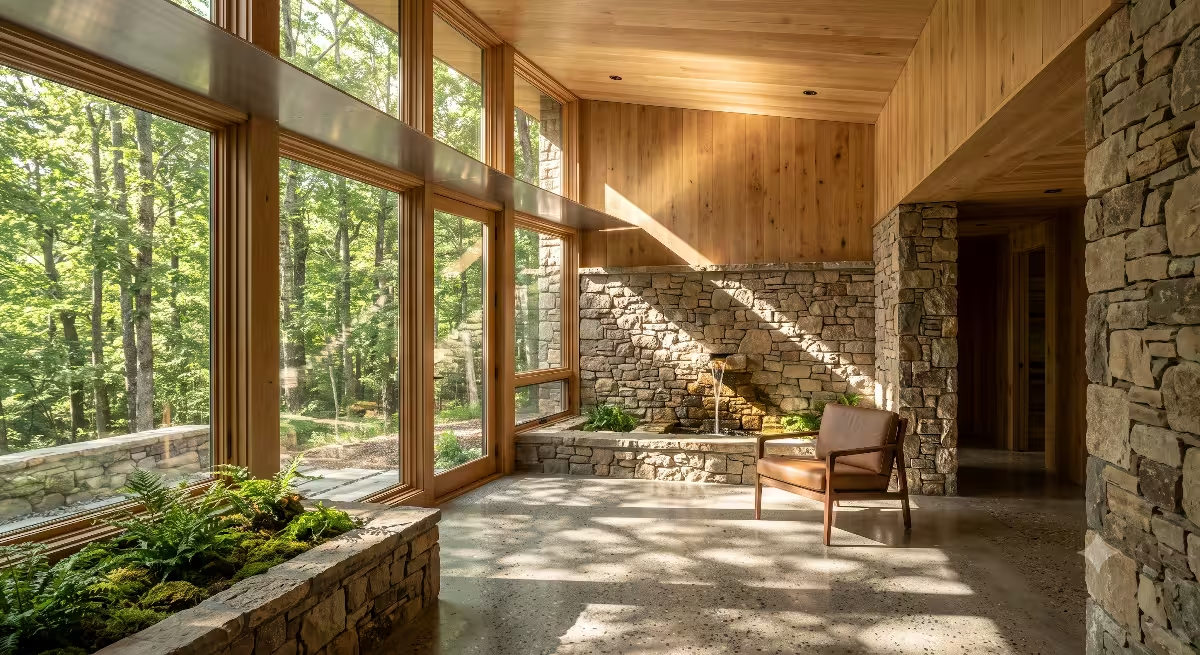
Getting sunlight through your windows is only half the battle in a passive solar lighting strategy. Once light enters your home, you must direct, diffuse, and bounce it so that every corner of the space receives gentle illumination.
Reflective Thermal Mass Integration
Thermal mass refers to dense materials like concrete, stone, tile, or brick that absorb and store heat. In a passive solar lighting design, your floor and wall materials play a double role. They store warmth during winter nights, and their surface finishes dictate how light bounces around the room.
To maximize passive solar lighting, select floor and wall materials with an appropriate Light Reflectance Value. Light Reflectance Value measures the percentage of light that a surface reflects rather than absorbs:
+-------------------------------------------------------------------------+
|                    LIGHT REFLECTANCE VALUES (LRV)                       |
|                                                                         |
|   Black Paint: ~5% LRV                   Polished Stone: ~40-50% LRV   |
|   [Absorbs almost all light]            [Balances reflection & mass]    |
|                                                                         |
|   Dark Wood: ~15-25% LRV                 Pure White Paint: ~80-90% LRV  |
|   [Creates rich shadows]                [Maximum daylight bouncing]   |
+-------------------------------------------------------------------------+
Using polished local quartzite or light-colored soapstone flooring near south windows gives you an ideal Light Reflectance Value of 40 percent to 50 percent. This allows the floor to absorb thermal energy while reflecting daylight upward into living spaces.
Dynamic Shadow Play & Spatial Variation
Nature is never uniformly flat or static. Sunlight filtering through a forest canopy creates moving patterns of light and shadow that change as breezes sway the branches. Biophilic design brings this natural dynamic into your home to enhance passive solar lighting.
You can create dynamic light patterns by using slatted wooden screens, timber trellises, or interior louvers near south-facing windows. As the sun moves across the mountain sky, these elements cast changing shadows across floors and walls. This shifting interplay of light keeps indoor environments engaging and connected to the passage of time outdoors.
       NATURAL SHADOW PLAY VIA WOODEN SCREENS

          Direct Sunlight
             \   \   \
              \   \   \
               v   v   v
            |  |  |  |  |  (Slatted Timber Screen)
            |  |  |  |  |
             \   \   \
              v   v   v
          =================
          Dappled Light Patterns on Floor
Surface Finishes & Glare Control
Harsh glare occurs when there is too much contrast between bright light sources and dark surrounding surfaces. If a bright window is framed by dark wall paint, your eyes struggle to adjust, causing discomfort and fatigue.
To maintain comfortable passive solar lighting, paint interior side walls and ceilings in light, matte finishes. Matte paint scatters incoming light rays evenly in all directions, eliminating shiny spots and reducing visual contrast. Placing windows adjacent to perpendicular side walls allows incoming daylight to wash smoothly down the wall surface, filling the room with soft, uniform light.
Frequently Asked Questions about Passive Solar Lighting
What is the best orientation for a ridge-top passive solar home?
The best orientation for a home relying on passive solar lighting is to align the main length of the building along an East-to-West axis. This puts your largest wall and primary window openings facing within 15 degrees of True South. On an Appalachian ridge line, a south-facing orientation allows you to capture long hours of consistent daylight throughout the winter when the sun sits low in the sky. It also allows you to block steep summer sun angles using roof overhangs, giving you bright rooms year-round without excessive heat.
How do you prevent glare in ridge-top homes with expansive views?
Controlling glare in homes with expansive mountain views requires a multi-layered approach. First, use exterior roof overhangs and light shelves to block high-angle direct sunlight from reaching your eyes. Second, finish surrounding interior walls and ceilings with light-colored, matte paint so that light bounces smoothly across surfaces instead of creating harsh contrasts. Third, install motorized interior shades made from woven biophilic fabrics. These shades soften incoming daylight while preserving your mountain views.
Are skylights recommended for high-elevation Appalachian homes?
Skylights are generally not recommended for high-elevation ridge-top homes in our region. Because skylights face flat toward the sky, they collect intense solar heat during hot summer days, increasing your cooling loads. They are also prone to winter heat loss and can fail when exposed to freezing rain, hail, and strong ridge-top winds. Instead of skylights, choose high vertical clerestory windows. Clerestory windows bring deep passive solar lighting into your home, are easier to shade, and perform much better against mountain weather.
How does morning ridge fog impact passive daylighting design?
Morning fog scatters direct sunlight into diffuse, ambient light that fills the sky. During foggy mornings, light arrives from all directions rather than from a single bright point. To capture this diffused daylight for passive solar lighting, your home design should include high window openings, like clerestories, along with reflective ceiling finishes with high Light Reflectance Values. This combination gathers soft morning light and bounces it far into your interior living spaces even when fog covers the mountain.
Implementation Roadmap for Tri-Cities Homebuilders
Building a home optimized for passive solar lighting requires careful planning from initial site selection through final construction. Follow this four-step roadmap to ensure your ridge-top project delivers exceptional natural light and long-term energy savings.
+--------------------------------------------------------------------+
|                      IMPLEMENTATION ROADMAP                        |
|                                                                    |
|  Step 1: Site Assessment & Sun Path Diagramming                    |
|  Step 2: Fenestration & Glazing Specification                      |
|  Step 3: Thermal Mass & Finishes Selection                         |
|  Step 4: Post-Occupancy Light Metering & Adjustment                |
+--------------------------------------------------------------------+
Step 1: Site Assessment & Sun Path Diagramming
Before pouring a foundation or finalizing blueprints, evaluate the solar access of your ridge-top property. Use a solar path tool or 3D modeling software to map out how nearby trees and terrain affect sunlight on your build site across every season.
- Measure the precise angle of True South on your plot.
- Identify potential obstructions, such as tall evergreen trees or rising ridge peaks to the east and west.
- Map out seasonal sun paths to confirm your home orientation will receive at least four to six hours of unblocked southern sunlight each day during winter.
Step 2: Fenestration & Glazing Specification
Once your home orientation is fixed, carefully select glass and window frames engineered for high-altitude weather and optimal passive solar lighting performance.
- South Windows: Choose double-glazed or triple-glazed units with a high Visible Light Transmittance rating above 0.60 to maximize daylight. Select a moderate Solar Heat Gain Coefficient around 0.40 to 0.50 so winter sun can help warm the space.
- East & West Windows: Choose spectrally selective glass with a low Solar Heat Gain Coefficient below 0.30. This permits gentle morning and evening passive solar lighting while blocking harsh, low-angle summer heat.
- North Windows: Keep window areas smaller on north walls to minimize heat loss during cold winter winds while still capturing cool, glare-free northern skylight.
Step 3: Thermal Mass & Finishes Selection
Coordinate interior materials so they work hand in hand with your window layout to capture and bounce daylight throughout every room.
- Lay down high-density flooring like polished concrete, local river stone, or light tile directly inside south-facing windows to absorb excess daytime warmth.
- Select wall and floor finishes with Light Reflectance Values between 40 percent and 60 percent near window zones to keep passive solar lighting moving through the home.
- Paint ceilings in soft, bright matte finishes with Light Reflectance Values above 80 percent to turn ceiling planes into broad reflectors of daylight.
Step 4: Post-Occupancy Light Metering & Adjustment
After moving into your new ridge-top home, test your passive solar lighting system across different seasons to fine-tune your comfort levels.
- Use a digital light meter to measure light levels (lux) in living spaces during winter equinox, summer solstice, and foggy mornings.
- Adjust interior shade positions or light shelf angles if you notice glare on television screens or work surfaces.
- Program automated LED lighting systems to dim naturally when passive solar lighting fills the room, ensuring minimal energy use while keeping light levels comfortable day and night.
Detailed Technical Analysis: Window Performance Parameters
To get the best possible passive solar lighting performance out of your fenestration choices, you need to understand three core numbers provided on window rating labels: Visible Light Transmittance, Solar Heat Gain Coefficient, and U-Factor.
+-------------------------------------------------------------------+
|                     SAMPLE WINDOW ENERGY LABEL                    |
|                                                                   |
|   U-Factor: 0.24            |  Visible Light Transmittance: 0.62  |
|   [Lower = Better Insulation] |  [Higher = More Daylight]          |
|                             |                                     |
|   Solar Heat Gain: 0.38     |  Air Leakage: < 0.1                 |
|   [Balanced for South Glass]|  [Essential for Ridge Winds]        |
+-------------------------------------------------------------------+
Visible Light Transmittance (VLT)
Visible Light Transmittance measures the percentage of sunlight in the visible spectrum that passes through a glass pane. VLT is expressed as a number between 0 and 1. A window with a VLT rating of 0.65 allows 65 percent of visible light to enter your home while blocking 35 percent.
For effective passive solar lighting design on an Appalachian ridge top:
- Aim for a VLT of 0.60 or higher on south-facing windows where daylight collection is your top priority.
- On east and west windows, a VLT between 0.45 and 0.55 prevents early morning and late afternoon glare while maintaining adequate daylighting levels.
- Tinted or dark reflective glass usually drops VLT below 0.30. Avoid heavily tinted glass on primary living areas because it restricts passive solar lighting and makes indoor spaces feel gloomy.
Solar Heat Gain Coefficient (SHGC)
The Solar Heat Gain Coefficient measures the fraction of solar radiation that enters a building through its glass, either by direct transmission or by absorption and re-radiation. SHGC is expressed as a number between 0 and 1. A low SHGC means the window transmits very little solar heat, while a high SHGC means the window allows solar heat to pass through freely.
In East Tennessee, balancing SHGC requires matching window ratings to their orientation:
- South-Facing Glass: Select a balanced SHGC between 0.35 and 0.45. This allows beneficial winter sun to contribute warmth while remaining low enough that summer roof overhangs can block high-angle heat.
- East and West Glass: Select a low SHGC below 0.30. Low-angle morning and afternoon summer sun strikes east and west windows directly. Keeping SHGC low prevents your air conditioning system from becoming overloaded.
- North-Facing Glass: SHGC matters less on northern walls because direct sun never strikes them. Focus instead on low U-Factors to prevent heat loss.
U-Factor (Thermal Insulation)
U-Factor measures how well a window prevents heat from escaping a building. Unlike VLT and SHGC, a lower U-Factor indicates a better insulated window. On wind-swept Appalachian ridge tops, keeping U-Factors low is essential to prevent heat from leaking out through large passive solar lighting window arrays during cold winter nights.
Look for windows with a U-Factor of 0.25 or lower across all sides of your home. Double-paned windows filled with argon gas and coated with low-emissivity (Low-E) films easily hit these performance targets while delivering excellent passive solar lighting results.
Spatial Layout Strategies for Ridge-Top Homes
The arrangement of rooms inside your floor plan determines how effectively passive solar lighting illuminates your everyday life. A well-designed floor plan groups living spaces based on when and how they are used throughout the day.
                      NORTH FACING SIDE
       +-----------------------------------------------+
       | Utility Rooms | Bathrooms | Garages | Storage |
       +-----------------------------------------------+
       |                   HALLWAYS                    |
       +-----------------------------------------------+
       |  Kitchen  |   Living Room   |   Primary Bed   |
       +-----------------------------------------------+
                      SOUTH FACING SIDE
                 (Primary Passive Solar Zone)
The South-Facing Living Zone
Spaces where your family spends the most awake hours should sit along the south side of the building footprint. This includes the kitchen, dining room, living area, and home office.
By placing these active living zones on the south side, you maximize their exposure to continuous passive solar lighting. Family members can cook, read, work, and relax under natural light for most of the day without reaching for a light switch. This alignment enhances daily mood and productivity while cutting household electricity use.
The North-Facing Buffer Zone
Utility spaces that require less natural light should sit along the cool north side of the house. This includes garages, laundry rooms, bathrooms, pantries, and storage closets.
These north-facing rooms act as a thermal buffer, insulating your primary living spaces against cold northern winter winds. Because north windows receive soft, consistent light without direct sunshine, north-facing rooms are also ideal for home art studios or computer workstations where steady, glare-free passive solar lighting is preferred.
East and West Bedroom Placement
Positioning bedrooms on the east or west corners of your ridge-top home aligns sleeping habits with natural sun angles:
- East-Facing Bedrooms: East windows capture early morning sunshine, providing natural passive solar lighting that wakes you up gently. Early sun helps reset your internal biological clock each day.
- West-Facing Bedrooms: West windows collect late afternoon light. However, in summer, west glass can overheat bedrooms right before sleep. Using exterior shade screens or deep porch overhangs on west-facing bedroom walls keeps these rooms cool at bedtime while maintaining afternoon brightness.
Integrating Electric Lighting Controls with Daylight Harvesting
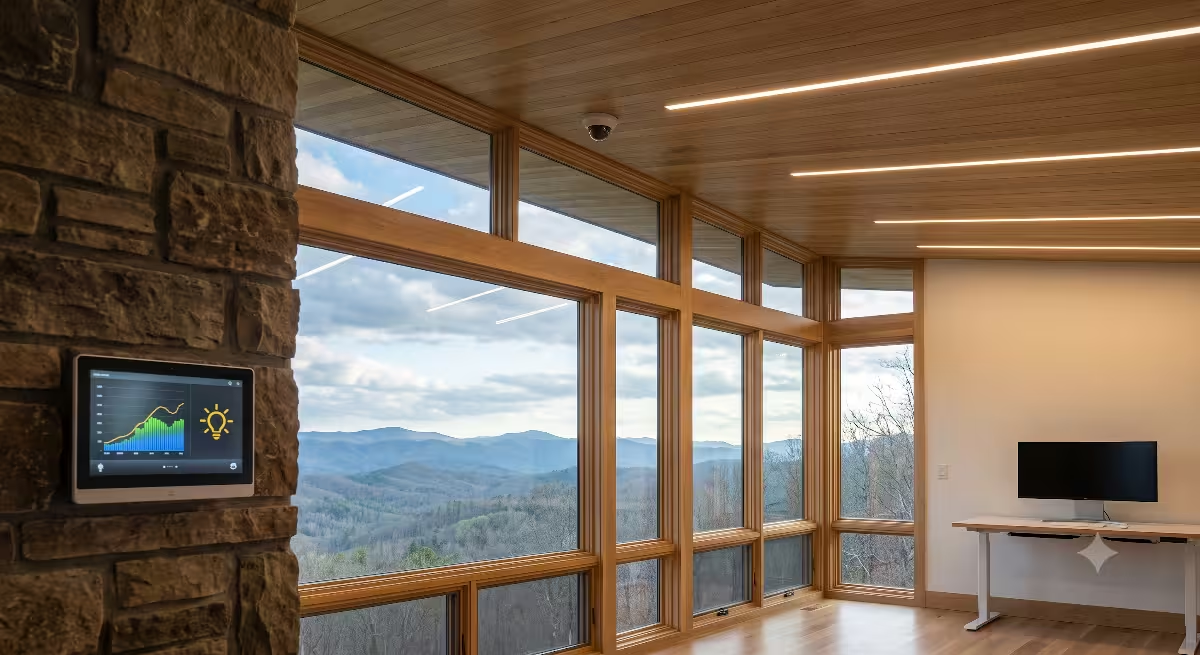
To get the full financial and ecological benefits of passive solar lighting, your home’s electric lighting system must work in harmony with incoming natural daylight. This integration is known as daylight harvesting.
                   DAYLIGHT HARVESTING SYSTEM

      Natural Sunlight            Photosensor (Ceiling)
            \                         |
             \                        v
              v                [Smart Dimmer]
       +-------------+                |
       | South Glass |                v
       +-------------+        (LED Light Fixture)
                              Dims down when sunshine
                              is bright indoors!
Photosensor Technology & Automated Dimming
A daylight harvesting system uses small light sensors, called photosensors, installed on ceilings throughout living areas. These sensors constantly measure indoor light levels.
When passive solar lighting floods a room on a clear midday, the photosensor sends a signal to smart LED light switches, automatically dimming or turning off electric fixtures. As clouds roll over the ridge line or as evening approaches, the system smoothly raises electric light output to maintain steady indoor illumination. This automated control ensures you never waste electricity lighting a room that is already illuminated by passive solar lighting.
Circadian LED Integration
To supplement passive solar lighting during night hours or stormy weather, install tunable white LED lighting systems. Tunable LEDs can change their color temperature throughout the day:
- Daytime Settings: Program LEDs to emit crisp, cool light (4000K to 5000K) that matches the bright blue spectrum of midday passive solar lighting.
- Evening Settings: Transition LEDs to warm, soft light (2200K to 2700K) that mirrors sunset colors over the mountain ridges.
Combining circadian LED technology with a solid passive solar lighting design creates a seamless lighting environment that supports your physical health around the clock.
Long-Term Maintenance for Peak Daylighting Performance
A successful passive solar lighting setup requires periodic maintenance to keep light levels high and window assemblies performing smoothly year after year. Ridge-top homes in East Tennessee face pollen, dust, driving rain, and mountain ice that can reduce window clarity over time.
Window Cleaning Schedules
Dirt, sap, and dust buildup on window glass can cut total light transmission by 10 percent to 20 percent. To maintain optimal passive solar lighting:
- Clean exterior glass panes at least twice a year, ideally during late spring after pine pollen season ends and again in mid-autumn before winter begins.
- Use non-abrasive, eco-friendly cleaning solutions to protect delicate Low-E glass coatings and anodized aluminum light shelf surfaces.
- Keep light shelf tops clear of dust so they can bounce passive solar lighting deep into rooms without obstruction.
Sealant and Weatherstripping Inspections
Because ridge-top homes experience high wind pressure, inspect window frames annually to preserve building envelope integrity:
- Check exterior caulk joints around south-facing windows for cracks or gaps caused by temperature expansion and contraction.
- Replace worn weatherstripping on operable clerestory windows to prevent air leaks during mountain storms.
- Inspect interior shades and light shelf mountings to confirm mechanical fasteners remain tight and operate smoothly.
Biophilic Design Case Study: The Ridge-Top Living Concept
To see how these ideas come together in practice, consider a hypothetical custom home built on a high ridge overlooking the Watauga River valley near Johnson City.
                      WATAUGA VALLEY CASE STUDY

          [ North Buffer Zone: Garage & Utilities ]
          -----------------------------------------
          [ Central Gallery with High Clerestories ] ---> Deep Daylight
          -----------------------------------------
          [ South Living Area: Stone Floor & Shelves] ---> Views & Light

          =========================================
          [ Deep 30-Inch Exterior Roof Overhang ]
Site Siting and Massing
The home sits along an East-West axis on a narrow ridge bench. The main long wall faces True South, offering unimpeded views of the valley below and the mountain crests beyond.
The building uses a simple rectangular footprint with a single-pitched shed roof sloping toward the north. This roof shape creates a tall south facade, providing ample wall space for large lower view windows paired with high clerestory windows.
Light Harvesting Features
- Dual-Tier Glazing: Lower south windows feature clear view glass with a VLT of 0.62 and a balanced SHGC of 0.40. High clerestory windows sit six feet above floor level, casting passive solar lighting across a white sloped ceiling.
- Integrated Light Shelves: An exterior light shelf runs continuously along the south facade, blocking high summer sun while bouncing daylight deep into a open-plan kitchen and dining area.
- Reflective Stone Floor: A dark-grey, polished Tennessee quartzite floor runs along the inside of the south glass wall. The stone absorbs daytime thermal heat while its polished surface reflects incoming passive solar lighting upward, eliminating dark corners.
Performance Results
By combining smart fenestration with automated daylight harvesting, this ridge-top layout cuts artificial lighting energy use by over 70 percent annually compared to a standard home. During winter months, low-angle passive solar lighting provides both natural illumination and helpful supplemental room warmth. In summer, deep overhangs keep interior spaces cool, bright, and comfortable without relying on continuous air conditioning.
Summary Checklist for Appalachian Ridge-Top Passive Solar Lighting
Use this quick checklist to guide your design and building process when planning a passive solar lighting strategy in the Tri-Cities region:
- [ ] Align the long axis of your home within 15 degrees of True South.
- [ ] Size south window glass area to equal roughly 7 percent to 12 percent of interior floor area for balanced daylighting.
- [ ] Choose south windows with a high Visible Light Transmittance rating above 0.60.
- [ ] Use spectrally selective glass with a low SHGC below 0.30 on east and west windows to prevent summer overheating.
- [ ] Select low U-Factors below 0.25 across all windows to prevent winter heat loss on wind-exposed ridge sites.
- [ ] Calculate roof overhang lengths to block steep summer sun while admitting low winter light.
- [ ] Install vertical clerestory windows instead of skylights to avoid leaks and mid-summer heat gain.
- [ ] Add interior or exterior light shelves to bounce light deep into central rooms.
- [ ] Use light-colored matte finishes on ceilings and interior walls to scatter daylight evenly and prevent glare.
- [ ] Incorporate high-density floor materials with balanced reflectance near south glass to absorb heat and redirect light.
- [ ] Install ceiling photosensors and dimmable LEDs to harvest daylight automatically when rooms are bright.
- [ ] Inspect weatherstripping and clean exterior window glass twice a year to keep passive solar lighting performance high.
Building on an Appalachian ridge top allows you to live surrounded by natural beauty and sweeping mountain views. By applying these passive solar lighting principles, you turn natural mountain sunshine into clean interior light. This approach lowers electricity bills, improves daily health, and creates a bright, comfortable sanctuary tailored to the East Tennessee landscape.