Why “New” Doesn’t Always Mean “Perfect”
There is a dangerous myth in the real estate world. It is the idea that because a home is “new,” it must be perfect. I have seen buyers walk into a brand new house in Johnson City, smell the fresh paint, see the granite countertops, and assume everything behind the walls is flawless. However, that is rarely the case. Just like a new car can have problems, a new house can too.
Consider a couple who just completed their custom home and who were absolutely in love with the crown molding in their new dining room. They were so focused on the trim that they completely missed the fact that the grading outside the window was sloping toward the foundation, not away from it. That “perfect” dining room was going to be a moldy disaster in two years because the basic rules of water management were ignored. Quality is not about the things you can see right away. Quality is about the thousands of decisions made before the drywall ever went up.
A high quality home is not an accident. It is the result of high intention, intelligent direction, and skillful execution. It requires a specific mindset. You have to look at a house not just as a place to live, but as a complex machine that needs to function correctly. This article is your manual for that machine.
The article below distills the standards to follow in a 10-point guide. This isn’t just a list of things to look at. It is a comprehensive system designed to help you verify that your builder is doing their job. We are going to cover everything from the dirt the house sits on to the final warranty paperwork. Whether you are building a custom home or buying from a large tract builder, this quality control guide is your insurance policy against future headaches.
Video Version of this Article
Criteria 1: Site Work & Grading (The First Line of Defense)
We have to start with the dirt. In the Tri-Cities area, we deal with a lot of red clay and steep hills. This makes site work the single most important part of the early construction phase. If you get this wrong, nothing else matters. You can build the strongest house in the world, but if you build it on unstable ground or let water pool against it, it will fail.
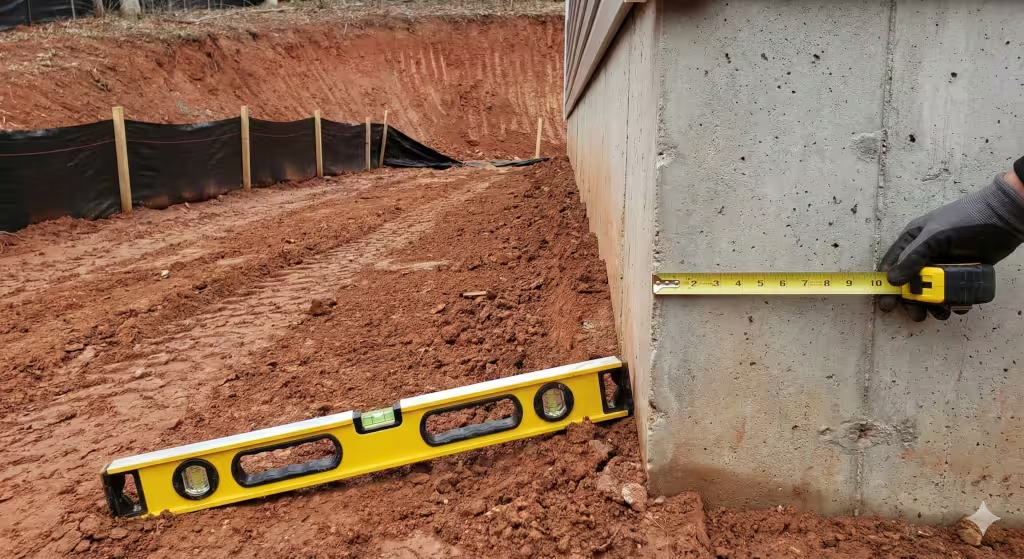
The goal of site work quality control is simple: manage the water. Water is the number one enemy of any structure. Your first step in quality control is to walk the perimeter of the home. You want to see “positive drainage.” This means the ground should slope away from the foundation. The general rule is a drop of six inches over the first ten feet away from the house. If the ground is flat, or worse, if it slopes toward the house, water will pool right against your foundation walls. Over time, that water will find a way in.
In our area, we also have to look at erosion control. During the build, you should see silt fencing, that black fabric fence, installed around the bottom of any slopes. This keeps our Tennessee red clay from washing into the street or the neighbor’s yard during a storm. If a builder ignores this, it is often a sign they are cutting corners elsewhere.
Finally, check the driveway and walkways. Concrete is expensive, and you do not want to replace it. A good quality control check is to look at where the driveway meets the garage. There should be a slight slope down and away from the garage door. If the driveway pours water toward the door, you will have rain blowing under the seal every time a storm comes through.
Criteria 2: Foundation Integrity (The “Bones” Inspection)

Once the dirt is right, we pour the concrete. Concrete is good, but it is unforgiving. Once it sets, you cannot easily fix it. That is why your quality control efforts need to happen before the pour if possible, and definitely right after.
The foundation is the bones of the house. If the bones are weak, the body cannot stand. One specific thing to look for is the footing dimensions. The footing is the wide strip of concrete that sits under the foundation wall. It spreads the weight of the house over the soil. If you have the blueprints, check the width. If the plan says the footing should be 24 inches wide, get out your tape measure. It needs to be 24 inches.
Inside the concrete, there should be steel rebar. This gives the concrete tensile strength so it doesn’t snap when the ground shifts. A vital part of quality control is ensuring this rebar is in the right place. It should not be laying in the dirt. It needs to be suspended in the middle of the footing using little plastic or metal stands called “chairs.” If the rebar is on the ground, it will rust and weaken the foundation.
After the concrete is poured and dried, you need to inspect for cracks. Now, concrete almost always cracks a little bit as it cures and shrinks. We call these hairline cracks. They are usually cosmetic and nothing to worry about. However, if you see a crack that is shaped like a V, wider at the top than the bottom, or if the two sides of the crack are uneven, that is a structural issue. That indicates the foundation is settling unevenly. Catching this early is a massive win for your quality control process.
Criteria 3: Framing & Structural Load Paths
Framing is when the house starts to look like a house. It is exciting, but it is also where a lot of mistakes happen. The wood frame has to resist two main forces: gravity (pushing down) and wind (pushing sideways or lifting up). In East Tennessee, we get some strong storms, so we have to respect the wind.
Your quality control focus here is on the “load path.” This is the continuous line of support from the roof down to the foundation. Every beam needs a post under it, and every post needs to sit on something solid. You should not see a heavy support post resting in the middle of a subfloor board with nothing underneath it. That floor will sag over time.
Check the trusses or rafters. These are the triangles that hold up the roof. Where they meet the wall, there should be metal metal clips called hurricane ties. These secure the roof to the walls so a high wind cannot lift the roof off. It seems like a small detail, but missing hurricane ties are a major failure in quality control.
You also want to look at the studs, the vertical 2x4s or 2x6s in the walls. Pick a few walls and look down them. Are they straight? Sometimes a builder will use a “crowned” stud, which is a piece of wood that is bowed. If they put that in the wall, your drywall will be wavy. A good framer will cull those bad boards out, but a builder with poor quality control will use them to save money.
Criteria 4: The Mechanical, Electrical, & Plumbing (MEP) “Rough-In”
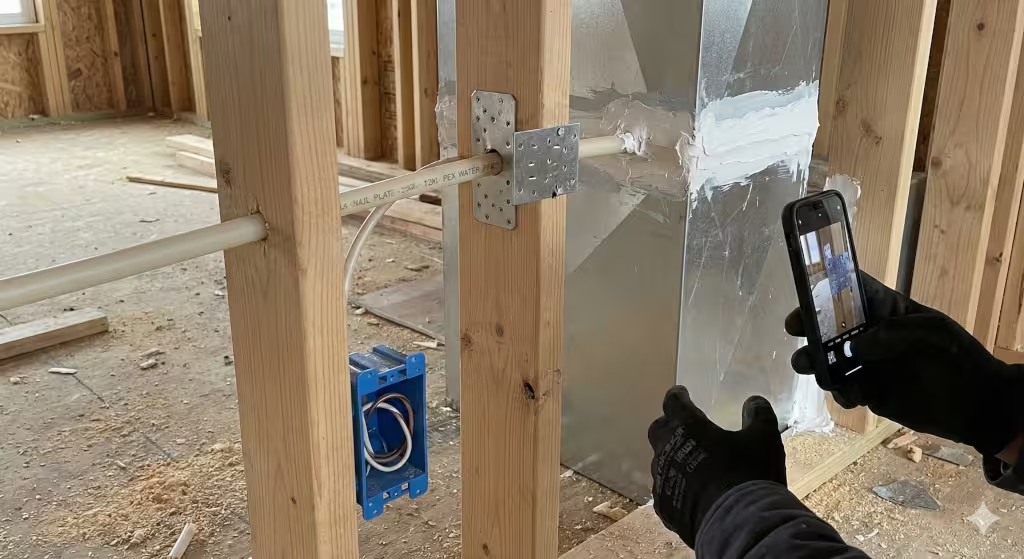
This phase is often called the “rough-in.” It is when the plumbers, electricians, and HVAC crews install the pipes, wires, and ducts inside the walls before the drywall covers them up. This is arguably the most critical time for a third-party inspection because once the drywall is up, these systems are invisible.
For plumbing quality control, look for nail plates. These are steel plates hammered into the studs wherever a pipe passes through a hole. Their job is to stop a drywall screw from piercing the water pipe. If you miss a nail plate, a drywaller might accidentally put a screw right into a water line. It might not leak immediately, but it will rust and flood your house a year later.
Electrical quality control is about safety and logic. Look at the breaker boxes and the outlets. Are the boxes mounted at consistent heights? It looks sloppy if one outlet is 12 inches off the floor and the next is 14 inches. Also, check the wiring in the kitchen and bathrooms. These areas need GFCI protection, which cuts the power if water gets in the outlet.
The HVAC system needs a close look too. The large silver tubes that carry air are called ducts. Where these ducts join together, they should be sealed tight with a thick paste called mastic. Tape alone often fails over time. If the ducts leak, you are paying to heat the attic or the crawlspace, not your living room. Efficient ductwork is a huge part of long-term energy quality control.
Criteria 5: The Building Envelope (Waterproofing)
The “envelope” is the skin of the house. It separates the inside from the outside. In our humid climate, keeping water out of the wall cavity is essential to prevent rot and mold.
The most visible part of this is the house wrap. This is usually a white or blue sheet material that covers the wood framing. Quality control here is about the details. The wrap should be taped at every seam. There should be no tears or holes. If there is a rip, water will get in.
Pay special attention to the windows. This is the number one spot for leaks. The flashing, the waterproof tape around the window, must be installed in “shingle fashion.” This means the bottom piece goes on first, then the sides, then the top. This way, if water runs down the wall, it runs over the tape, not behind it. If the top piece is taped under the side piece, water acts like a funnel and goes right into the wall. I have seen this mistake countless times, and it always leads to rot.
Don’t forget the roof. Look at the edge where the shingles stop. There should be a metal strip called a “drip edge.” It kicks the water away from the wooden fascia board. Many budget builders skip this $10 piece of metal, and five years later, the homeowner has rotting wood all around their roofline. Proper quality control catches this before the builder leaves the site.
Criteria 6: Insulation & Energy Efficiency
Insulation is what keeps you warm in the winter and cool in the summer. It also keeps your utility bills down. Most people just look for the pink fiberglass fluff and assume it is fine, but installation quality matters more than the material itself.
We measure insulation effectiveness by “R-value.” The higher the number, the better it stops heat transfer. In the attic, you want a high R-value, usually R-38 or higher in our area. Your quality control step is to verify the depth. If they are blowing in insulation, there should be rulers stapled to the trusses showing how deep it is. Go up there and look. If the code says 14 inches and you only see 10, you are getting ripped off.
Inside the walls, look for gaps and voids. Insulation works like a blanket. If you have a blanket with a hole in it, you get cold. Contractors often rush and leave gaps around electrical outlets or in tight corners. These are called voids. A good quality control check involves inspecting these tricky spots to ensure the insulation is tucked in tight without being compressed. Compressed insulation loses its R-value.
Also, check the attic ventilation. You should see “baffles” or chutes near the eaves. These keep the insulation from blocking the flow of air from the soffit vents. If the attic cannot breathe, moisture will build up and rot your roof deck from the inside out.
Criteria 7: Exterior Finishes (Brick, Stone, Siding)
The exterior finish is the face of your home. It needs to look good, but it also needs to be durable. Whether you have brick, stone, or vinyl siding, the principles of quality control remain the same: keep the water out and let the wall dry.
If you have a brick home, look for “weep holes.” These are small gaps in the mortar at the bottom of the brick wall, usually every few bricks. Brick is porous; it absorbs water like a sponge. That water runs down the back of the brick and needs a way out. The weep holes let that water escape and help in quality control. If the mason was sloppy and filled them with mortar, the water gets trapped and can rot the wood framing behind the brick.
For siding, check the clearance from the ground. Siding should never touch the dirt or the mulch. It should be at least six inches off the grade. This prevents moisture from wicking up the siding and stops termites from having an easy hidden path into your house.
Caulking is another major quality control point. Look at where different materials meet, like where the stone veneer meets the siding. These joints should be caulked with a high-quality sealant. If there are gaps, water will get in. However, do not caulk the flashing above windows; that needs to remain open to let water escape. Knowing where to caulk and where not to caulk is a sign of an educated builder.
Criteria 8: Interior Finishes (The “Blue Tape” Walkthrough)
This is the phase most buyers are familiar with. It is often called the “blue tape walkthrough” because you carry a roll of blue painter’s tape and mark every flaw you see.9 While this is largely cosmetic, strict quality control here ensures you get the fit and finish you paid for.
Start with the drywall. Do not just look at it straight on. Take a bright flashlight and shine it along the wall at an angle. This will reveal bad taping seams, humps, and sanding marks. Look for “nail pops,” which are small round bumps where the drywall screw has popped loose. These will only get worse with time.
Check the trim and molding. Look at the corners of the door frames and baseboards. The miter joints, where the two pieces of wood meet at a 45-degree angle, should be tight. If there is a big gap filled with caulk, it will eventually crack. The baseboards should sit flush against the floor.
Walk every inch of the flooring. If it is hardwood or tile, you are looking for scratches or chips. If it is carpet, look for loose seams. But more importantly, listen. Listen for squeaks. A squeak means the subfloor is loose. It is much easier to fix a squeak now than after you move in. This attention to detail is what separates a custom home from a basic build.
Criteria 9: Systems Operation & Final Functionality
The house looks done, but does it work? You cannot assume the lights work just because the switch is on the wall. You have to test everything. This is functional quality control.
Start with the HVAC system. Turn on the heat and go into every single room. Is there air coming out of the register? Is the bonus room above the garage the same temperature as the living room? Often, the rooms furthest from the unit get poor airflow. This needs to be balanced before you close.
Go to the electrical panel in the garage or basement. Open the door. Is every breaker labeled? “Lights” is not a good label. It should say “Kitchen Lights” or “Master Bedroom Plugs.” If you trip a breaker three years from now, you do not want to be guessing which one it is.
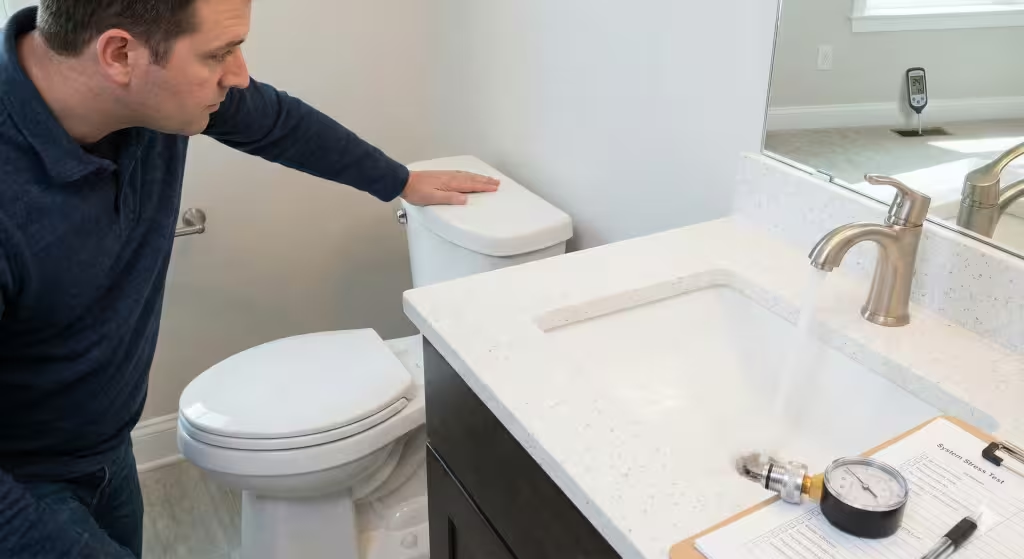
Test the plumbing rigorously. I like to fill the bathtub all the way up and then pull the plug. While it is draining, flush the toilet and run the sink. Does the pressure drop significantly? Does the drain gurgle or back up? This “stress test” reveals if the plumbing vents are working correctly. It is a simple quality control measure that saves you from a nasty surprise the first morning you get ready for work in your new house.
Criteria 10: Documentation, Warranty & Handoff
The final piece of the quality control puzzle is paperwork. A house is a complex asset, and it comes with a lot of documents. If you don’t have them organized, you are losing value.
First, understand the “Punch List.” This is the formal list of items that need to be fixed before or shortly after closing. Do not rely on a handshake. Write it down. Both you and the builder should sign it. This document is your leverage to ensure the final touches are completed.
Ask for the manuals. Every appliance, the garage door opener, the HVAC unit, and the gas logs has a manual. Your builder should collect these for you. You also need the warranty documents. In Tennessee, there are specific laws regarding builder warranties.12 Know what is covered for one year (usually fit and finish) and what is covered for longer (structural defects).
Finally, verify the certificates. You need the Certificate of Occupancy (CO) from the local building department. This proves the house is legal to live in. You also want the termite treatment verification. In the South, this is non-negotiable.
Common Questions about New Home Quality Control
What is the difference between a home inspection and a builder walkthrough?
A builder walkthrough is usually an orientation where the builder shows you how to operate the home and marks cosmetic defects. A home inspection is a deep dive by a licensed third-party professional who looks for code violations, safety hazards, and structural issues. For true quality control, you need both.
Should I hire a private inspector for a new build in Tennessee?
Absolutely. Many buyers assume the county codes inspector catches everything. The reality is that county inspectors are overworked and only spend a few minutes at each site. A private inspector works for you and will spend hours scrutinizing the home. It is a critical layer of quality control.
What are the most common defects found in new construction?
The most common issues I see are grading/drainage problems, improper window flashing, and insulation voids. Cosmetic issues like paint and drywall flaws are also common but are less risky than the structural and water-management defects.
When should quality control inspections happen?
Ideally, you want a “pre-pour” inspection for the foundation, a “pre-drywall” inspection for the framing and rough-ins, and a “final” inspection before closing.
How do I handle disputes about quality control with my builder?
Refer to your contract and the “performance standards” often included in home warranties. Keep everything in writing. A documented trail of communication is your best friend if a dispute escalates.
Conclusion & Tri-Cities Context
Building a home is likely the largest investment you will ever make. It is an emotional journey, but you cannot let emotion override logic. By implementing a strict quality control process, you protect that investment.
I have seen the difference between a home built with rigorous quality control and one built in a rush. The difference usually does not show up on day one. It shows up on day 366, right after the one-year warranty expires. It shows up as a leak in the ceiling, a crack in the drywall, or a room that never stays warm.
In the Tri-Cities, we have great builders, but we also have challenging terrain and a climate that tests our buildings. The red clay expands when wet, the hills create drainage challenges, and the humidity is relentless. A checklist like this is not about being difficult or mistrusting your builder. It is about partnership. A good builder appreciates an educated buyer who cares about quality control because it ensures everyone is on the same page.
Take the list below. Print it out. Bring it to the job site. If you do not feel comfortable doing these checks yourself, hire a professional third-party inspector who specializes in new construction. It costs a little money up front, but the peace of mind is priceless.
A Checklist to Take to Your House for Quality Control
Here is a condensed, field-ready version of the New Home Quality Control Checklist. You can copy and paste this into a document to print, or view it on your phone while walking the job site.
It is organized it by the phases of construction so you can check items off as the build progresses.
The Tri-Cities Engineer’s New Home Quality Control Checklist
| Phase / Criteria | Specific Quality Control Checks | Status / Notes |
| 1. Site Work & Grading | Positive Drainage: Ground slopes 6 inches down over the first 10 feet away from the foundation. | [ ] Pass [ ] Fail |
| Erosion Control: Silt fencing is installed and intact (crucial for red clay soil). | [ ] Pass [ ] Fail | |
| Hardscape Slope: Driveways and walkways slope away from garage doors and entryways. | [ ] Pass [ ] Fail | |
| 2. Foundation Integrity | Footing Dimensions: Width and depth match the engineering blueprints. | [ ] Pass [ ] Fail |
| Rebar Placement: Rebar is suspended on “chairs” (not laying on the dirt). | [ ] Pass [ ] Fail | |
| Concrete Curing: No V-shaped or uneven structural cracks (hairline cracks are normal). | [ ] Pass [ ] Fail | |
| 3. Framing & Structure | Load Path: Continuous vertical support from roof trusses down to the foundation. | [ ] Pass [ ] Fail |
| Wind Connections: Hurricane ties (metal clips) connect trusses to wall plates. | [ ] Pass [ ] Fail | |
| Stud Quality: No “crowned” (bowed) studs in the walls; headers match plan sizes. | [ ] Pass [ ] Fail | |
| 4. MEP Rough-In | Plumbing Protection: Steel nail plates installed on studs over water lines. | [ ] Pass [ ] Fail |
| Electrical Logic: Outlet boxes at consistent heights; GFCIs planned for wet areas. | [ ] Pass [ ] Fail | |
| Duct Sealing: HVAC joints sealed with mastic paste (not just tape); straight duct runs. | [ ] Pass [ ] Fail | |
| 5. Building Envelope | House Wrap: Seams taped tightly; no tears or holes in the barrier. | [ ] Pass [ ] Fail |
| Window Flashing: Taped in “shingle fashion” (Bottom → Sides → Top). | [ ] Pass [ ] Fail | |
| Roof Edge: Metal drip edge installed at the eaves to protect fascia board. | [ ] Pass [ ] Fail | |
| 6. Insulation | Attic Depth: Insulation level meets R-value requirements (check depth markers). | [ ] Pass [ ] Fail |
| No Voids: Insulation is tucked behind outlets and in corners without gaps. | [ ] Pass [ ] Fail | |
| Ventilation: Baffles installed at eaves to allow air flow from soffit vents. | [ ] Pass [ ] Fail | |
| 7. Exterior Finishes | Brick Weep Holes: Open and clear of mortar debris at the bottom of the wall. | [ ] Pass [ ] Fail |
| Siding Clearance: Siding is at least 6 inches above soil/mulch grade. | [ ] Pass [ ] Fail | |
| Sealants: Caulk applied where dissimilar materials meet (e.g., stone to siding). | [ ] Pass [ ] Fail | |
| 8. Interior Finishes | Drywall: “Glance light” test shows no bad seams or nail pops. | [ ] Pass [ ] Fail |
| Trim: Miter joints are tight; baseboards sit flush with the flooring. | [ ] Pass [ ] Fail | |
| Flooring: No squeaks or soft spots when walking; no chips in tile/wood. | [ ] Pass [ ] Fail | |
| 9. Systems Operation | HVAC Balance: All rooms (including bonus rooms) have airflow and consistent temp. | [ ] Pass [ ] Fail |
| Electrical Panel: Every breaker is clearly and specifically labeled. | [ ] Pass [ ] Fail | |
| Plumbing Stress Test: No pressure drop when flushing toilet while sink runs; drains flow freely. | [ ] Pass [ ] Fail | |
| 10. Documentation | Punch List: Signed list of final repairs needed before/after closing. | [ ] Pass [ ] Fail |
| Manuals: Collection of manuals for all appliances and mechanical systems. | [ ] Pass [ ] Fail | |
| Certificates: Certificate of Occupancy and Termite Treatment verification in hand. | [ ] Pass [ ] Fail |
How to use this:
Take this to the site during your scheduled walkthroughs. If you see a “Fail,” snap a photo of it immediately and email it to your project manager. Remember, in construction, if it isn’t written down, it didn’t happen.